MOTOROLA QUENCH XT5 XT502 TM User Guide
Table of contents Chapter 1: Getting started .................................................................... 1 1.1 Your phone................................................................................................... Front ........................................................................................................... Back ............................................................................................................ Top..................................................
Table of contents Chapter 5: Email & messaging ............................................................ 22 To open messaging ................................................................................. 5.1 Text messages ........................................................................................... Creating and sending a text message..................................................... Receiving and managing messages........................................................ 5.
Table of contents Chapter 9: Using GPS .......................................................................... 49 9.1 Using GPS tracker ..................................................................................... Turning on GPS........................................................................................ Hiding the GPS window........................................................................... Managing tracking data ...............................................................
Table of contents Accounts & sync....................................................................................... Privacy ...................................................................................................... SD card, USB mass storage & phone storage ........................................ Search....................................................................................................... Language & keyboard ...................................................................
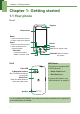
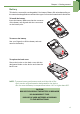
Chapter 1: Getting started Chapter 1: Getting started 1.1 Your phone Front Earpiece Touch screen Menu: • Press to unlock the device. • Press to view menu options. Home: Return • Return to the Home screen. • Press and hold to see recent activities. Search End: End or reject a call. Talk/Send: • Activate the Dialer. • Make or answer a call. MIC Back Trackball: Move to select an option. LED Alerts Flash LED 5-Megapixel camera: See “Photos and videos” on page 40.
Chapter 1: Getting started Top Headset jack: Use a headset for hands-free conversation or for listening to music Power: • Press and hold for 5 seconds to turn the device on or off. • To save battery, quick press to turn the screen on or off temporarily. Side Volume: Slide up or down to increase or decrease the volume. Micro USB port: • Connect USB cable to PC as a modem/USB mass storage. • Connect USB cable and the AC adapter to charge the battery.
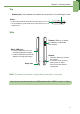
Chapter 1: Getting started 1.2 Accessories Your package comes with the following items. If any of these are missing, please contact your retailer. • • • • • • Phone USB cable AC adaptor Li-Ion battery Headset Quick start guide 1.3 Installing the SIM card, battery and memory card To remove the back cover 1. Turn the device off. 2. Push and slide down to open the back cover. 2 1 SIM card The SIM card contains your phone number, memory storage and network service details.
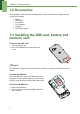
Chapter 1: Getting started Battery This device comes with a rechargeable Li-Ion battery. Battery life varies depending on the network and applications used and the type of connections attached to this device. To install the battery Insert the battery. Make sure that the contacts of the battery are aligned with the connectors on the battery slot. To remove the battery Use your fingertip to lift the battery tab and remove the battery.
Chapter 1: Getting started Memory card You will need a microSD® card to store photos, music, videos and other data. To install the memory card 1. Insert the memory card with the gold contacts facing down. 2. Push the memory card until it clicks into place. To remove the memory card 1. For safe removal of the memory card, tap Application Drawer > Settings > SD card, USB Mass storage & phone storage > Unmount SD card. 2. Push the memory card down to eject it from the slot. 1.
Chapter 1: Getting started 1.6 Turning the phone on or off After installing the SIM card and charging the battery, the device is ready to be turned on. To turn on your phone Press and hold the power button until the device vibrates. To turn off your phone 1. Press and hold the power button for 5 seconds. 2. A pop-up window appears, tap Power off. 3. Select OK to confirm. To set your phone to sleep mode To set this device to sleep mode, press the power button briefly. This will turn the display off.
Chapter 2: The basics Chapter 2: The basics 2.1 The Home screen From the Home screen, you can quickly access common features and view notifications of missed calls, received messages, check battery and connection status. Status bar • Displays status and notification icons and clock. • Message, appointment, task and connection notifications are also displayed here. Google Search Enter the text that you want to search for in the box. Shortcut menu Tap an icon to access the function.
Chapter 2: The basics The icons on the status bar indicate the following information: Hidden icons Notification icon Alarm icon Battery icon Signal strength icon Wi-Fi icon Bluetooth icon USB connection icon Volume icon Battery icon The following icons may appear in the volume icon area. The following icons may appear in the battery icon area: Icon Description Icon Description Sound is off. Battery is full. Vibrate mode is activated. Battery is low. Battery is charging. Speakerphone is on.
Chapter 2: The basics Connection icon Notification icon The following icons may appear in the connection icon area. The following icons may appear in the notification icon area. Icon Description Icon Description WiFi is connected. New text message notification Bluetooth connection is active. New WAP Push notification GPRS data connection is active. New email notification HSDPA data connection is active. New Google Mail notification Device is connected to PC via USB connector.
Chapter 2: The basics Customising the Shortcut menu To add a shortcut: 1. Tap Menu > Add > Shortcuts. 2. Tap Widgets to display the list of widgets. 3. Tap to add the items that you want to appear on the Home screen. To remove a shortcut: 1. Tap and hold the desired shortcut icon. The icon expands. 2. appears at the bottom of the Home screen. 3. Drag the icon to to delete. The shortcut icon is then removed.
Chapter 2: The basics Application drawer The Application drawer contains all applications and settings. On the Home screen, tap to display the menu. • Swipe your finger up or down to access more applications in this device. • Tap an icon to open the application. Tap to close the Application drawer and return to the Home screen. Extended Home screen Swipe your finger to the left or right across the Home screen.
Chapter 2: The basics Using widgets Save time with live updates right on the Home screen and get all of your personalised updates in one place. You may add and customise the widgets on the Home screen as you like. 1. From the Home screen, tap Menu > Add > Widgets. A gallery list of all available widgets is displayed. 2. Tap to select the widget that you want to appear on the Home screen. To remove widgets: 1. From the Home screen, tap and hold the desired widget. The widget expands. 2.
Chapter 2: The basics 2.2 LED indicators This device has 2 LED indicators: green and red. Whether this device is turned on or off, the LED indicators provide useful information. LED Location Phone status Green (solid) Red (solid) Send button Phone On/Off End button Phone On/Off Indication Battery is fully charged. Battery is charging. NOTE: When the device is on, pressing the Send or End button will light all the LED indicators. 2.
Chapter 2: The basics 2.4 Contacts Contacts is your phonebook that lets you store names, phone numbers, email addresses and other information. Contacts are stored in the phone memory. You can save information such as names, pictures, phone numbers, email addresses, etc. You can also add frequently used contacts to the favorites list. See “Favorite contacts” on page 16. Adding a contact 1. On the Home screen, tap Contacts. 2. Tap Menu > New contact. The New contact window appears. 3.
Chapter 2: The basics Importing contacts Copy SIM contacts to the phone 1. From the Home screen, tap Contacts. 2. Tap Menu > Import/Export > Import from SIM card. 3. Tap OK. NOTE: • To copy a single contact, simply tap the contact, then edit contact information as in “Adding a contact“. • To copy all contacts, tap Menu > Import all. All contacts on the SIM card are imported. Copy microSD contacts to the phone 1. From the Home screen, tap Contacts. 2. Tap Menu > Import/Export > Import from SD card.
Chapter 2: The basics Backing up contacts You can copy the contacts to the memory card to back up the contact information in this device. Export contacts to the memory card 1. From the Home screen, tap Contacts. 2. Tap Menu > Import/Export > Export to SD card. NOTE: • Copying contacts to the memory card will overwrite the old backup file. 3. A warning message pops up, tap OK to proceed. All contacts are copied to the memory card.
Chapter 3: Using the phone Chapter 3: Using the phone To open the Phone screen, complete any of the following: • On the Home screen, tap Phone. • From any application screen, press the Send button. 3.1 Voice calls Making a call To make a call from the Phone screen 1. From the Home screen, tap Phone. 2. Tap the phone number on the keypad. NOTE: Tap hold to erase a wrong number. Tap and to erase the entire number. 3. Tap the phone number or press the Send button to dial. 4.
Chapter 3: Using the phone To make emergency calls Emergency calls without a SIM card: 1. Open the Phone screen. 2. Tap the emergency number on the keypad. 3. Tap the phone number or press the Send button. To make international calls 1. Open the Phone screen. 2. Tap and hold until the international prefix code “+” is displayed. 3. Enter the country code, area code and the phone number. 4. Tap the phone number or press the Send button.
Chapter 3: Using the phone To manage other voice call features • Tap Menu > Speaker to activate or deactivate the speakerphone. • Tap Menu > Mute to mute or unmute the microphone. • To view the call history, from the Home screen tap Menu > Phone > Call log. Ending a call To end a call, tap End call or press the End button. 3.2 Voice mail Listening to voice mail To listen to a voice mail message 1. From the Home screen, tap Phone. 2. Tap to listen to your voice mail messages.
Chapter 4: Entering information Chapter 4: Entering information 4.1 On-screen keyboard The on-screen keyboard appears in portrait mode when an application requires text input, such as messaging and writing emails. The keyboard input method is activated by default. CAPs Lock selector arrow Tap to toggle between upper case or lower case text input method.
Chapter 4: Entering information Setting the input method This device supports several text input methods, select your preferred method. 1. Tap Application Drawer > Settings > Language & keyboard. 2. In the Text settings submenu, a list of the input methods is displayed. Select and check the options that you prefer. Changing the input method 1. Tap and hold any text field in a programme. For instance, in Messaging, tap and hold the field “To:”. The Input method screen pops up. 2.
Chapter 5: Email & messaging Chapter 5: Email & messaging Use Messaging to access text and MMS messages. Use Email receive email messages via your Internet email accounts. to send and To open messaging • On the Home screen, tap . • From the Application drawer, tap Messaging. 5.1 Text messages A text message can only contain letters, numbers and symbols. Creating and sending a text message This device offers several ways to create and send a new text message. From the Messaging screen 1.
Chapter 5: Email & messaging From Contacts 1. 2. 3. 4. 5. From the Home screen, tap Contacts. Tap and hold a contact to display the options menu. Tap Text contact. Compose the contents. Tap Send. From Call log 1. 2. 3. 4. 5. 6. From the Home screen, tap Contacts. Tap the Call log tab to view all call history. Tap a call from the Call log. Tap Send text message. Compose the contents. Tap Send. Note: If you exit Messaging before sending a message, the unsent message will automatically be saved as a draft.
Chapter 5: Email & messaging To lock a text message 1. Tap Application Drawer > Messaging. 2. Tap to view a message thread. 3. Tap and hold a message to display the message options. 4. Tap Lock message. 5. The message is locked and will not be deleted when the conversation limit reaches the maximum. 6. To unlock a message, repeat the steps above. To forward a text message 1. Tap Application Drawer > Messaging. 2. Tap to view a message thread. 3. Tap and hold a message to display the message options. 4.
Chapter 5: Email & messaging To delete one message thread 1. Tap Application Drawer > Messaging. 2. Tap and hold the message thread that you want to delete. 3. Tap Delete thread. To delete a message within a thread 1. Tap Application Drawer > Messaging. 2. Tap the message thread to open it. 3. Highlight the message to be deleted by flicking your finger down across the sender of the message. 4. Tap and hold the highlighted message. 5. Tap Delete message.
Chapter 5: Email & messaging 5.2 Multimedia messages A Multimedia message or MMS can contain letters, an image, an audio or video file. Creating and sending an MMS message This device offers several ways to create and send an MMS message. From the Messaging screen 1. Tap Application Drawer > Messaging. 2. Tap New message. 3. Tap Menu > Add subject. The message automatically converts to an MMS message. 4. In the To field, enter the recipient’s phone number or email address.
Chapter 5: Email & messaging From the Call log 1. 2. 3. 4. 5. 6. 7. 8. From the Home screen, tap Contacts > Call log. Tap and hold a call from the Call log. Tap Send text message. Tap Menu > Add subject to convert to an MMS message. To enter a subject, tap Subject. To insert a picture or video file, tap Menu > Attach > Pictures / Videos. To insert an audio file, tap Menu > Attach > Audio. To insert text, tap Type to compose, then enter your message using the on-screen keyboard. Tap Send. 5.
Chapter 5: Email & messaging Displays recording information. Tap buttons to record, stop and play. Equaliser Recording voice 1. Tap to record your message. 2. Tap to stop recording. NOTE: Tap to play voice.
Chapter 5: Email & messaging 5.4 Email accounts This device can send and receive emails just like you do with a computer. This device supports Internet email: an email account provided by an Internet Service Provider (ISP) or web-based email, such as Google Mail, Hotmail, Yahoo! Mail, etc. Setting up an Internet email account 1. 2. 3. 4. Tap Application Drawer > Email. Select your email account provider. Enter your email address and password. Tap Next.
Chapter 5: Email & messaging To configure email settings Configure message settings using the Account settings submenus. 1. On the Accounts screen, tap to select an email account. 2. Tap Menu > Account settings to open the email setting submenus.
Chapter 5: Email & messaging 5.5 Using email Composing and sending an email 1. Tap Application Drawer > Email, then tap an email account. 2. Tap Menu > Compose. 3. In the To field, enter the recipient’s email address. 4. To enter a subject, tap Subject. 5. Compose the contents. 6. Tap Send. Sending an email from contacts You can send an email to a contact with an email address stored in Contacts. 1. 2. 3. 4. On the Home screen, tap Contacts. Tap a name to open contact. Tap Email home or Email work.
Chapter 5: Email & messaging Reading and replying to emails The Inbox displays the email headers. When you open the email, it shows only a part of the message, unless it is a very short message. Download the email to view the complete content. To download attachments • With POP3 email accounts, attachments are downloaded when you download the complete message. • With IMAP4 email accounts, tap the attachment to mark it for download.
Chapter 5: Email & messaging Customising email settings You can configure the general settings of your email account such as account name, email checking frequency, default account, notifications and server settings. To set up your account name 1. Tap an email account. 2. Tap Menu > Account settings to view the email account settings and make adjustments. 3. Tap Account name to change the account name. 4. Tap OK to confirm. To set up the email checking frequency 1. Tap an email account. 2.
Chapter 6: Using the Internet Chapter 6: Using the Internet 6.1 Connecting to the Internet This device connects to the Internet via: • Wi-Fi • Mobile data networks Wi-Fi To turn Wi-Fi on or off 1. From the Home screen, tap Application Drawer > Settings > Wireless & networks. 2. Tap to check the Wi-Fi function and turn Wi-Fi on or off. To connect to a Wi-Fi network 1. Turn Wi-Fi on. 2. Tap Wi-Fi settings. The device scans for Wi-Fi signals. 3. Detected networks are displayed below.
Chapter 6: Using the Internet To add a Wi-Fi network 1. From the Home screen, tap Application Drawer > Settings > Wireless & networks. 2. Tap Wi-Fi settings. 3. In Wi-Fi networks, tap Add Wi-Fi network. A new window is displayed. 4. Follow the on-screen instructions and enter the necessary information, then tap Save to store your settings. To configure Wi-Fi settings 1. From the Home screen, tap Application Drawer > Settings > Wireless & networks. 2. Tap Wi-Fi settings. 3. Tap Menu > Advanced.
Chapter 6: Using the Internet To set up wireless data connection 1. Tap Application Drawer > Settings > Wireless & networks. 2. Tap Mobile networks > Access Point Names. 3. Tap Menu > New APN. 4. Tap Name to enter a name for the connection, then tap OK. 5. Enter the APN, then tap OK. 6. Enter the Proxy, Port, Username and Password (if available) etc., then tap OK. 7. Tap Menu > Save to store your settings or tap Menu > Discard to exit without saving the changes.
Chapter 6: Using the Internet 6.2 Browsing a web page 1. Tap Application Drawer > Browser. 2. Tap the address bar at the top of the screen. Type the URL then tap . Tap to enter the website. Address bar Recently viewed websites are listed. To scroll the page To scroll up or down, swipe your finger down or up. To scroll left or right, tap and swipe your finger to the right or left. To set the Home page 1. While viewing a web page, tap Menu > More > Settings > Set home page. 2.
Chapter 6: Using the Internet Menu item Descriptions Add bookmark Tap to save as favorite web pages to visit. Find on page Tap to find the text on the web page. Select text Tap to select text on the web page. Page info Tap to view web page information. Share page Tap to send this web page via email or messaging. Downloads Tap to view the download history. Settings Tap to configure browser settings: • Page content settings: configure page content settings.
Chapter 7: Using Bluetooth Chapter 7: Using Bluetooth Bluetooth modes • On: Bluetooth is turned on. This device detects other Bluetooth devices, but this device is not visible to others. • Discoverable: Bluetooth is turned on and this device is visible to other Bluetooth devices. • Off: Bluetooth is turned off. To turn Bluetooth on or off 1. Tap Application drawer > Settings > Wireless & networks. 2. Tap to check Bluetooth and activate. 3.
Chapter 8: Multimedia applications Chapter 8: Multimedia applications 8.1 Photos and videos You can take photos and videos with the 5.0-megapixel camera in this device. Taking a photo Displays the last captured image. Swipe right to open the camera settings menu. Slide to switch between video and camera mode. Tap to take a photo. Tap “+” or “-” to zoom the image in or out. 1. Tap Application Drawer > Camera. The screen automatically switches to landscape view.
Chapter 8: Multimedia applications Recording video Displays the last recorded video. Slide to switch between video and camera mode. Indicates recording time. Tap to record video. 1. Tap Application Drawer > Camcorder. 2. Aim the device at the subject. 3. To start recording, press the shutter button or tap . 4. To stop recording, press the shutter button again or tap . Reviewing a photo After taking a shot, a thumbnail image is displayed in the top-right corner of the screen. 1.
Chapter 8: Multimedia applications Reviewing a video After recording a video, the video thumbnail is displayed in the top-right corner of the screen. 1. Tap the video thumbnail to playback the video in full screen mode. • Tap DELETE • Tap SHARE • Tap PLAY • Tap DONE to delete the picture and view the next picture. to share the picture via Email or Messaging. to playback the video clip. to save your settings. Configuring camera settings On the camera screen, tap Menu > Settings.
Chapter 8: Multimedia applications Tap to view and adjust the general settings of your camera Mode Photo mode Video mode 43 Setting Available options Flash Mode Auto, On, Off White Balance Auto, Incandescent, Daylight, Fluorescent, Cloudy Anti Banding Off, 50 Hz, 60 Hz, Auto Color effect None, Mono, Sepia, Negative Store location Off, On Picture size 5 M, 3 M, 2 M, 1 M, VGA, QVGA Picture quality Super fine, Fine, Normal Metering Mode Frame Average, Center Weighted, Spot Metering Sharpn
Chapter 8: Multimedia applications 8.2 Viewing photos & videos To view photos in the album 1. 2. 3. 4. Tap Application Drawer > Gallery Tap Camera to view the images as thumbnails. Tap an image to view. To view previous/next image, tap the left/right sides of the screen. To play a slideshow 1. While viewing an image, tap Slideshow. 2. Tap the screen again to stop the slideshow. To zoom the image While viewing the image, tap the screen to show the zoom bar. Tap to zoom out /in.
Chapter 8: Multimedia applications To set an image as wallpaper 1. While viewing an image, tap Menu > More > Set as > Wallpaper. 2. Drag your finger to select the crop area and tap inside the box to crop the image. 3. Tap Save to set the image as wallpaper. To save an image to Contacts 1. While viewing an image, tap Menu > More > Set as > Contact icon. 2. Tap the contact name to add the image. 3. Drag your finger to select the crop area and tap inside the box to crop the image. 4.
Chapter 8: Multimedia applications 8.3 Using the music player You can transfer your music to this device from the computer. Tap Application Drawer > Music. Music screen • Playback screen: Displays the playback area with the playback controls. Tap to go to the Now playing screen. Album art picture or animation Tap to shuffle. Tap to enable or disable the repeat function. Audio information display area. Tap to go to the next song. Tap to go to the previous song. Tap to play or pause the song.
Chapter 8: Multimedia applications Playing music To play music 1. Tap Application Drawer > Music. The Library screen is displayed. 2. Tap Songs and all of the songs on the device are displayed. 3. Tap to select the song, then the music playback starts automatically. Changing playback options While on the Playback screen, tap Menu. • Tap Library to go to the Music Library screen. • Tap Party shuffle to play all songs in shuffle order. • Tap Add to playlist to add the song to a preferred playlist.
Chapter 8: Multimedia applications To remove a music file from a playlist 1. Tap Application Drawer > Music. The Library screen is displayed. 2. Tap and hold the song you want to delete. 3. Tap Remove from playlist. The song is removed from the playlist.
Chapter 9: Using GPS Chapter 9: Using GPS This device supports a GPS tracker to record your position, your speed and track distance. You can also save the data as personal sports records. 9.1 Using GPS tracker Turning on GPS 1. Tap Application drawer > GPS Tracker. The device automatically starts connecting to GPS. 2. When GPS is connected, tap to set POI. 3. Tap to start tracking. 4. You can view your tracking distance, speed, trackers and the number of POIs on screen. 5.
Chapter 9: Using GPS Managing tracking data You can save the tracking data for your personal record. Set GPS file format 1. Tap Application drawer > GPS tracker. 2. Tap Menu > Format. 3. Tap to choose the file format. You can save the GPS tracking record in the following file formats: KML, GPX or Both. 4. Tap OK to confirm. Save GPS file 1. Tap Application drawer > GPS tracker. 2. Tap Menu > Save to. 3. Enter default path to save the file on your memory card. 4. Tap OK to confirm.
Chapter 10: Programmes Chapter 10: Programmes This device comes with the following pre-installed programmes. Programmes 51 Description Browser Browses the web and downloads files from the Internet. See page 37. Calculator Performs basic arithmetic functions, such as addition, subtraction, multiplication and division. See page 53. Calendar Creates and tracks schedules or appointments. See page 53. Camcorder Records video clips. Camera Captures still images and records videos. See page 44.
Chapter 10: Programmes Programmes Description Messaging Sends and receives all types of messages, such as text messages, MMS and voice messages. See page 22. Music Plays and manages the music and audio files on your phone. MySpace Logs in and uses MySpace applications on your device. Note pad Creates notes for drafts. Phone Makes and receives phone calls. See page 17. Rss Reader Gets live updates of your favorite news or websites.
Chapter 10: Programmes 10.1 Browser Open the Browser to view web pages. See “Browsing a web page” on page 37. 10.2 Calculator With Calculator, you can perform basic arithmetic functions on this device. Tap Application drawer > Calculator. 10.3 Calendar The Calendar lets you schedule and sound alarms for appointments, meetings and other events. Scheduled appointments for the day can be displayed on the Home screen. To schedule an event 1. Tap Application drawer > Calendar. 2. Tap Menu > New event. 3.
Chapter 10: Programmes 10.4 Camcorder Record video clips with this device. See “Photos and videos” on page 40. 10.5 Camera Capture images with this device. See “Photos and videos” on page 40. 10.6 Clock The clock function contains alarm clock, global time, timer and stop watch. For alarm clock settings, see page 67. Viewing world clock Use world clock time to view the current time in different locations. 1. Tap Application drawer > Clock. 2.
Chapter 10: Programmes Using countdown timer 1. Tap Application drawer > Clock. 2. Tap the countdown timer tab. • Tap Set to set the countdown time. • Tap Start to start and time elapsed will appear on screen. • Tap Ring to set a ringtone when the time is up. 10.7 Contacts View or manage your contact list. See “Contacts” on page 14. 10.8 Documents To Go Documents To Go allows you to open Microsoft® Office and Adobe file formats.
Chapter 10: Programmes To open Sheet To Go Viewer 1. Tap Application drawer > Documents To Go > Sheet To Go Viewer. 2. Tap Open File. 3. Tap the file you want to open. • Swipe your finger on screen to pan through the sheet. • To view other worksheets on file, tap Menu > View > Worksheets, then tap the worksheet name that you want to view. 4. To close the file, tap Return. NOTE: To create a new spreadsheet or edit an existing spreadsheet, purchase the full version of Documents To Go.
Chapter 10: Programmes 10.9 Email Use Email to connect to your remote mailbox to retrieve your new email messages, or view your previously retrieved email messages offline. See “Using email” on page 31. 10.10 Facebook Facebook lets you connect to your Facebook account with a single tap. You can log in to your Facebook account and get connected with your friends any time. 10.11 File browser File browser lets you browse the contents of this device. 1. Tap Application drawer > File Browser. 2.
Chapter 10: Programmes 10.13 Google Mail Google Mail is Google's web-based email service. Google Mail is configured when you first set up this device. Depending on your synchronization settings, Google Mail is automatically synchronised on your phone with your Google Mail account on the web. 1. Tap Application Drawer > Google Mail. 2. Tap Create or Sign in to your Google account. 3. Follow the on-screen instructions to login or create your Google Mail username and password. 4.
Chapter 10: Programmes 10.16 Market Android Market allows you to find and download applications and fun games to this device. To start using Android Market 1. 2. 3. 4. Tap Application drawer > Market. Tap Accept after reading the terms of service. Tap Next to setup your Google account. Tap Create to create a new account or Sign in to sign in your existing account. 5. Once you are signed in, you can begin searching and downloading programmes from the market.
Chapter 10: Programmes 10.20 Note Pad Use the note pad to write down notes as you would on a note pad. Saved notes are displayed here. Tap to add a new note. Tap to mark the note. To create a note 1. Tap Application drawer > Note Pad. 2. Tap Menu > Add note. 3. Enter your notes using the on-screen keyboard. 4. Tap Menu > Edit title to add a title to the note. 5. When you are done, tap automatically saved. to return to the Note pad screen. The note is 10.
Chapter 10: Programmes Update RSS feed 1. Tap Application Drawer > Rss Reader. 2. Tap Menu > Update all to update the RSS feeds. New feeds are displayed in the RSS feed inbox. 10.23 Settings In the Settings menu, you can view and make adjustments for wireless control, call settings, general phone settings and security settings. See “Phone settings” on page 63. 10.24 SIM Toolkit Connects directly to and uses services provided by your mobile service provider. 10.
Chapter 10: Programmes 10.27 Voice dialer Read and record predefined texts to be recognised and used by this device for voice dialling, finding a contact and others. Tap Applications drawer > Voice Dialer. 10.28 Voice note To record a voice note 1. Tap Menu > Voice Note. 2. Tap Menu > Record. The recording screen is displayed. 3. Tap to record your voice. To stop recording, tap . 4. Tap Save to save the file. To play a voice note 1. Tap Menu > Voice Note. A list of voice notes is displayed. 2.
Chapter 11: Managing your phone Chapter 11: Managing your phone 11.1 Phone settings Tap Application drawer > Settings to view and adjust the settings of this device. The Settings menu is categorised into: Wireless & networks, Call settings, Sound & display, Location & security, Applications, Accounts & sync, Privacy, SD card, USB Mass Storage & phone storage, Search, Language & keyboard, Accessibility, text-to-speech, Date & time and About phone.
Chapter 11: Managing your phone Application Description Audible touch tones Enable/disable sound when using dial pad. Audible selection Enable/disable sound when making screen selection. Haptic feedback Play sound when pressing soft keys and on certain UI interactions. SD card notifications Enable memory card notification sounds. Orientation Switch orientation automatically when rotating the device. Animation Show animation when opening & closing windows.
Chapter 11: Managing your phone Application Description Running services View and control services that are currently running. Development Set options for application development. Accounts & sync Application Description Background data Tick to enable sync, send and receive data for all applications. Auto-sync Tick to sync data with applications automatically.
Chapter 11: Managing your phone Text-to-speech Application Install voice data Description Install the voice data required for speech synthesis. Date & time Application Description Automatic Check to use network provided values. Set date Tap to set the date for this device. Set time zone Set time zone of your current location. Set time Tap to set the time for this device. Use 24-hour format Set the clock to 24-hour format. Select date format Set the preferred date format.
Chapter 11: Managing your phone Setting alarms You can set up three alarms on this device. To set the alarm 1. Tap Application drawer > Clock. 2. Under the Alarm clock tab, tap to select from the existing alarm clock settings or tap Menu > Add alarm to set up a new alarm. 3. Tap Time open a clock and set the time for the alarm. To enter the time numerically, tap the hour, minute or AM/PM field, and tap + or - to increase or decrease the value. 4.
Chapter 11: Managing your phone Display settings The display settings of this device affect the battery and external power level. To turn off backlight when the phone is idle 1. Tap Application Drawer > Settings > Sound & display to enter the submenu. 2. In Display settings submenu, tap Screen timeout. 3. Select from the screen timeout list. Your setting is automatically saved. To adjust brightness 1. Tap Application Drawer > Settings > Sound & display to enter the submenu. 2.
Chapter 11: Managing your phone 11.4 Protecting your phone You can protect this device from unauthorised users by requiring the PIN code or entering a password. Enable or disable SIM card PIN When PIN code is enabled, you are required to enter the PIN code before making a call. 1. 2. 3. 4. 5. 6. 7. Tap Application Drawer > Settings > Location & security. In the SIM card lock submenu, tap Set up SIM card lock. Tap Lock SIM card to use PIN to use the device. Tick to enable, untick to disable.
Chapter 12: Using the PC Tools application Chapter 12: Using the PC Tools application The PC Tools application is a software application that enables you to change USB modes when your device is connected to a computer. Available modes are as follows: • USB mass storage: Allows the computer to recognise your device as a USB mass storage device. • Phone as modem: Allows you to use your device as a modem. • Synchronization Tool: Allows you to sync your device with a computer.
Chapter 12: Using the PC Tools application Using your phone as a storage device To browse and transfer video and still images to a computer, complete the following: 1. In the PC Tools application, select USB mass storage. 2. The Removable Disk window appears on the screen. 3. Locate the DCIM folder and double-click the DCIM folder to open it and find more folders. Your recorded images and video clips will be inside these folders. 4. Copy and paste the image and video files to a folder on your computer.
Chapter 12: Using the PC Tools application Using your phone to sync with a computer This feature allows you to sync your device with a computer. In the PC Tools application, select Synchronization Tool. • Start Synchronization: allows you to initiate synchronization. • Synchronization Setting: allows you to set the synchronization settings. Follow the on-screen instructions to complete the settings. • Synchronization Summary: displays the summary of the synchronization process.
Safety, regulatory & legal Safety, regulatory & legal Battery use & safety Important: handle and store batteries properly to avoid injury or damage. Most battery issues arise from improper handling of batteries, and particularly from the continued use of damaged batteries. DON’Ts • Don’t disassemble, crush, puncture, shred, or otherwise attempt to change the form of your battery. • Don’t let the phone or battery come in contact with water. Water can get into the phone’s circuits, leading to corrosion.
Safety, regulatory & legal Motorola recommends you always use Motorola-branded batteries and chargers. Motorola mobile devices are designed to work with Motorola batteries.
Safety, regulatory & legal The guidelines use a unit of measurement known as the Specific Absorption Rate (SAR). The ICNIRP SAR limit for mobile devices used by the general public is 2 watts per kilogram (W/kg) and the highest SAR value for this mobile device when tested at the ear is 1.16 W/kg. As mobile devices offer a range of functions, they can be used in other positions, such as on the body as described in this guide. In this case, the highest tested SAR value is 0.592 W/kg.
Safety, regulatory & legal Software copyright notice Motorola products may include copyrighted Motorola and third-party software stored in semiconductor memories or other media. Laws in the United States and other countries preserve for Motorola and third-party software providers certain exclusive rights for copyrighted software, such as the exclusive rights to distribute or reproduce the copyrighted software.
Safety, regulatory & legal GPS & AGPS Your mobile device can use Global Positioning System (GPS) signals for locationbased applications. GPS uses satellites controlled by the U.S. government that are subject to changes implemented in accordance with the Department of Defense policy and the Federal Radio Navigation Plan. These changes may affect the performance of location technology on your mobile device.
Safety, regulatory & legal Navigation Motorola strives to provide complete and accurate mapping information, directions, and other navigational data, using a combination of governmental and private location information sources. These sources may contain inaccurate or incomplete data. In some countries, complete information may not be available. Therefore, you should visually confirm that the navigational instructions are consistent with what you see.
Safety, regulatory & legal Follow instructions to avoid interference problems Turn off your mobile device in any location where posted notices instruct you to do so. In an aircraft, turn off your mobile device whenever instructed to do so by airline staff. If your mobile device offers an airplane mode or similar feature, consult airline staff about using it in flight.
Safety, regulatory & legal Symbol Key Your battery, charger or mobile device may contain symbols, defined as follows: Symbol 032374o 032376o 032375o Definition Important safety information follows. Do not dispose of your battery or mobile device in a fire. Your battery or mobile device may require recycling in accordance with local laws. Contact your local regulatory authorities for more information. Do not throw your battery or mobile device with normal household waste.
Safety, regulatory & legal Caution about high volume usage Warning: exposure to loud noise from any source for extended periods of time may affect your hearing. The louder the volume sound level, the less time is required before your hearing could be affected. To protect your hearing: • Limit the amount of time you use headsets or headphones at high volume. • Avoid turning up the volume to block out noisy surroundings. • Turn the volume down if you can’t hear people speaking near you.
Safety, regulatory & legal • Connect the equipment to an outlet on a circuit different from that to which the receiver is connected. • Consult the dealer or an experienced radio/TV technician for help. Use & care To care for your Motorola mobile device, please observe the following: liquids of any kind Don’t expose your mobile device to water, rain, extreme humidity, sweat or other moisture.
Safety, regulatory & legal Please retain your original dated sales receipt for your records. For warranty service of your Motorola Personal Communications Product you will need to provide a copy of your dated sales receipt to confirm warranty status. Thank you for choosing a Motorola product. Caring for the environment by recycling This symbol on a Motorola product means the product should not be disposed of with household waste.
Safety, regulatory & legal • Online accounts—Some mobile devices provide a Motorola online account (such as MOTOBLUR). Go to your account for information on how to manage the account, and how to use security features such as remote wipe and device location (where available). • Location-based information—Location-based information includes information that can be used to determine the approximate location of a mobile device.
Safety, regulatory & legal • Dial sensibly and assess the traffic; if possible, place calls when your car is not moving or before pulling into traffic. If you must make a call while moving, dial only a few numbers, check the road and your mirrors, then continue. • Do not engage in stressful or emotional conversations that may be distracting. Make people you are talking with aware you are driving and suspend conversations that can divert your attention away from the road.
Safety, regulatory & legal www.motorola.com Certain mobile phone features are dependent on the capabilities and settings of your service provider’s network. Additionally, certain features may not be activated by your service provider, and/or the provider’s network settings may limit the feature’s functionality. Always contact your service provider about feature availability and functionality.
Specifications Specifications Radio band & standard GSM bands 850 / 900 / 1800 / 1900 UMTS bands 850 / 1900 / 2100 or 900 / 1900 / 2100 GPRS GPRS Class 12 EGPRS/EDGE Multi-Slot Class 12 UMTS DL / UL, HSDPA 7.2 Mbps Connectivity GPS GPS / AGPS Wi-Fi 802.11 b/g Bluetooth 2.1 + EDR USB USB 2.0 High-Speed client Power Battery Rechargeable Li-Ion 1270 mAh AC Adapter AC input voltage: 100-240 Vac, 50/60 Hz AC input current: 0.3 Aac max.
INDEX A Android Market 59 B Battery 4 charging 5 Bluetooth 39 connecting 39 Browser 53 C Calculator 53 Calendar 53 add event 53 agenda 53 Call answer a call 18, 19 conference call 18 make a call 17 Camcorder 54 Camera 54 settings 42 Camera using 43 Clock 54 countdown timer 55 stopwatch 54 world clock 54 Contacts 14, 55 add image 45 searching 14 D Display backlight 68 brightness 68 orientation 68 E Email 57, 58 Email 33 Email 31 F File managing 57 Folders managing 57 G Gallery 57 Google Mail 58 Google Talk
INDEX P Phone 60 answering a call 18, 19 making a call 17 protect 69 reset 69 settings 61 Phone settings 63 Photo edit 45 set as wallpaper 45 slideshow 44 taking photos 40 viewing 41, 44 zoom 44 PIN code 69 Power button 2 turn on and off 6 Programmes 51 S Screen orientation 68 Screen lock 6, 69 Settings alarms 67 basic 66 date and time 66 display 68 keyboard 21 ringtone 68 Shutter button 2 SIM install 3 remove 3 SIM Toolkit 61 Slideshow 44 T Text entering 20 V Video playback 45 recording 41 viewing 42 Video