MOTOROLA QUENCH XT3 TM User Guide
Table of contents Chapter 1: Getting started .................................................................... 1 1.1 Your phone .................................................................................................. Front ........................................................................................................................ Back......................................................................................................................... Top.........................
Table of contents Receiving and managing messages ....................................................................... 5.2 Multimedia messages ............................................................................... Creating and sending an MMS message ............................................................... 5.3 Voice messages ........................................................................................ Recording voice...............................................................
Table of contents Creating a playlist.................................................................................................. 8.4 Google Talk................................................................................................ 8.5 Voice note .................................................................................................. 8.6 YouTube™ ................................................................................................. 50 51 51 52 Chapter 9: Navigation ...
Table of contents Setting alarms ........................................................................................................ Display settings ..................................................................................................... Ring settings .......................................................................................................... 12.3 Using wireless control ............................................................................ 12.4 Protecting your phone ..
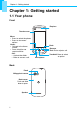
Chapter 1: Getting started Chapter 1: Getting started 1.1 Your phone Front Earpiece Touch screen Menu: • Press to unlock the phone. • Press to view menu options. Home: • Go back to the Home screen. • Press & hold to see recent activities. Call: • Activate the dialler. • Make or answer a call. Back Flash 3 Megapixel camera Back cover: Push and slide down to open. Speaker 1 Back Browser End: End or reject a call. Microphone Trackball: Move to select an option.
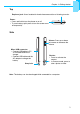
Chapter 1: Getting started Top Earphone jack: Use a headset for hands-free conversation or listening to music. Power: • Press and hold to turn the phone on or off. • To save battery, quick press to turn the screen on or off temporarily. Side Volume: Press up or down to increase or decrease the volume. Micro USB connector: • Connect USB cable to PC as a modem/USB mass storage. • Connect USB cable and the AC adapter to charge the battery. Strap hole Shutter: • Press to activate the camera.
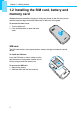
Chapter 1: Getting started 1.2 Installing the SIM card, battery and memory card Caution: before assembling, charging or using your phone for the first time, please read the important legal and safety information at the back of this guide. To remove the back cover 1. Turn the phone off. 2. Push and slide down to open the back cover. SIM card The SIM card contains your phone number, memory storage and network service details. To install the SIM card Insert the SIM card as shown.
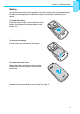
Chapter 1: Getting started Battery Your phone comes with a rechargeable Li-Ion battery. Battery life varies depending on the network and applications used and the type of connections attached to your phone. To install the battery Insert the battery. Make sure the contacts of the battery are aligned with the connectors on the battery slot. To remove the battery Lift the battery tab and remove the battery.
Chapter 1: Getting started Memory card You will need a microSD memory card to store photos, music, videos and other data. To install the memory card 1. Insert the memory card with the gold contacts facing down. 2. Push the memory card until it clicks into place. To remove the memory card 1. For safe removal, go to Settings > SD card, USB mass storage & phone storage > Unmount SD card. 2. Push the memory card down to eject it from the slot.
Chapter 1: Getting started 1.5 Turning the phone on or off After installing the SIM card and charging the battery, you are now ready to turn on your phone. To turn on your phone Press and hold the Power key until the phone vibrates. To turn off your phone 1. Press and hold the Power key. 2. A pop-up window appears, tap Power off. 3. Select OK to confirm. To set your phone to sleep mode To set your phone to sleep mode, press the Power key briefly. This will turn the display off.
Chapter 2: The basics Chapter 2: The basics 2.1 The Home screen From the Home screen, you can quickly access common features and view notifications of missed calls, received messages, battery and connection status. Status bar • Displays status and notification icons and the clock. • Message, appointment, task and connection Shortcut menu notifications are Tap an icon to access the also displayed here. function. Tap to open the Dial keypad.
Chapter 2: The basics The status bar icons indicate the following information: Notification icon Battery icon Phone network icon Wi-Fi™ icon Bluetooth® icon Volume icon Battery icon The following icons may appear in the volume icon area. The following icons may appear in the battery icon area: Icon Description Icon Description Volume is muted. Battery is full. Vibrate mode is activated. Battery is low. Battery is charging. Speakerphone is on.
Chapter 2: The basics Connection icon Notification icon The following icons may appear in the connection icon area. The following icons may appear in the notification icon area. Icon Description Icon Description WiFi is connected. New text message notification Bluetooth connection is active. New email notification Alarm GPRS data connection is active. Task notification HSDPA data connection is active. Missed call notification Phone is connected to PC via USB connector.
Chapter 2: The basics Customising the shortcut menu To add a shortcut: 1. Tap Menu > Add > Shortcuts. 2. Tap Applications to display the list of applications. 3. Tap to add the items that you want to appear on the Home screen. To remove a shortcut: 1. Tap and hold the desired shortcut icon. The icon expands. 2. appears at the bottom of the Home screen. 3. Drag the icon to to delete. The shortcut icon is then removed.
Chapter 2: The basics Application drawer The Application drawer contains all applications and settings. Tap menu. to display the Tap to open/close the Application drawer. Tap an icon to open the application. Drag or flick the menu up/down to access more applications on your phone. Using widgets Save time with live updates right on your Home screen and get all of your personalised updates in one place. You may add and customise the Widgets on your Home screen as you like. 1.
Chapter 2: The basics Setting the wallpaper You can customise the wallpaper on your Home screen using default wallpaper or using pictures taken with your phone. Set wallpaper from pictures From the Home screen, tap Menu > Wallpaper. Select wallpaper from is displayed on screen. Tap Pictures. You will see thumbnail images of all pictures. Tap to select the picture you want to use as wallpaper. 5. Drag your finger to select the crop area and tap inside the box to crop the image. 6.
Chapter 2: The basics To adjust ringer volume 1. Tap Application drawer > Settings> Sound & display. 2. Tap Ringer volume or press the Volume key on the right side of your phone to activate the volume window. 3. Tap the slider for the volume you want to adjust. 4. Do either of the following: a. Drag the slider right to increase or drag the Ringer volume slider slider left to decrease volume. b.
Chapter 2: The basics 2.4 Contacts Contacts lets you store names, phone numbers, email addresses and other information. Contacts are stored in the phone memory. You can save information such as names, pictures, phone numbers, email addresses, etc. You can also add the frequently used contacts to the favourites list. See “Favourite contacts” on page 16. Adding a contact 1. On the Home screen, tap Contacts. 2. Tap Menu > New > Create contact. 3.
Chapter 2: The basics Importing contacts Copy SIM contacts to the phone 1. From the Home screen, tap Contacts. 2. Tap Menu > Import > SIM card. 3. Tap OK. Note: • To copy a single contact, simply tap the contact, then edit contact information as in “Adding a contact“. • To copy all contacts, tap Menu > Import all. All contacts on the SIM card are imported. Copy microSD contacts to the phone 1. From the Home screen, tap Contacts. 2. Tap Menu > Import > SD Card.
Chapter 2: The basics Backing up contacts You can copy the contacts to the microSD memory card to back up the contact information or import contacts from the memory card to your phone. Export contacts to the microSD memory card 1. From the Home screen, tap Contacts. 2. Tap Menu > Export contacts. Note: • Copying contacts to the microSD memory card will overwrite the old backup file. 3. A warning message pops up, tap OK to proceed. All contacts are copied to the memory card.
Chapter 3: Making and answering calls Chapter 3: Making and answering calls To open the call features: • • On the Home screen, tap Dialler. From any application screen, press the Call key. 3.1 Voice calls Making a call To make a call from the phone screen 1. From the Home screen, tap Dialler. 2. Enter the phone number using the keypad. Note: tap hold to erase a wrong number. Tap and to erase the entire number. 3. Tap the phone number or press the Call key to dial. 4. To end the call, press the End key.
Chapter 3: Making and answering calls To make emergency calls Emergency calls without a SIM card: 1. Open the phone screen. 2. Enter the emergency number using the keypad. 3. Tap the phone number or press the Call key. To make international calls 1. Open the phone screen. 2. Tap and hold until the international prefix code “+” is displayed. 3. Enter the country code, area code and the phone number. 4. Tap the phone number or press the Call key.
Chapter 3: Making and answering calls Note: conference call is a network service. Check with your network provider for the availability of this function. To use other voice call features • • • Tap Speaker to activate or deactivate the speakerphone. Tap Mute to mute or unmute the microphone. To view the call history, tap Menu > Dialler > Call log. Ending a call To end a call, tap End call 19 or press the End key.
Chapter 4: Entering information Chapter 4: Entering information 4.1 On-screen keyboard The keyboard appears when an application requires text input, such as messaging and writing emails. The keyboard input method is activated by default. CAPs Lock Tap to toggle between upper case or lower case. Dictionary: tap to enable dictionary. Input method selector: tap to choose your preferred input method. Using the on-screen keyboard Tap the screen to display the on-screen keyboard.
Chapter 4: Entering information Setting the input method Your phone supports several text input methods, select your preferred method. 1. Tap Application drawer > Settings > Locale & text. 2. In Text settings, you will see a list of the input methods. Select and check the options you prefer. Changing the input method 1. Tap and hold any text field in an application. For instance, in Messaging, tap and hold the field “To:”. The input method screen pops up. 2.
Chapter 4: Entering information Key press vibration Phone vibrates when user presses any key on the onscreen keyboard. Layout in portrait mode Select to change the keyboard layout in portrait mode. Layout in landscape mode Select to change the keyboard layout in landscape mode. Swipe to switch layout Enables swipe to change layout orientation function. Enable mixed language input Check to enable text input in different languages.
Chapter 5: Email & Messaging Chapter 5: Email & Messaging Use Messaging to access text and MMS messages. Use Email receive email messages via your internet email accounts. To open messaging • On the Home screen, tap . • From the Application Drawer, tap Messaging. 5.1 Text messages A text message can only contain letters, numbers and symbols. Creating and sending a text message Your phone offers several ways to create and send a new text message. From the Messaging screen 1. Tap New message.
Chapter 5: Email & Messaging From Contacts 1. 2. 3. 4. 5. From the Home screen, tap Contacts. Tap a contact to display the contact information. Tap Text mobile. Compose your message. Tap Send. From Call log 1. 2. 3. 4. 5. 6. From the Home screen, tap Contacts. Tap the Call log tab to view all call history. Tap a call from the Call log. Tap Send SMS/MMS message. Compose your message. Tap Send. Note: If you exit Messaging before sending, the unsent message will automatically be saved as a draft.
Chapter 5: Email & Messaging To forward a text message 1. Tap Application Drawer > Messaging. 2. Tap to view a message thread. 3. Tap and hold a message to display the message options. 4. Tap Forward. 5. In the To field, enter the recipient’s phone number. 6. Tap Send. To delete all text messages You can delete all text threads in Messaging. 1. Tap Application Drawer > Messaging. • To delete one message thread, tap and hold the message thread you want to delete, and tap Del. thread.
Chapter 5: Email & Messaging To copy message text You can use this function to copy the text from a message to a new message you are composing. 1. Tap Application Drawer > Messaging. 2. Tap a message thread to open it. 3. Tap and hold the message to display the submenu options. 4. Tap Copy message text. 5. Go to New Message. 6. Tap and hold Type to compose. 7. Tap Paste to paste the copied text to your new message.
Chapter 5: Email & Messaging 5.2 Multimedia messages A Multimedia message or MMS can contain letters, an image, an audio or video file. Creating and sending an MMS message Your phone offers several ways to create and send an MMS message. From the Messaging screen 1. Tap Application Drawer > Messaging. 2. Tap New Message. 3. Tap Menu > Add sbj. The message automatically converts to an MMS message. 4. In the To field, enter the recipient’s phone number or email address.
Chapter 5: Email & Messaging From the Call log From the Home screen, tap Contacts > Call log. Tap a call from the Call log. Tap Send SMS Message. Tap Menu > Add sbj to convert to an MMS message. Tap Subject to enter the Subject. To insert a picture or video file, tap Menu > Attach. To insert an audio file, tap Menu > Attach > Audio. To insert text, tap Type to Compose, then enter your message with the on-screen keyboard. 9. Tap Send. 1. 2. 3. 4. 5. 6. 7. 8. 5.
Chapter 5: Email & Messaging Displays recording information. Equaliser Tap buttons to record, stop and play. Recording voice 1. Tap or Record to record your message. 2. Tap or Stop to stop recording. Note: Tap to play voice. 3. Tap Send. 4. In the To field, enter the mobile phone number. 5. Tap Send. Managing recorded voice • To listen to the recording, tap • • To redo the recording, tap to record. To save the recording, tap Save. • To stop recording, tap 29 to play. to stop.
Chapter 5: Email & Messaging 5.4 Email accounts Your phone can send and receive emails just as you do with a computer. Your phone supports Internet email: an email account provided by an Internet Service Provider (ISP) or web-based email, such as Google Mail™, Hotmail™, Yahoo! Mail™, etc. Setting up an Internet email account Tap Application Drawer > Email. Select your email account provider. Enter your Email address and Password. Tap Next. The phone will automatically retrieve the email settings.
Chapter 5: Email & Messaging To configure email settings Configure message settings using the Settings submenu. 1. On the Your accounts screen, tap to select an email account. 2. Tap Menu > Settings to open the email settings menu. 5.5 Using email Composing and sending an email 1. Tap Application drawer > Email, then tap an email account. 2. Tap Menu > Compose. 3. In the To field, enter the recipient’s email address.
Chapter 5: Email & Messaging Sending an email from contacts You can send an email to a contact with an email address stored in Contacts. 1. 2. 3. 4. 5. On the Home screen, tap Contacts. Tap a name to open contact. Tap Send email. Enter the Subject and compose your email. Tap Send. Adding attachments to an email message 1. Before sending your message, tap Menu > Attach. 2. Select the picture you want to attach.
Chapter 5: Email & Messaging To reply to or forward an email 1. Open the message. 2. Do any of the following: • Tap Reply or Reply all to reply to the email. • Tap Menu > Forward. Then enter the recipient in the To field. 3. Compose your message. 4. Tap Send. Managing email folders To delete an email 1. 2. 3. 4. Tap Application drawer > Email, then tap an email account. Tap Inbox to view the inbox messages. Tap and hold the message to delete. Tap Delete.
Chapter 5: Email & Messaging 3. Tap Email check frequency. You can set the phone to check for new email automatically every 5 mins, every 10 mins, every 15 mins, every 30 mins, every hour or never. To set up default account 1. Tap an email account. 2. Tap Menu > Settings to view the email account settings and make adjustments. 3. Tap Default account to send email from this account by default. To delete an email account 1. 2. 3. 4. Tap Application drawer > Email. Tap and hold the account to delete.
Chapter 6: Using the Internet Chapter 6: Using the Internet 6.1 Connecting to the Internet Your phone connects to the Internet via: • • Wi-Fi Mobile data networks Wi-Fi To turn Wi-Fi on or off 1. From the Home screen, tap Application drawer > Settings to access Wireless controls. 2. Tap to check the Wi-Fi function and turn Wi-Fi on or off. To connect to a Wi-Fi network 1. Turn Wi-Fi on. 2. Tap Wi-Fi settings. The phone scans for Wi-Fi signals. 3. Detected networks are displayed below.
Chapter 6: Using the Internet To add a Wi-Fi network 1. From the Home screen, tap Application drawer > Settings to access Wireless Controls. 2. Tap Wi-Fi settings. 3. In Wi-Fi networks, tap Add Wi-Fi network. A new window is displayed. 4. Follow the on-screen instructions and enter the necessary information, then tap Save to store settings. To configure Wi-Fi settings 1. From the Home screen, tap Application drawer > Settings to access Wireless Controls. 2. Tap Wi-Fi settings. 3. Tap Menu > Advanced.
Chapter 6: Using the Internet To set up a mobile data connection Note: you should not need to change these settings. If you do, contact your network service provider for details. 1. Tap Application drawer > Settings > Wireless controls. 2. Tap Mobile network settings > Access point names. 3. Tap Menu > New APN. 4. Enter a name for the connection. 5. Tap OK. 6. Enter the APN, then tap OK. 7. Enter the Proxy, Port, Username and Password (if available) etc., then tap OK to save your settings.
Chapter 6: Using the Internet 6.2 Browsing a web page 1. Tap Application drawer > Browser. 2. Tap Menu > Go. 3. An address bar appears on screen. Type the URL then tap . Tap to enter the website. Address bar See recently viewed websites. To scroll To scroll up or down, swipe down or up. To scroll left or right, swipe to the right or left. To set the home page 1. While viewing a web page, tap Menu > Settings > Set home page. 2. Enter the URL of the page that you want to set as home page. 3.
Chapter 6: Using the Internet Select text Tap to select text on the web page. Save page Tap to save the web page. Page Tap to view web page information. Share page Tap to send this web page via email or messaging. Exit Tap to close the Browser and return to the Home screen. Download Tap to view the download history. Zoom Out Tap to activate zooming functions. Tap within the page to go back to normal view.
Chapter 6: Using the Internet To use the Google Search Widget From the Home screen, you can browse the internet right away with the Google search function. 1. On the Home screen, swipe left to show Google search. 2. Tap the Google search widget, then type the text to search. 3. Tap . 6.3 Market Find and download applications and fun games to your phone. To start using Android market Tap Application drawer > Market. Tap Accept after reading the terms of service. Tap Next to setup your Google account.
Chapter 7: Using Bluetooth® Chapter 7: Using Bluetooth® Bluetooth modes • • • On: Bluetooth is turned on. Your phone detects other Bluetooth devices, but your phone is not visible to others. Discoverable: Bluetooth is turned on and your phone is visible to other Bluetooth devices. Off: Bluetooth is turned off. To turn Bluetooth on or off 1. Tap Application Drawer > Settings > Wireless Controls. 2. Tap Bluetooth Settings. 3. Tap to check Bluetooth and activate. 4.
Chapter 8: Media applications Chapter 8: Media applications 8.1 Photos and videos Your phone is equipped with a 3.0 megapixel camera to take photos and videos. Taking a photo Tap to adjust the brightness of the image. Displays the last image. Swipe to switch between video and camera mode. Tap to take a photo. Tap “+” or “-” to zoom the image in or out. 1. Tap Application drawer > Camera. The screen automatically switches to landscape view.
Chapter 8: Media applications Recording video Indicates capture mode. Indicates remaining recording time. Tap to record video. 1. Tap Application drawer > Camcorder. 2. Aim the phone at the subject. 3. To start recording, press the Shutter key or tap . 4. To stop recording, press the Shutter key again or tap . Reviewing a photo After taking a shot, a thumbnail image is displayed in the lower left corner of the screen. 1. Tap the thumbnail to view the image in full screen size.
Chapter 8: Media applications Reviewing a video After recording a video, the video thumbnail is displayed in the lower left corner of the screen. 1. Tap the video thumbnail to playback the video in full screen mode. • Tap DELETE • Tap SHARE • Tap PLAY • Tap DONE to delete the picture and view the next picture. to share the picture via Email or Messaging. to playback the video clip. to save your settings. Configuring camera settings On the camera screen, tap Menu > Settings.
Chapter 8: Media applications Tap to view and adjust the general settings of your camera Mode Photo mode Video mode 45 Setting Available options Store location in pictures Record the location in picture data.
Chapter 8: Media applications 8.2 Viewing photos & videos Note: you can transfer your captured images and recorded video clips onto your computer. See “Transferring files to your computer” on page 70. To view photos in the album 1. Tap Application drawer > Gallery 2. Tap Camera pictures to view the images as thumbnails. 3. Tap an image to view. 4. To view previous/next image, tap the left/right arrow keys on the screen. To play a slideshow 1. While viewing an image, tap Menu > Play slide Show. 2.
Chapter 8: Media applications To set an image as wallpaper 1. While viewing an image, tap Menu > Set as > Wallpaper. 2. Drag to select the crop area and tap inside the box to crop the image. 3. Tap Save to set the image as wallpaper. To save an image to Contacts 1. While viewing an image, tap Menu > Set as > Contact icon. 2. Tap the contact name to add the image. 3. Drag to select the crop area and tap inside the box to crop the image. 4. Tap Save to save the image as contact icon.
Chapter 8: Media applications To configure camera & video playback settings 1. Tap Application drawer > Gallery > Camera pictures. 2. Tap Menu > Setting. 3. Camera general settings are displayed. You can change the camera display size, sort picture orders and set up slideshow settings. To play back videos in the album 1. Tap Application drawer > Gallery > Camera videos. All saved video clips are displayed in the folder. 2. Tap the video to playback. 8.
Chapter 8: Media applications Displaying folder categories Tap Library to go to the Music Library screen. It displays folder categories which makes searching for media files quick and easy. It contains the following categories: Artists, Albums, Songs and Playlists. Arranging media files The Now playing screen displays the list of songs currently playing and those on queue for playback. Use the icons on the left of each media file to arrange the sequence of files for playback. Playing music 1.
Chapter 8: Media applications Creating a playlist Add songs to a specific playlist or create a playlist. 1. Tap Application drawer > Music. The Library screen is displayed. 2. Tap and hold the song you want to add. 3. Tap Add to playlist. 4. Select from the current playlist or tap New to create a new playlist. 5. The song is added to the playlist. Note: if you create a new playlist, enter the playlist name now. To remove a song from a playlist 1. Tap Application drawer > Music.
Chapter 8: Media applications 8.4 Google Talk Google Talk is Google's instant messaging application. To sign in to Google Talk 1. Tap Application drawer > Google Talk. 2. Tap Create or Sign in to your Google account. 3. Follow the on-screen instructions to login or create your Google Mail username and password. 4. Once logged in, you can begin using Google Talk and do any of the following: • View friends list: tap Menu > All friends • Add friends to friends list: tap Menu > Add friends.
Chapter 8: Media applications 8.6 YouTube™ YouTube™ is an online video streaming service that allows you to view, search and upload videos. To start using YouTube™ 1. Tap Application drawer > YouTube. 2. Videos are grouped into categories, such as Featured, Most popular, Most viewed, Top rated and more. Tap a category to see the available videos for that category. 3. Tap a video to play it.
Chapter 9: Navigation Chapter 9: Navigation 9.1 Using GPS tracker Your phone supports a GPS tracker to record your position, your speed and track distance. You can also save the data as personal sports records. Turning on GPS 1. Tap Application drawer > GPS tracker. 2. When GPS is connected, tap 3. Tap to set POI. to start tracking. 4. You can view your tracking distance, speed, trackers and the number of POIs on screen. 5. Tap Menu > Mode to set your mode: Walk, Bicycle or Car.
Chapter 9: Navigation Managing tracking data You can save the tracking data for your personal record. Set GPS file format 1. Tap Application drawer > GPS tracker. 2. Tap Menu > Format. 3. Tap to choose the file format. You can save the GPS tracking record in the following file formats: KML, GPX or Both. 4. Tap OK to confirm. Save GPS file 1. Tap Application Drawer > GPS Tracker. 2. Tap Menu > Save to. 3. Enter a default path to save the file on your memory card. 4. Tap OK to confirm. 9.
Chapter 10: Tools Chapter 10: Tools 10.1 Calculator With Calculator, you can perform basic arithmetic functions on your phone. Tap Application drawer > Calculator. 10.2 Calendar The Calendar lets you schedule and sound alarms for appointments, meetings and other events. Scheduled appointments for the day can be displayed on the Home screen. To schedule an event 1. Tap Application drawer > Calendar. 2. Tap Menu > New event. 3. Enter event details. 4. Select the dates for the From and To fields.
Chapter 10: Tools 10.3 Clock The clock function contains alarm clock, global time, timer and stop watch. For alarm clock settings, see page 67. Viewing world clock Use world clock time to view the current time in different locations. 1. Tap Application drawer > Clock. 2. The current time of selected cities is displayed on the world clock tab. 3. Tap Menu > Add to select from the world cities list. 4. The current time of the selected cities is shown on the atlas screen. Using stop watch 1.
Chapter 10: Tools Using countdown timer 1. Tap Application drawer > Clock. 2. Tap the countdown timer tab. • Tap Set to set the countdown time. • Tap Start to start and time elapsed will appear on screen. • Tap Ring to set a ringtone when the time is up. 10.4 Note pad Use the note pad to write down notes as you would on a note pad. Saved notes are displayed here. Tap to add a new note. Tap to mark the note. To create a note 1. Tap Application drawer > Note pad. 2. Tap Add note. 3.
Chapter 11: Management Chapter 11: Management 11.1 Documents To Go Documents To Go allows you to open Microsoft® Office and Adobe file formats. Word To Go® Viewer Word To Go® Viewer allows you to view Microsoft® Word documents (.doc and .docx). It supports embedded pictures, font colour, bold, italics, underline, bulleted, numbered list and more. To open Word To Go Viewer 1. Tap Application drawer > Documents To Go > Word To Go Viewer. 2. Tap Open File. 3. Tap the file you want to open.
Chapter 11: Management Slideshow To Go® Viewer Slideshow To Go® Viewer allows you to view Microsoft® PowerPoint presentations (.ppt and .pptx). It supports slide view, outline view, speaker notes, images, charts, font formatting and effortless slide “flick” navigation. To open Slideshow To Go Viewer 1. 2. 3. 4. Tap Application drawer > Documents To Go > Slideshow To Go Viewer. Tap Open file. Tap the file you want to open. To close the file, tap Back.
Chapter 11: Management • • • To paste an item, tap Menu > Paste. To sort items, tap Menu > Sort, then select an option. To search for a file, tap Menu > More > Search. 11.3 RoadSync RoadSync provides secure, wireless and direct push synchronisation of corporate email, calendar, contacts and attachments. Set up RoadSync for the first time 1. Tap Application drawer > RoadSync. 2. The setup wizard appears. Tap Next, then follow the on-screen instructions. 3. Read and accept the licence agreement.
Chapter 11: Management Sync schedule Tap to set the synchronisation schedule. • • • • • • Peak schedule: to set the time interval for synchronisation during a peak schedule. Off peak schedule: to set the time interval for synchronisation during an off peak schedule. Peak start time: to set the peak start time. Tap the [+] or [-] buttons to adjust the time. Tap to select AM or PM. Tap Set to complete. Peak end time: to set the peak end time. Tap the [+] or [-] buttons to adjust the time.
Chapter 11: Management Start synchronisation 1. Tap Application drawer > RoadSync. 2. On the RoadSync main screen, tap Start sync to start synchronisation. 3. To stop synchronisation manually, tap Stop sync. Update RoadSync Tap Application drawer > RoadSync > Check for updates. 11.4 RoadSync calendar Use the RoadSync calendar to view and add events or appointments on your calendar. Note: RoadSync must be set up first to use this application. See “RoadSync” on page 60. To open RoadSync calendar 1.
Chapter 11: Management 11.6 Rss reader Use the Rss reader to get live updates from your favourite websites. Add a new Rss feed 1. Tap Application drawer > Rss reader. 2. Tap Menu > New feed. 3. Tap an import option: • Import from OPML file: select a file from the SD card. • Import OPML from Internet: enter the URL to import OPML from. • Manual Add: manually enter a URL. • Import from Google reader: sign in to Google reader to import feed. 4. Tap OK to confirm. Update Rss feed 1.
Chapter 12: Managing your phone Chapter 12: Managing your phone 12.1 Phone settings Tap Application drawer > Settings to view and adjust the settings of your phone. The Settings menu is categorised into: Wireless controls, Call settings, Sound & display, Security & location, Applications, SD card, USB mass storage & phone storage, Date & time, Locale & text and About phone. Wireless controls Application Description Wifi settings Set up and manage wireless access points.
Chapter 12: Managing your phone Application Description Audible selection Enable/disable sound when making screen selection. SD card notifications Enable memory card notification sounds. Orientation Switch orientation automatically when rotating phone. Animation Show animation when opening & closing windows. Light sensor Switch LCD backlight brightness setting manually. Brightness Adjust the brightness of the screen. Screen timeout Adjust the delay before the screen automatically goes off.
Chapter 12: Managing your phone Applications Application Description Unknown sources Allow install of non-market applications. Manage applications Manage and remove installed applications. Development Set options for application development. SD card USB Mass Storage & phone storage Application Description Unmount SD card Unmount the memory card for safe removal. Format SD card Format all data on memory card. Warning: this feature will clear all data stored on your memory card.
Chapter 12: Managing your phone 12.2 Changing basic settings Date and time To set the date and time Tap Application drawer > Settings > Date & time. Set the date. Select the time zone from the list. To adjust the time, tap the hour, minute, second or AM/PM field, and use the up and down arrows to increase or decrease the value. 5. To adjust the date, tap the month, day, or year field, and tap + or - to increase or decrease the value. 6. Tap Set to apply the values. 1. 2. 3. 4.
Chapter 12: Managing your phone Display settings The display settings of your phone affect the battery and external power level. To turn off backlight when the phone is idle 1. Tap Application drawer > Settings > Sound & display to enter the submenu. 2. In the Display settings, tap Screen timeout. 3. Select from the screen timeout list. Your setting is automatically saved. To adjust brightness 1. Tap Application drawer > Settings > Sound & display to enter the submenu. 2.
Chapter 12: Managing your phone 12.4 Protecting your phone You can protect your phone from unauthorised users by requiring the PIN code or entering a password. Enable or disable SIM card PIN When PIN code is enabled, you are required to enter the PIN code before making a call. 1. Tap Application drawer > Settings > Security & location. 2. On the SIM card lock tab, tap Set up SIM card lock. 3. Tap Lock SIM card to use PIN to use the phone. Check to enable, uncheck to disable. 4. Enter the current PIN code.
Chapter 12: Managing your phone 12.6 Transferring files to your computer To transfer your captured images, recorded video clips and other contents onto your computer: 1. 2. 3. 4. 5. 6. Open the Micro USB connector cover. Connect the USB cable to the phone. Connect the other end of the USB cable to the computer. Turn on your phone. From the Windows desktop, double click My computer and locate the CD drive. Browse and double click Setup.exe. 7.
Safety, Regulatory & Legal Safety, regulatory & legal Battery use & safety Important: handle and store batteries properly to avoid injury or damage. Most battery issues arise from improper handling of batteries, and particularly from the continued use of damaged batteries. DON’Ts • • • • • • Don’t disassemble, crush, puncture, shred, or otherwise attempt to change the form of your battery. Don’t let the phone or battery come in contact with water.
Safety, Regulatory & Legal • • • • Remove the battery and inspect it to confirm that it has a “Motorola Original” hologram; If there is no hologram, the battery is not a Motorola battery; If there is a hologram, replace the battery and retry charging it; If the message remains, contact a Motorola authorized service centre. Important: Motorola’s warranty does not cover damage to the phone caused by nonMotorola batteries and/or chargers.
Safety, Regulatory & Legal other positions, such as on the body as described in this guide. In this case, the highest tested SAR value is 0.592 W/kg. The tests are carried out in accordance with international guidelines for testing. The SAR information includes the Motorola testing protocol, assessment procedure and measurement uncertainty range for this product.
Safety, Regulatory & Legal the copyrighted software. Accordingly, any copyrighted software contained in Motorola products may not be modified, reverse-engineered, distributed, or reproduced in any manner to the extent allowed by law.
Safety, Regulatory & Legal uses your wireless service provider's network and therefore airtime, data charges and/ or additional charges may apply in accordance with your service plan. Contact your wireless service provider for details. Your location Location-based information includes information that can be used to determine the approximate location of a mobile device. Mobile phones which are connected to a wireless network transmit location-based information.
Safety, Regulatory & Legal Safety & general information This section contains important information on the safe and efficient operation of your mobile device. Read this information before using your mobile device. Exposure to Radio Frequency (RF) energy Your mobile device contains a transmitter and receiver. When it is ON, it receives and transmits RF energy. When you communicate with your mobile device, the system handling your call controls the power level at which your mobile device transmits.
Safety, Regulatory & Legal Implantable medical devices If you have an implantable medical device, such as a pacemaker or defibrillator, consult your physician before using this mobile device. Persons with implantable medical devices should observe the following precautions: • ALWAYS keep the mobile device more than 20 centimeters (8 inches) from the implantable medical device when the mobile device is turned ON. • DO NOT carry the mobile device in the breast pocket.
Safety, Regulatory & Legal Symbol Key Your battery, charger or mobile device may contain symbols, defined as follows: Symbol 032374o 032376o 032375o Definition Important safety information follows. Do not dispose of your battery or mobile device in a fire. Your battery or mobile device may require recycling in accordance with local laws. Contact your local regulatory authorities for more information. Do not throw your battery or mobile device with normal household waste.
Safety, Regulatory & Legal disorientation. It is always a good idea to hold the screen away from your eyes, leave the lights on in the room, take a 15-minute break every hour, and stop use if you are tired. Caution about high volume usage Warning: exposure to loud noise from any source for extended periods of time may affect your hearing. The louder the volume sound level, the less time is required before your hearing could be affected.
Safety, Regulatory & Legal turning the equipment off and on, the user is encouraged to try to correct the interference by one or more of the following measures: • • • • Reorient or relocate the receiving antenna. Increase the separation between the equipment and the receiver. Connect the equipment to an outlet on a circuit different from that to which the receiver is connected. Consult the dealer or an experienced radio/TV technician for help.
Safety, Regulatory & Legal Product registration Online product registration: www.motorola.com/us/productregistration Product registration is an important step toward enjoying your new Motorola product. Registering permits us to contact you for product or software updates and allows you to subscribe to updates on new products or special promotions. Registration is not required for warranty coverage. Please retain your original dated sales receipt for your records.
Safety, Regulatory & Legal Secure personal information—Your mobile device can store personal information in various locations including your SIM card, memory card, and phone memory. Be sure to remove or clear all personal information before you recycle, return, or give away your device. You can also backup your personal data to transfer to a new device. Note: For information on how to backup or wipe data from your mobile device, go to www.motorola.
Safety, Regulatory & Legal • • • • • • • • 83 Position your mobile device within easy reach. Be able to access your mobile device without removing your eyes from the road. If you receive an incoming call at an inconvenient time, if possible, let your voicemail answer it for you. Let the person you are speaking with know you are driving; if necessary, suspend the call in heavy traffic or hazardous weather conditions. Rain, sleet, snow, ice, and even heavy traffic can be hazardous.
Safety, Regulatory & Legal www.hellomoto.com Certain mobile phone features are dependent on the capabilities and settings of your service provider’s network. Additionally, certain features may not be activated by your service provider, and/or the provider’s network settings may limit the feature’s functionality. Always contact your service provider about feature availability and functionality.
Specifications Specifications Radio band & standard GSM/GPRS/EDGE 850 / 900 / 1800 / 1900 WCDMA 900 (850) / 1900 / 2100 Connectivity GPS GPS / AGPS Wi-Fi 802.11 b/g Bluetooth 2.0 + EDR USB USB 2.0 Power Battery Rechargeable Li-Ion 1270mAh Power adapter AC input: 100-240V, 50 / 60Hz, 0.2A max.