
Installation guide


Switch Management
7-3
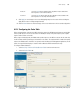
7.2 Configuring Access Control
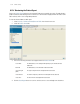
Refer to the Access Control screen to allow/deny management access to the switch using the different
protocols (HTTP, HTTPS, Telnet, SSH or SNMP) available to users. Access options are either enabled or
disabled as required. The Access Control screen is not meant to function as an ACL (in routers or other
firewalls), where you can specify and customize specific IPs to access specific interfaces.
To configure access control settings:
1. Select Management Access > Access Control from the main menu tree.
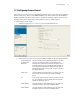
2. Refer to the Management Settings field to enable or disable the following switch interfaces:
Secure Management
(on Management
VLAN only)
Select this checkbox to allow management VLAN access to switch
resources. The management VLAN is used to establish an IP
connection to the switch from a workstation connected to a port in
the VLAN. By default, the active management VLAN is VLAN 1, but
you can designate any VLAN as the management VLAN. Only one
management VLAN can be active at a time. This option is disabled
(not selected) by default.
Enable Telnet Select this checkbox to allow the switch to use a Telnet session for
communicating over the network. This setting is enabled by
default.
Port Define the port number used for the Telnet session with the switch.
This field is enabled as long as the Enable Telnet option remains
enabled. The default port is port 23.
Enable SNMP v2 Select this checkbox to enable SNMPv2 access to the switch over
the SNMPv2 interface. This setting is enabled by default.
Enable SNMP v3 Select this checkbox to enable SNMPv3 access to the switch over
the SNMPv3 interface. This setting is enabled by default.