
Owner's manual


Switch Services 5-5
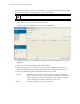
6. Click the Edit button to modify the properties displayed on an existing DHCP pool. For more information,
see Editing the Properties of an Existing DHCP Pool on page 5-5.
7. To delete an existing DHCP pool from the list of those available to the switch, highlight the pool from
within the Network Pool field and click the Delete button.
8. Click the Add button to create a new DHCP pool. For more information, see Adding a New DHCP Pool on
page 5-6.
9. Click the Options button to insert a global pool name into the list of available pools. However, individual
pool options require initial setup using the Options Setup functionality before they can be made
available for use with individual pools. For more information, see Configuring DHCP Global Options on
page 5-8.
10.Click the DDNS button to configure a DDNS domain and server address that can be used with the list of
available pools. For more information, see Configuring DHCP Server DDNS Values on page 5-9.
11.Click the Options Setup button to initially configure individual pool options available using the Options
button. Pool options require initial configuration using the Options Setup functionality before they can be
selected using the Options button.
12.Click Apply to save any changes to the screen. Navigating away from the screen without clicking the
Apply button results in all changes to the screen being lost.
13.Click the Revert button to display the last saved configuration. Unapplied changes are not saved and
must be re-entered.
5.2.1.1 Editing the Properties of an Existing DHCP Pool
The properties of an existing pool can be modified to suit the changing needs of your network.
To modify the properties of an existing pool:
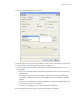
1. Select Services > DHCP Server from the main menu tree.
The DHCP Server screen displays with the Configuration tab displayed.
2. Select an existing pool from those displayed within the Network Pool field and click the Edit button.
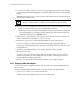
3. Modify the name of the IP pool from which IP addresses can be issued to client requests on this interface.
4. Modify the Domain name as appropriate
for the interface using the pool.
5. Modify the NetBios Node used with this particular pool. The NetBios Node could have one of the
following types:
•A b-broadcast (broadcast node) uses broadcasting to query nodes on the network for the owner of
a NetBIOS name.
•A p-peer (peer-to-peer node) uses directed calls to communicate with a known NetBIOS name
server, such as a Windows Internet Name Service (WINS) server, for the IP address of a NetBIOS
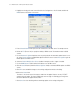
Lease Time
(dd:hh:mm)
When a DHCP server allocates an address for a DHCP client, the client is assigned a lease,
which expires after a designated interval defined by the administrator. The lease time is the
number of seconds an IP address is reserved for re-connection after its last use. Using very
short leases, DHCP can dynamically reconfigure networks in which there are more
computers than there are available IP addresses. This is useful, for example, in education
and customer environments where mobile-unit users change frequently. Use longer leases if
there are fewer users.
Domain Displays the domain name for the current interface.