
Installation guide


Chapter 3: Hardware Installation 27
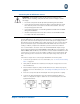
For a cinder block installation, use a screwdriver to tighten the anchors.
Wall Bracket Installation
Follow these steps to mount the wall bracket:
1. Depending on the height of the installer, position the wall bracket on the
installation surface approximately 36 to 42 inches off the ground.
The SBV5506 chassis is approximately 24 inches in length. If the wall
bracket is positioned too high off the ground, you will have difficulty
reaching the mounting flanges on the rear of the SBV5506 chassis when
you mount the chassis to the wall bracket.
For siding and applicable wood installations, locate the wood stud and
then position the wall bracket. For best results, ensure that the mounting
holes are directly in the middle of the stud.
2. When you position the wall bracket, place a leveling tool across the top of the
wall bracket to verify that the bracket is level.
3. Use a pencil and mark the location of the wall mounting holes.
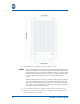
4. Refer to the following diagram and mark the location of the Mounting Flange
holes on the chassis.
The diagram is not drawn to scale. All measurements should be per-
formed with a measuring device, such as a tape measure, and a level.
The distance between the wall mounting bracket holes is 9 inches, and
the distance between the wall mounting bracket holes and the Mounting
Flange holes on the chassis is 19.67 inches.
If Mounting To... Then Use This Hardware
Cinder Block (4) ¼”- 20 hollow wall anchors
(4) ¼”- 20 machine screws
(4) ¼” flat washers
Brick and Concrete (4) ¼” expansion anchors
(4) ¼” x 2” lag screws
(4) ¼” flat washers
Siding (4) ¼” x 3” lag screws
(4) ¼” flat washers
Wood (4) ¼” x 2” Wood screws
(4) ¼” flat washers
NOTE:
NOTE:
NOTE: