
Installation manual
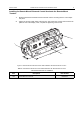
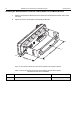

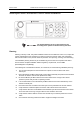
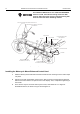

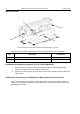
Table Of Contents
- COPYRIGHT
- IMPORTANT SAFETY INFORMATION
- DOCUMENT HISTORY
- CONTENTS
- SCOPE
- MODEL INFORMATION & ACCESSORIES
- INSTALLATION
- Introduction
- DC Power Cable Installation
- Ignition Sense Cable Installation
- Terminal Installation
- Enhanced Control Head Installation
- Trunnion Installation
- Dashboard Installation
- Desktop Installation
- Remote Mount Installation
- Installing the Remote Mount Enhanced Control Head onto the Remote Mount Trunnion
- Installing the Remote Mount Enhanced Control Head in a DIN Mount Bracket
- Inserting the Remote Mount Enhanced Control Head with the DIN Mount Bracket into the DIN Frame
- Adding Extra Connectivity to the Remote Head
- Installing the Accessories Expansion Cable
- Motorcycle Mount Enhanced Control Head Installation
- Data Expansion Head Enhanced Installation
- Connectors and Pin Assignment of the Radio
- Connectors and Pin Assignment of Data Expansion Head Enhanced and Remote Head Enhanced
- Connector and Pin Assignment of the Enhanced Control Head
- Connecting Cables
- Motorcycle Mount Enhanced Control Head-to-Remote Head Enhanced/Data Expansion Head Enhanced (Motorcycle Mount TELCO Cable)
- Remote Mount Enhanced Control Head/Motorcycle Mount Enhanced Control Head-to-Accessories (Accessories Expansion Cable)
- Radio-to-Junction Box
- Data Expansion Head Enhanced Radio-to-Data Device
- Data Expansion Head Enhanced Radio-to-Fist Microphone
- Radio-to-Data Device: Active Data Cable
- Vehicle Antenna Installation
- External Speaker Installation
- UPGRADING THE TERMINAL
- APPENDIX

INSTALLATION MTM800 Enhanced Mobile Terminal Installation Manual 45
Motorcycle Mount Enhanced Control Head Installation
Figure 16 Motorcycle Mount Enhanced Control Head - Front Side
Planning
Planning is the key to fast, easy radio installation. Before a hole is drilled or a wire is run, inspect the
vehicle and determine how and where you intend to mount the antenna, radio, and accessories.
Plan wire and cable runs to provide maximum protection from pinching, crushing, and overheating.
The installation planning should only be undertaken by persons who are competent and able to
ensure that the complete installation fulfils its regulatory requirements, such as EMC
(ElectroMagnetic Compatibility).
The following list of considerations should, as a minimum, be checked during installation planning:
1. The recommended place for the transceiver is to place it in the box at the back of the
motorcycle.
2. Mount the Motorcycle Mount Enhanced Control Head horizontally at a position which enables
the driver to view the controls and operate them easily.
3. Be sure the Motorcycle Mount Enhanced Control Head is close enough to the vehicle
operator to permit easy access to operating controls.
4. It is recommended to mount the Motorcycle Mount Enhanced Control Head directly on the
chassis or handle part.
5. Ensure that the units mounted in the motorcycle box are protected from dirt and moisture.
6. Verify that there is sufficient space around the units to allow air flow and removal.
7. Verify that the cable from a handlebars mounted Motorcycle Mount Enhanced Control Head
and to the radio unit is long enough to allow for the handles to be turned.
8. Verify that the antenna cable is routed in the shortest way to minimize power loss over the
cable.
9. Check that the mounting surfaces are able to support the weight of the units.
The keypad labelling of the control head may vary
according to the specific customer/country concerns.