
Laptop User Manual


Staging and Provisioning 8 - 23
2. Connect to the vehicle computer using Remote Desktop. See
3. Select Start > Programs > AirBEAM Smart Client. The AirBEAM Smart CE window appears.
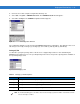
4. Select File > Configure. The AirBEAM configuration window appears.
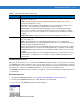
Figure 8-33
AirBEAM Configuration Window
The configuration window is used to view and edit AirBEAM Smart Client configurations. This dialog box has seven
tabs that you can modify - Packages(1), Packages(2), Server, Misc(1), Misc(2), Misc(3) and Misc(4).
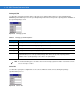
Packages(1) Tab
Use this tab to specify the package name of the first four of eight packages that are to be loaded during the
AirBEAM synchronization process. The specified package name must correspond to a package that is available on
the specified package server.
Figure 8-34
Package (1) Tab
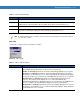
Table 8-2
Package (1) Tab Descriptions
Field Description
Package 1 Package name of the first of eight packages. This is an optional field.
Package 2 Package name of the second of eight packages. This is an optional field.
Package 3 Package name of the third of eight packages. This is an optional field.
Package 4 Package name of the fourth of eight packages. This is an optional field.
NOTE No inadvertent trailing spaces should be entered on the Packages(1) tab. Information entered in these fields
are case and space sensitive.