
Laptop User Manual


Installation 2 - 13
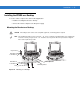
3. Select a location for mounting the filter box. This should be on a hard flat surface and in a location where the
connector end of the cable reaches the vehicle computer.
4. Secure the filter box of the power cable to the forklift, using #8 screws or bolts.
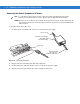
5. Connect the green wire to the vehicle's negative power source.
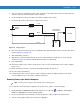
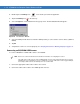
Figure 2-13
Wiring Diagram
6. Place a fuse and fuse holder in-line of the red and black wires approximately four inches from the cable end, as
shown in Figure 2-6 on page 2-6.
7. Slide shrink tubing over wires.
8. Strip the wires (0.4 in./10 mm) and insert into the fuse holder. Crimp fuse holder ends to ensure a proper
electrical connection (use Thomas & Betts WT-11-M crimp tool or equivalent).
9. Heat shrink tubing.
10. Connect the red wire to the vehicle's positive power source. Connect the black wire to the vehicle's negative
power source.
11. Ensure the wiring connections created are sufficiently insulated from each other.
12. Re-connect the vehicle battery.
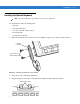
13. Insert the power cable connector into the vehicle computer's Power port. Align the keyway on the power
connector with the notch on the vehicle computer’s power port.
Removing Power to the Vehicle Computer
If it is required to remove the vehicle computer from a power source (replace a vehicle’s battery):
1. Ensure that all the Forklift Ignition Off wakeup settings are set to No. Tap > Settings > Control Panel >
Power icon > Wakeup tab to view the wakeup settings.
2. Press the Power button on the Quick Access Panel to place the vehicle computer in suspend mode.
3. Turn the vehicle ignition switch to the off position, if applicable.
VC5090
20A Fuse
20A Fuse
Vehicle
Battery
Power Cable
25-71919-02R
Red
Green
Black
Filter
Box
NOTE Place the vehicle computer in suspend mode prior to removing power.