
User's Guide
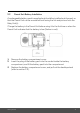
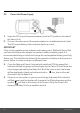
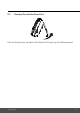


Table Of Contents
- 1. Safety Instructions
- 2. Getting Started
- 2.1 Baby Unit Power Supply
- 2.2 Parent Unit Battery Installation
- 2.3 Parent Unit Power Supply
- 2.4 Desktop Stand of the Parent Unit
- 3. Using the Baby Monitor
- 3.1 Setting Up
- 3.2 Power On or Off the Baby Unit
- 3.3 Power On or Off the Parent Unit
- 3.4 Night Vision Mode
- 3.5 Turn off Parent Unit LCD Screen
- 4. Parent Unit Menu Options
- 4.1 Adjust Speaker Volume
- 4.2 LCD Brightness
- 4.3 Set Alarm Time on the Parent Unit
- 4.3.1 Set lullaby
- 4.4 Monitor the Temperature
- 4.4.1 Temperature Format
- 4.4.2 Temperature Range
- 4.4.3 Temperature Alert
- 4.5 Remove a Baby Unit from the Parent Unit
- 4.6 Set Screen Off time for the Parent Unit
- 4.7 Zoom, Pan or Tilt
- 4.8 Pair and Replace a Baby Unit
- 4.9 Multi-Camera Use
- 5. Disposal of the Device (environment)
- 6. Cleaning
- 7. Troubleshooting
- 8. General Information

Getting Started 11
2
.2 Parent Unit Battery Installation
A rechargeable battery pack is supplied and should be installed and charged, so
that the Parent Unit can be moved without losing the link and picture from the
Baby Unit(s).
Charge the battery in the Parent Unit before using it for the first time or when the
Parent Unit indicates that the battery is low (flashes in red).
1. Remove the battery compartment cover.
2. Insert the plug of the battery pack into the socket inside the battery
compartment, and fit the battery pack into the compartment.
3. Replace the battery compartment cover, and pull out the desktop stand
(refer to section 2.4).