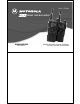
User's Guide SERIES TWO-WAY RADIO -1 0 @6864110R04@ 6864110R04-A Models XU1100, XU2100, XU2600, XV1100, XV2100, and XV2600
Introduction Thank you for purchasing a Motorola£ XSeries Radio. Your radio is a product of Motorola’s 70 plus years of experience as a world leader in the designing and manufacturing of communications equipment. The XSeries radios provide costeffective communications for businesses such as retail stores, restaurants, schools, construction sites, manufacturing, property and hotel management and more.
Contents Introduction...................................1 FCC Licensing Information..........5 Safety and General Information ..7 Getting Started............................15 Installing the Swivel Belt Holster ..................................16 Installing the Nickel-Metal Hydride Battery .....................17 Charging the XSeries Radio ....18 Turning Your Radio On or Off ...19 Adjusting the Volume ................19 Using the Radio ........................19 Understanding the Display........
FCC Licensing Information FCC Licensing Information XSeries professional two-way radios operate on radio frequencies that are regulated by the Federal Communications Commission (FCC). In order to transmit on these frequencies, you are required to have a license issued by the FCC. Application is made available on FCC Form 601 and Schedules D, H, and Remittance Form 159. To obtain these FCC forms please request document 000601 which includes all forms and instructions.
Important Information on Safe and Efficient Operation Read This Information Before Using Your Radio The information provided in this document supersedes the general safety information contained in user guides published prior to July 2000. For information regarding radio use in a hazardous atmosphere please refer to the Factory Mutual (FM) Approval Manual Supplement or Instruction Card, which is included with radio models that offer this capability. This device complies with Part 15 of the FCC Rules.
Safety and General Information Portable Radio Operation and EME Exposure Antenna Care Use only the supplied or an approved replacement antenna. Unauthorized antennas, modifications, or attachments could damage the radio and may violate FCC regulations. DO NOT hold the antenna when the radio is “IN USE.” Holding the antenna affects the effective range.
Safety and General Information Persons with pacemakers should: • ALWAYS keep the radio more than six inches (15 centimeters) from their pacemaker when the radio is turned ON. • not carry the radio in the breast pocket. • use the ear opposite the pacemaker to minimize the potential for interference. • turn the radio OFF immediately if you have any reason to suspect that interference is taking place. Hearing Aids Some digital wireless radios may interfere with some hearing aids.
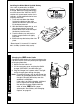
Safety and General Information Save these Instructions 1. Do not expose the charger to rain or snow. 2. Do not operate the charger if it has received a sharp blow, or has been dropped or damaged in any way. 3. Do not disassemble the charger if it has received a sharp blow, or has been dropped or damaged in any way. 14 4. Never alter the AC cord or plug provided with the unit. If plug will not fit the outlet, have proper outlet installed by a qualified electrician.
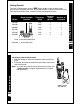
Getting Started Frequency Band Transmit Power (Watts) Number of Channels XU1100 UHF 1 1 XU2100 UHF 2 1 XU2600 UHF 2 6 XV1100 VHF 1 1 XV2100 VHF 2 1 XV2600 VHF 2 6 Model Model Number Location Getting Started This User’s Guide covers several XSeries models, and may detail some features your radio does not have.
Ribbed Latch Getting Started Installing the Nickel-Metal Hydride Battery Your radio is powered by an NiMH battery, which provides up to 15 hours* of usage. Before you install the battery, mark the date in the "INSTALL DATE" section with a permanent marker. As in vehicles, all rechargable batteries lose capacity over time. 1. Push and hold down the ribbed latch on the bottom of the radio toward the contacts, then slide and lift the battery door off. 2.
k 188 218 Frequency c Adjusting the Volume You can set the volume by turning P. Note: Do not hold the radio too close to your ear when adjusting the volume or if it is at a high setting. Code Using the Radio 1. Press and hold Q to check for channel activity. If you hear static, the channel is clear to use. Do not transmit if someone is speaking on the channel. Press Q again to stop monitoring the channel. 2. Press and hold Mand speak into the microphone.
Understanding the Display Scan Keypad Lock Scramble (XU2600, XV2600 Only) Battery Meter (2-Watt Models Only) Programming Mode 1 Getting Started Signal Strength Frequency and Interference Eliminator Code Frequency Indicator Channel VOX/Microphone Gain X 21 Battery and Charging Options Battery and Charging Options You have several battery and charging options on your XSeries Two-Way Radio. X 22 NiMH Battery See “Installing the Nickel-Metal Hydride Battery” on page 17.
10-Hour charger Battery and Charging Options Charging with the Drop-in Charging Tray Drop-in (Not included with all models) charging tray 1. Place the drop-in charging tray on a flat surface. 2. Insert the plug of the 10-hour charger into the jack of the drop-in charging tray. 3. Plug the charger into a power outlet. Insert the battery or radio into the tray with the Motorola logo or radio front facing the front of the charger and the contacts facing down. Note: To extend battery life, do not overcharge.
Channel 1 2 3 4 5 6 • Code: • Call Tone: • VOX: • Scramble: UHF Frequency Bandwidth 2 25.0 8 25.0 5 25.0 6 25.0 10 12.5 12 12.5 Battery and Charging Options XTN Series Factory Defaults Your XTN radio is programmed at the factory to the following settings. If you need to change settings, refer to Programming Features on page 31. VHF Frequency Bandwidth 3 25.0 4 25.0 1 25.0 2 25.0 10 25.0 12 25.
Keypad Lock 1. To maintain settings and lock keypad, press and hold \for three seconds. 2. To unlock, press and hold \for three seconds. With Compatible VOX Accessories 1. Turn radio off. 2. Open accessory cover. 3. Insert plug of audio accessory firmly into accessory jack. 4. Turn radio on. Radio displays: g. If flashing and for initial use, please refer to "Setting Vox Sensitivity" on page 28. 5. Lower radio volume BEFORE placing accessory near ear. 6.
Monitoring a Channel Check for channel activity. 1. Press and hold Q. You will hear static if the channel is clear and w 0 will display. 2. Press Q again to release. Talking and Receiving Scanning (XU2600 and XV2600 only) You can scan up to six channels and frequencies. When the radio detects activity, it stops scanning and locks in on the active channel. This allows you to talk and listen to the person transmitting without changing channels. 1. To start scanning, briefly press J.
Programming Features Programming Features You can change the following features by entering the programming mode (k).
Programming the Interference Eliminator Code The Interference Eliminator Code helps minimize interference by providing you with code combinations, which filter out static, noise, and unwanted messages. Interference 1. Enter Programming Mode as necessary, refer to “Entering Eliminator Programming Mode” on page 31. Code 2. Press \ until the Interference Eliminator Code display number begins to flash. 3. Press [ or ] to select the desired Code (See “Interference Eliminator Codes” beginning on page 48). 4.
4. Press and hold M to exit k. Note: Spirit GT radios operate at 12.5 kHz. The M Series radios may operate at 25.0 kHz or 12.5 kHz bandwidth if selectable. If you have questions on radio use, call 1-800-448-6686. Programming Call Tones Your radio can transmit call tones to other radios in your group so you can alert them that you are about to talk. The default is set to 0 (off) or you may choose 1, 2, or 3 to choose a distinctive call tone. 1.
Programming Features 1. Enter Programming Mode as necessary, refer to “Entering Programming Mode” on page 31. 2. Press \ until h displays and the channel and Y or n flashes. 3. Press [ or ] to increase or decrease the channel. 4. Press J to display either: Y to include the channel n to exclude the channel 5. Press and hold M to exit k. Cloning You can duplicate XSeries radio settings from one radio to another by using the optional accessory 53879 Multi-Unit Charger (MUC).
Advanced Features Turn Keypad Tones on/off You can disable keypad beeps for silent menu operation. [ On Turn End-of-Transmission Tone on/off When enabled, your two-way radio transmits a tone when you finish transmitting. It’s like saying “Roger” or “Over.” Note: If Keypad Tones are off, you will not hear the end-of-transmission tone but it is transmitted (if enabled). ] Off Advanced Features You can set the following features by pressing and holding additional button(s) while you turn on your radio.
Symptom Try This: No Power Recharge or replace battery 53871 battery (NTN8971 or NNTN4190). Reposition or replace alkaline batteries. For NickelMetal Hydride batteries, “Installing the Nickel-Metal Hydride Battery” on page 17 or “Battery and Charging Options” on page 22. Message not transmitted Make sure M is completely pressed while transmitting. Recharge, replace and/or reposition batteries. Verify the transmit light is illuminated while speaking.
Symptom Try This: Low batteries Recharge or replace battery or batteries. Extreme operating temperatures affect battery life. See “Battery Life” on page 24. Reinsert radio/battery. Clean battery/charger contacts. Verify that the charging pin is inserted correctly. AA cells installed in radio, remove and replace with NiMH battery.
Frequencies and Bandwidths The charts on the next few pages provide frequency information. These charts are useful when using Motorola X Series two-way radios with other business radios. Frequency Display Number is identical to Spirit M, GT and S-Series frequency position (where applicable). VHF Frequencies Display Frequency Number (MHz) Bandwidth 1 2 3 4 5 6 *7 *8 *9 10 11 12 13 14 15 151.6250 151.9550 154.5700 154.6000 151.7000 151.7600 151.8200 151.8800 151.9400 151.5125 151.6550 151.6850 151.7150 151.
UHF Frequencies (Continued) Display Number Frequency (MHz) Bandwidth Display Number Frequency (MHz) Bandwidth 29 462.9125 12.5 43 466.2625 12.5 30 464.4875 12.5 44 466.2875 12.5 31 464.5125 12.5 45 466.3125 12.5 32 464.5375 12.5 46 466.3375 12.5 33 464.5625 12.5 47 466.3625 12.5 34 466.0375 12.5 48 467.7875 12.5 35 466.0625 12.5 49 467.8375 12.5 36 466.0875 12.5 50 467.8625 12.5 37 466.1125 12.5 51 467.8875 12.5 38 466.1375 12.5 52 467.9125 12.
Digital Interference Eliminator Codes Display Number Digital Code Display Number Digital Code Display Number Digital Code 39 023 54 115 69 223 40 025 55 116 70 226 41 026 56 125 71 243 42 031 57 131 72 244 43 032 58 132 73 245 44 043 59 134 74 251 45 047 60 143 75 261 46 051 61 152 76 263 47 054 62 155 77 265 48 065 63 156 78 271 49 071 64 162 79 306 50 072 65 165 80 311 51 073 66 172 81 315 52 074 67 174 82 331 X 53
Verifying the M-Series Frequency and Code Setting The XSeries Two-Way radio replaces the Spirit M-Series radio. The factory default settings for both radios are identical. However, existing radios may have been programmed to different settings. To program your XSeries radio to talk with an M-Series radio, verify or change your M-Series settings as follows. 1. Press and hold M while you turn on the radio to enter programming mode. The radio announces current frequency for that channel.
Products Covered Products and Accessories as defined above, unless otherwise provided for below. Decorative Accessories and Cases. Decorative covers, bezels, PhoneWrap™ covers and cases. Professional Two-way Radio Accessories. Products and Accessories that are Repaired or Replaced. Length of Coverage One (1) year from the date of purchase by the first consumer purchaser of the product unless otherwise provided for below.
Exclusions Software Embodied in Physical Media. No warranty is made that the software will meet your requirements or will work in combination with any hardware or software applications provided by third parties, that the operation of the software products will be uninterrupted or error free, or that all defects in the software products will be corrected. Motorola Limited Warranty Altered Products.
Canada All Products 1-800-461-4575 TTY TTY 1-888-390-6456 For Accessories and Software, please call the telephone number designated above for the product with which they are used. You will receive instructions on how to ship the Products, Accessories or Software, at your expense, to a Motorola Authorized Repair Center.
ITC02-159 Motorola Limited Warranty Some states and jurisdictions do not allow the limitation or exclusion of incidental or consequential damages, or limitation on the length of an implied warranty, so the above limitations or exclusions may not apply to you. This warranty gives you specific legal rights, and you may also have other rights that vary from state to state or from one jurisdiction to another.
This product is controlled under the export regulations of the United States of America and Canada. The Governments of the United States of America and Canada may restrict the exportation or re-exportation of this product to certain destinations. For further information contact the U.S. Department of Commerce or the Canadian Department of Foreign Affairs and International Trade. Export Law Assurances Export Law Assurances Index 61 62 A Audio accessories ...................................
Index 64 Diagram ........................................... 20 Display............................................. 24 Functions and settings ..................... 21 Off ................................................... 19 On .................................................... 39 Operating ......................................... 26 Out of range..................................... 26 Range Talking............................................. 26 S Safety information ..................................
XSeries Programming Quick Reference Function Appearance Press & hold MQfor 3 sec. and turn on radio. k displays. *Channel 2 Use [or ] for1 through 6. Press \ until l displays. To change, press [or ]. Frequency *depending upon model *depending upon model Interference Eliminator Code *Scramble Code Bandwidth XSeries Programming Quick Reference Radio On *Available Channels Call Tone Microphone Gain *Scan List Visual 6 \as needed, then [or ] = E ? Y Press \ until = displays.
• Extend Your Productivity Provides a cost-effective solution to onsite communication needs. Designed for heavy duty, everyday industrial use. Well suited for construction, manufacturing, security, property management, retail, and more. • Simple and Easy to Operate • Cloning Capability Allows one-to-one or group • Business Exclusive Frequencies communication at the pus of a button. You can even customize the number of channels you want to operate on (XU2600 and XV2600).