TRANSTECH IV Transmission Service System Part No. 500-1125 USER MANUAL 1324 Blundell Rd. Mississauga ON Tel. 905.615.8620 Fax. 905.615.9745 www.motorvac.
Introduction Congratulations on your selection of the TRANSTECH IV Transmission Service System. By choosing this product, you are acquiring the most technologically advanced method available for automatic transmission service and fluid exchange. The TRANSTECH IV System is a self-contained system designed to connect to any automatic transmission through cooling system lines or vehicle dipstick tube.
Table of Contents Page System Features and Functions .………….....…………………………..................................................... 1 Control Panel Features and Functions ………………………………………………............…….………… 2 Getting to Know the TransTech IV…………………………………………………….....................………… 3 Front Features ….………………………………….……………….….....……............................... 3 Right View ….………………………………….……………….………………................................ 3 Left View ...……………………………………………............................
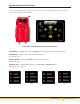
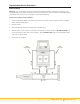
System Features and Functions The front of the TRANSTECH IV cabinet contains the control panel, the fluid fill neck for adding new transmission fluid, and the fluid level windows. Front View - Control Panel Features and Functions MODE Button - Toggles from Inline to Dipstick and enters manual mode for both functions INLINE LED - Unit set to Inline exchange when LED is on (see below, Fig. 1) DIPSTICK LED - Unit set to Dipstick exchange when LED is on (see below, Fig.
Control Panel Features and Functions START/RESUME Button - Begins & Resumes service DRAIN Button - Drains fluid from vehicle’s transmission. FILL Button – Adds fluid to the transmission. LOW VEHICLE FLUID LED - Illuminates when fluid in the vehicle in service is low or empty. COMPLETE LED - Illuminates when service is complete. START ENGINE LED – The LED illuminates when the vehicle’s engine is running in inline mode. The Start Engine LED flashes when the vehicle’s engine needs to be started.
Getting to Know the TransTech IV Front Features Control Panel – All electronic operational functions are initiated at this location. See Control panel features section. Filler Port & Cap – New ATF is poured into unit before service. Pressure Gauge – Indicates fluid flow through the unit when in Inline mode. Right Side Features Dipstick Adapter – Manifold that is permanently attached to DIPSTICK RETURN hose.
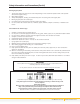
Safety Information and Precautions DANGER: 1. Vehicle exhaust gases contain carbon monoxide, which is a colorless and odorless lethal gas. 2. Only run engines in well-ventilated areas and avoid breathing exhaust gases. 3. Extended breathing of exhaust gases will cause serious injury or death. WARNING: 1. Exhaust gases, moving parts and hot surfaces are present during and after the engine is running. 2. Read and understand the operator’s manual before using the TRANSTECH IV service system. 3.
Safety Information and Precautions (Cont’d) Moving engine parts: 1. The engine cooling fan will cycle on and off depending on the coolant temperature and could operate without the engine running. 2. Wear safety goggles. 3. Always keep objects, clothing, and hands away from the cooling fans and engine parts. 4. Moving engine parts can cause injury. 5. Hot surfaces are present during and after running the engine. 6.
TransTech IV Auto-Prime Procedure (For first time set-up only) Set-Up Instructions: 1. Check the output/return hoses, battery connections, and all external components for damage. 2. Fill the CLEAN FLUID tank with approximately 6 quarts (5.7 liters) of new ATF. 3. Connect two compatible adapters to each other, secure tightly. Attach the CLEAN FLUID & INLINE RETURN hoses together using the connected adapters 4. Place the waste hose into the clean tank fill neck with the ball valve open. 5.
Transmission Service Procedure Inline Exchange Warning: It is not necessary to empty the waste tank before beginning an exchange. If beginning an exchange with fluid in the waste tank ensure that there is less fluid in the clean tank than the remaining capacity of the waste tank. Failure to do so will result in waste tank overflowing! Connection to Vehicle using H-Adapter 1. Connect appropriate adapters to vehicle transmission cooler lines. Attach opposite ends to H-adapter. Ensure valve is partially open.
Inline Exchange (Cont’d) Control Panel Pressure Gauge Automatic Fluid Exchange Operation. 1. Make sure the TransTech IV new fluid tank is filled with the correct type and amount of Transmission Fluid. 2. Connect TransTech IV power leads to the vehicle’s battery. 3. With vehicle running, pressure should be present at the TransTech IV pressure gauge and the START ENGINE light should be on solid. If pressure drops to zero, and START ENGINE light is flashing, the hoses may be reversed. 4.
Optional Procedure - Drain Pan for Filter Change Warning: It is not necessary to empty the waste tank before beginning an exchange. If beginning an exchange with fluid in the waste tank ensure that there is less fluid in the clean tank than the remaining capacity of the waste tank. Failure to do so will result in waste tank overflowing! 1. Make sure the TransTech IV new fluid tank is filled with the correct type and amount of transmission fluid. 2. Connect TransTech IV power leads to the vehicle’s battery.
Dipstick Exchange Warning: It is not necessary to empty the waste tank before beginning an exchange. If beginning an exchange with fluid in the waste tank ensure that there is less fluid in the clean tank than the remaining capacity of the waste tank. Failure to do so will result in waste tank overflowing! 1. Fill the TransTech IV new fluid tank with the correct type and amount of Transmission Fluid. 2. Connect TransTech IV power leads to the vehicle’s battery. 3.
Dipstick Exchange (Cont’d) 7. The DRAIN light is on solid. Initial drain cycle begins. 8. Once fluid flow has stopped, service pauses, FILL light flashes. The operator can continue with service or remove the drain pan if drain pan service is required. 9. Press FILL button to continue service. The unit will refill the same amount of fluid that was drained from the transmission oil pan. After the initial Fill sequence, the unit will pause and the START ENGINE light will flash. 10. Start the engine. 11.
Changing Fluid Types Follow these steps if it is necessary to completely empty the clean fluid tank in order to change to another type of fluid. 1. Install an open adapter in the clean hose coupler. Install hose into a capture container. 2. Connect power cord to a 12 volt DC source. Press the MODE button until both the In-Line and Manual LED’s are on. 3. Press & hold the FILL button. The pump will operate until the FILL button is released. 4.
Maintenance Procedures The following maintenance procedures should be performed on a routine basis: 1. Carefully clean the exterior with a soft cloth to keep the cabinet looking new. Check the cabinet for dents or impact markings, if found, inspect for damaged components. 2. Check all hoses and wires for cuts or frays. 3. Clean the filter screens after every 100 services or 4. 6 months, which ever comes first. See the next section for procedure. Cleaning the Unit’s Internal Filters 1.
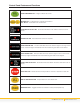
Troubleshooting and Additional Help Refer to the list below troubleshooting assistance. Problem Possible Cause 1. Unit does not power-up. No LED’s are illuminated Polarity is reversed on vehicle battery connection. Check connection to battery for a loose condition. Circuit breaker may be tripped. (Automatic reset). Faulty battery 2. Start light does not stop blinking when the engine is started. Observe pressure gauge to see if fluid/pressure is reaching the machine.
Error Alerts The TransTech IV has been designed to stop the service and alert the operator in certain instances if the unit is not functioning properly. There are 2 different notifications, one that occurs while draining and the other while the unit is filling. See below for details. Alert Notification Cause Hardware Troubleshooting steps Fill Error The alarm sounds. There is a hardware or software problem that has caused the unit to lose track of how much fluid is in the Clean Tank.
Description Picture ID Mark Vehicles Deluxe Adapter Kit 200-3101A Mating Part Standard Adapter Kit 200-3100A 11/22/13 In Euro Kit 2003120 TransTech System Accessories 1 060-0450 Hose Clamp 7/8” I.D.
Description 060-2110 NA Adapter Trans Opel Corsa Picture ID Mark Vehicles 110 Opel Corsa Deluxe Adapter Kit 200-3101A Mating Part Standard Adapter Kit 200-3100A 11/22/13 In Euro Kit 2003120 TransTech System Accessories 1 1 060-2300 14 mm Female 060-2402 060-2740 14mm x 1.5 Banjo Euro / Asia Vehicles 060-2600 060-2300 060-2700 16mm x 1.5 Bubble Flare European Vehicles Union - M 14mm X 16mm European Vehicles 2 1 1 1 1 060-2700 060-2740 060-2402 14mm x 1.
Mating Part Description 062-2061 062-2062 Volvo 850 Application, Volvo V-70 All Wheel Drive Male O-Ring Type / Flange Style Volvo 850 Application, Volvo V-70 All Wheel Drive O’Ring P/N: 080-3602 062-2062 062-2061 Volvo 850 Application, Volvo V-70 All Wheel Drive Female receptacle / Flange Style Volvo 850 Application, Volvo V-70 All Wheel Drive 062-2064 Volvo ‘S’ Series Application Male O-Ring Type / Push Lock Style Volvo ‘S’ Series Application Volvo 'V' & 'XC' O'ring:P/N 080-2326 1 062-2063 0
Parts Service Parts for the TRANSTECH IV Transmission System. Please refer to the part numbers below when ordering parts for this unit. Part # 010-0027 010-1052 011-0003 010-5004 010-5500 010-5602 010-6060 010-6101 040-0507 040-0604 040-2200 050-1000 050-1928 200-0061 200-0085 200-1101 200-1109 200-1113 200-1604 200-3102 200-8612 200-8650 200-8665 200-9001 ZIM10-00243 20-8043 030-0055 Description Wheel (8 x 1.
20 info@motorvac.com www.motorvac.
ZIM10-00220 Rev5 1324 Blundell Rd. Mississauga ON Tel. 905.615.8620 Fax. 905.615.9745 www.motorvac.