
User Manual


CUEMIX FX
92
DSP METER
The DSP meter (Figure 9-1) shows how much of
the available DSP processing power is currently
being used by the 828x for effects processing. DSP
resources are allocated in channel order from the
first input to the last output. If there aren’t enough
DSP resources for all effects to be enabled on a
channel, none of them are allocated on that
channel or any following channel.
EQ on a stereo channel requires approximately
twice the DSP resources as the same EQ on a mono
channel. The Compressor (2.5 x 1 EQ band) and
Leveler (4 x 1 EQ band) require about the same
DSP resources for a mono or stereo channel.
SOLO LIGHT
The Solo light (Figure 9-1) illuminates when any
input in the current (active) mix bus is soloed
(even if it is currently scrolled off-screen).
TALKBACK AND LISTENBACK
CueMix FX provides Tal kb a c k and Listenback
buttons. Talkback allows an engineer in the control
room to temporarily dim all audio and talk to
musicians in the live room. Conversely, Listenback
allows musicians to talk to the control room.
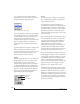
Hardware setup
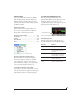
Figure 9-25 below shows a typical hardware setup
for Talkback and Listenback. For Talkback, set up a
dedicated mic in your control room and connect it
to a mic input on your MOTU audio interface. For
Listenback, set up a dedicated listenback mic in the
live room for the musicians and connect it to
another mic input (or just use one of the mics you
are recording from). For talkback output, set up a
headphone distribution amp or set of speakers in
the live room, and connect it to any 828x output, as
demonstrated below in Figure 9-25.
Figure 9-25: Typical hardware setup for Talkback and Listenback.
Talkback / Listenback Mic Input
To configure the talkback mic in CueMix FX, go to
the Inputs tab (Figure 9-3 on page 74) and click the
Focus button for the input that the talkback mic is
connected to. Click the Channel tab (Figure 9-8 on
page 78) and enable the Talk button.
Repeat this procedure for the Listenback mic,
except click the Listen button in the Channel tab.
Talk / Listen output
To configure the talkback and listen back outputs,
go to the Outputs tab (Figure 9-6 on page 77) and
enable the Ta l k button for any output pair on which
you’d like to hear the talkback mic. Similarly,
enable the Listen button for any output pair on
which you’d like to hear the listenback mic.
Talkback / Listenback Monitor Dim
Use the knobs next to the Talk and Listen buttons
(Figure 9-26) to determine the amount of
attenuation you would like to apply to all other
audio signals (besides the talkback/listenback
signal) when Talkback and/or Listenback is
Listenback
mic
Control room
Talkback
mic
Main outs
Live room
Analog out 7-8
Headphone distribution amp