
User Manual


INSTALLING THE MICROBOOK HARDWARE
19
CONNECT INPUTS AND OUTPUTS
Here are a few things to keep in mind as
you connect other devices.
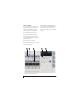
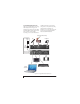
Mic input with preamp
Connect a dynamic or condenser
microphone to the mic input (Figure 4-7)
with a standard mic cable.
☛ Do not connect a +4 (line level) input
to the mic input (because it will overdrive
the preamp).
Phantom power
If you are connecting a condenser
microphone or other device that requires
48V phantom power, you can enable
phantom power for the mic input using
the MIC knob on the top panel: push and
hold the knob to toggle 48V, as indicated
by the 48V LED. See “Quick Reference:
MicroBook Top Panel” on page 6.
Alternately, you can use the MicroBook’s
CueMix FX software. See “Input settings”
on page 21.
☛ Make sure 48V power is
turned OFF before plugging
anything in to the mic input.
Only engage 48V power when a device
that requires it is plugged in.
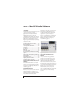
20 dB pad
If the input signal is still too hot with the
trim turned all the way down, engage the
-20dB pad by pushing the MIC knob or
by enabling it in the CueMix FX Channel
tab (Figure 4-9). See “Input settings” on
page 21.
Guitar input
Plug in your guitar to the guitar input
(Figure 4-7). You can trim the level using
the CueMix FX software. See “Input
settings” on page 21.
For ultra-realistic sound and feel when
producing guitar tones with processing
software (amp modeling, cabinet
modeling, virtual effects pedals, etc.),
consider using MOTU’s ZBox guitar
impedance adapter (sold separately),
which adds proper impedance character-
istics that cannot be modeled in software.
Visit motu.com for details.
Line level inputs
The quarter-inch analog line level inputs
3-4 (Figure 4-8) are balanced (TRS)
connectors that can also accept an
unbalanced plug. Alternately, you can use
the eighth-inch stereo mini plug for line
level input (from an iPod or other
source).
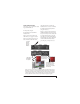
Figure 4-7: MicroBook IIc front panel