!8pre Manual/Mac Page 1 Tuesday, October 12, 2010 5:52 PM MOTU 8pre ™ User’s Guide for Mac OS X 1280 Massachusetts Avenue Cambridge, MA 02138 Business voice: (617) 576-2760 Business fax: (617) 576-3609 Technical support: (617) 576-3066 Tech support fax: (617) 354-3068 Tech support email: techsupport@motu.com Web site: www.motu.
!8pre Manual/Mac Page 2 Tuesday, October 12, 2010 5:52 PM SAFETY PRECAUTIONS AND ELECTRICAL REQUIREMENTS CAUTION! READ THIS SAFETY GUIDE BEFORE YOU BEGIN INSTALLATION OR OPERATION. FAILURE TO COMPLY WITH SAFETY INSTRUCTIONS COULD RESULT IN BODILY INJURY OR EQUIPMENT DAMAGE. HAZARDOUS VOLAGES: CONTACT MAY CAUSE ELECTRIC SHOCK OR BURN. TURN OFF UNIT BEFORE SERVICING. WARNING: TO REDUCE THE RISK OF FIRE OR ELECTRICAL SHOCK, DO NOT EXPOSE THIS APPLIANCE TO RAIN OR OTHER MOISTURE.
!8pre Manual/Mac Page 0 Tuesday, October 12, 2010 5:52 PM About the Mark of the Unicorn License Agreement and Limited Warranty on Software TO PERSONS WHO PURCHASE OR USE THIS PRODUCT: carefully read all the terms and conditions of the “click-wrap” license agreement presented to you when you install the software. Using the software or this documentation indicates your acceptance of the terms and conditions of that license agreement. Mark of the Unicorn, Inc.
!8pre Manual/Mac Page iii Tuesday, October 12, 2010 5:52 PM Contents 5 Quick Reference: 8pre Front Panel 6 Quick Reference: 8pre Rear Panel 7 Quick Reference: MOTU Audio Setup 9 About the 8pre 13 Packing List and Macintosh System Requirements 15 Installing the 8pre Hardware 21 Installing the 8pre Mac OS X Software 25 MOTU Audio Setup 29 Front Panel Settings 31 Digital Performer 35 AudioDesk 39 Other Mac OS X Audio Software 45 Reducing Monitoring Latency 51 MOTU CueMix Console 59
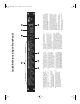
Turn it to adjust headphone volume. In the LED section to the right, the row of amber LEDs, second from the top, provides general feedback regarding the headphone level as you turn the knob. Push in the knob twice (so that it clicks two times) and then turn it to adjust the volume of the main outs on the rear panel. In the LED section to the right, the middle row of green LEDs, third from the bottom, provides general feedback regarding the headphone level as you turn the knob.
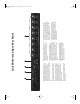
2 3 When the 8pre is slaving to its optical input, it resolves to the input in the top row, even when operating at the 2x sample rates (88.2 or 96 kHz). When the 8pre is not connected directly to a computer (via FireWire), the optical input is disabled and the eight optical output channels mirror any incoming signal on the 8pre’s eight XLR/TRS combo jack analog inputs.
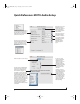
!8pre Manual/Mac Page 7 Tuesday, October 12, 2010 5:52 PM Quick Reference: MOTU Audio Setup CHAPTER Click the tabs to access general MOTU interface settings or settings specific to the 8pre (or other connected interface.) Determines the clock source for your 8pre. If you’re just using the analog ins and outs, set this to ‘Internal’. The other settings are for digital transfers (via optical) or external synchronization to other systems. This menu lets you choose what you will hear from the headphone jack.
!8pre Manual/Mac Page 8 Tuesday, October 12, 2010 5:52 PM 8
!8pre Manual/Mac Page 9 Tuesday, October 12, 2010 5:52 PM CHAPTER 1 About the 8pre OVERVIEW The 8pre is and audio interface that can operate in two general modes: as a FireWire audio interface or as an analog-to-digital converter. With a standard 19-inch, single-space, rackmountable I/O form factor, the 8pre connects directly to a computer via a standard FireWire cable or to another interface via an ADAT optical cable.
!8pre Manual/Mac Page 10 Tuesday, October 12, 2010 5:52 PM ■ Two 6-pin FireWire jacks 16 inputs and 12 outputs When operating as a FireWire audio interface, all 8pre inputs and outputs can be used simultaneously, for a total of 16 inputs and 12 outputs: Connection Input Output Mic preamps 24-bit 96kHz on XLR/TRS combo 8 - Main outputs 24-bit 96kHz on bal/unbal TRS - stereo Headphone output - stereo ADAT optical digital (from 44.
!8pre Manual/Mac Page 11 Tuesday, October 12, 2010 5:52 PM FireWire interfaces — on a single FireWire bus. It can also be used to connect other FireWire devices without the need for a FireWire hub. On-board SMPTE synchronization The 8pre can resolve directly to SMPTE time code via any analog input, without a separate synchronizer. The 8pre provides a DSP-driven phase-lock engine with sophisticated filtering that provides fast lockup times and sub-frame accuracy.
!8pre Manual/Mac Page 12 Tuesday, October 12, 2010 5:52 PM Standard third-party high-performance hard drive solutions can also help you achieve higher track counts.
!8pre Manual/Mac Page 13 Tuesday, October 12, 2010 5:52 PM CHAPTER 2 Packing List and Macintosh System Requirements PACKING LIST PLEASE REGISTER TODAY! The 8pre ships with the items listed below. If any of these items are not present in your 8pre box when you first open it, please immediately contact your dealer or MOTU. Please register your 8pre today. There are two ways to register.
!8pre Manual/Mac Page 14 Tuesday, October 12, 2010 5:52 PM 14 PACKING LIST AND MACINTOSH SYSTEM REQUIREMENTS
!8pre Manual/Mac Page 15 Tuesday, October 12, 2010 5:52 PM CHAPTER 3 Installing the 8pre Hardware OVERVIEW CONNECT THE 8PRE TO YOUR COMPUTER Here’s an overview for installing the 8pre: 1 Plug one end of the 8pre FireWire cable (included) into the FireWire socket on the computer as shown below in Figure 3-1. Connect the 8pre to your computer . . . . . . . . . . . . . . . . . 15 Connect the 8pre to the computer. Connect audio inputs and outputs . . . . . . . . . . . . . . . . . .
!8pre Manual/Mac Page 16 Tuesday, October 12, 2010 5:52 PM CONNECT AUDIO INPUTS AND OUTPUTS The 8pre audio interface has the following audio input and output connectors: 8 combo XLR/quarter-inch analog mic/guitar/ instrument inputs ■ ■ 2 balanced, +4 dB quarter-inch TRS main outs ■ 2 pair of ADAT optical (“Lightpipe”) in/out Here are a few things you should keep in mind as you are making these connections to other devices.
!8pre Manual/Mac Page 17 Tuesday, October 12, 2010 5:52 PM combo jack analog inputs. By connecting the 8pre optical output to another device, such as another ADAT-optical equipped interface or a digital mixer, you add an additional eight mic inputs to your system, as demonstrated in Figure 3-5 on page 19. This can be done at any sample rate up to 96 kHz. To set the sample rate (or clock mode) when operating as an 8-channel optical expander, see “Setting the clock source in converter mode” on page 29.
!8pre Manual/Mac Page 18 Tuesday, October 12, 2010 5:52 PM OPERATING THE 8pre AS AN INTERFACE Here is a typical studio setup for using the 8pre as an audio interface. All mixing and processing can be done in the computer with audio software. During recording, you can use the 8pre’s CueMix™ DSP no-latency monitoring to listen to what you are recording via the main outs, headphone outs, or any other output pair. You can control monitoring from the included MOTU CueMix Console software.
!8pre Manual/Mac Page 19 Tuesday, October 12, 2010 5:52 PM OPERATING THE 8pre AS A CONVERTER As explained earlier in “Using optical I/O to operate the 8pre as an 8-channel expander” on page 16, the 8pre can serve as an 8-channel analogto-digital converter when disconnected from the computer and instead connected to another device equipped with an ADAT optical input.
!8pre Manual/Mac Page 20 Tuesday, October 12, 2010 5:52 PM SYNCING OPTICAL DEVICES The word optical is our short-hand way of referring to any device that connects to the 8pre via an optical cable. An example is an audio interface with optical connectors on it. There are many other devices that fall into this category, including digital mixers, digital effects processors, synthesizers and many more.
!8pre Manual/Mac Page 21 Tuesday, October 12, 2010 5:52 PM CHAPTER 4 Installing the 8pre Mac OS X Software OVERVIEW Software installation for Mac OS X . . . . . . . . . . . . . . . . . . . 21 MOTU CueMix Console . . . . . . . . . . . . . . . . . . . . . . . . . . . . . . 23 AudioDesk workstation software . . . . . . . . . . . . . . . . . . . . 23 SOFTWARE INSTALLATION FOR MAC OS X Install the 8pre software as follows: 1 Insert the MOTU Audio Installer disc and launch the installer.
!8pre Manual/Mac Page 22 Tuesday, October 12, 2010 5:52 PM CoreMIDI and Audio MIDI Setup CoreMIDI is the “under-the-hood” portion of Mac OS X that handles MIDI services for MIDI hardware and software. CoreMIDI provides many universal MIDI system management features, including MIDI communication between your 8pre interface and all CoreMIDI compatible software.
!8pre Manual/Mac Page 23 Tuesday, October 12, 2010 5:52 PM MOTU CUEMIX CONSOLE This program provides a mixing console that gives you control over the 8pre’s no-latency CueMix DSP features. For details, see chapter 11, “MOTU CueMix Console” (page 51). AUDIODESK WORKSTATION SOFTWARE The MOTU audio installer places AudioDesk in the Applications folder. Figure 4-3: Connecting devices to the 8pre.
!8pre Manual/Mac Page 24 Tuesday, October 12, 2010 5:52 PM 24 INSTALLING THE 8PRE MAC OS X SOFTWARE
!8pre Manual/Mac Page 25 Tuesday, October 12, 2010 5:52 PM CHAPTER 5 MOTU Audio Setup OVERVIEW Accessing the 8pre settings. . . . . . . . . . . . . . . . . . . . . . . . . . 25 ‘8pre’ tab Settings. . . . . . . . . . . . . . . . . . . . . . . . . . . . . . . . . . . . 26 Sample Rate . . . . . . . . . . . . . . . . . . . . . . . . . . . . . . . . . . . . . . . . . 26 Clock Source . . . . . . . . . . . . . . . . . . . . . . . . . . . . . . . . . . . . . . . . . 26 Default Stereo Input/Output. . . . . . . .
!8pre Manual/Mac Page 26 Tuesday, October 12, 2010 5:52 PM ‘8PRE’ TAB SETTINGS Sample Rate Choose the desired Sample Rate for recording and playback. The 8pre can operate at 44.1 (the standard rate for compact disc audio), 48, 88.2 or 96 kHz. Make absolutely sure that all of the devices connected digitally to the 8pre match the 8pre’s sample rate. Also make sure that your Digital Timepiece, MIDI Timepiece AV or other digital audio synchronizer matches it as well.
!8pre Manual/Mac Page 27 Tuesday, October 12, 2010 5:52 PM 96 kHz). In ADAT optical clock mode, the 8pre always resolves to the optical input in the top row, even during 88.2 or 96 kHz operation. So be sure to connect the ADAT optical clock master to the optical input in the top row. If the ADAT Optical setting does not appear in the menu, it means that the 8pre’s optical input is currently turned off. Choose the ADAT optical format from the Optical input menu (Figure 5-1 on page 26).
!8pre Manual/Mac Page 28 Tuesday, October 12, 2010 5:52 PM Phones The Phones setting lets you choose what you will hear from the headphone jack. Choose Main Outs 1-2 if you’d like the headphone output to match the main outs. Choose Phones 1-2 if you would like the headphones to serve as their own independent output, which you can access as an independent output destination in your host audio software and as an output destination for the four on-board CueMix DSP mix busses.
!8pre Manual/Mac Page 29 Tuesday, October 12, 2010 5:52 PM CHAPTER 6 Front Panel Settings OVERVIEW The VOLUME knob is a rotary encoder that can be pushed as well as turned. By pushing it repeatedly, or by pushing and holding it in for varying amounts of time, you can adjust several 8pre settings as described in the following sections. Figure 6-1: The VOLUME knob is a push-button rotary encoder.
!8pre Manual/Mac Page 30 Tuesday, October 12, 2010 5:52 PM flashes, turn the knob to change the clock mode. Push it again to confirm the current clock setting exit clock mode.
!8pre Manual/Mac Page 31 Tuesday, October 12, 2010 5:52 PM CHAPTER 7 Digital Performer OVERVIEW This chapter provides a brief overview of Digital Performer’s basic I/O and synchronization operation with the 8pre hardware. Setting up your system . . . . . . . . . . . . . . . . . . . . . . . . . . . . . . The 8pre settings . . . . . . . . . . . . . . . . . . . . . . . . . . . . . . . . . . . . Be sure you have enough voices . . . . . . . . . . . . . . . . . . . . . Trimming the mic/instrument inputs . . .
!8pre Manual/Mac Page 32 Tuesday, October 12, 2010 5:52 PM rate. Imported audio or soundbites in existing files that do not match this sample rate will be displayed in the Soundbites window with a red ‘X’ on its move handle to indicate that it cannot be played. Clock Source This setting is very important because it determines which audio clock the 8pre will follow.
!8pre Manual/Mac Page 33 Tuesday, October 12, 2010 5:52 PM 1 Record-enable a track in Digital Performer. 2 Choose the desired 8pre mic input for the track. 3 Open the Audio Monitor or Meter Bridge window. 4 As you feed signal to the input, adjust the input’s corresponding trim knob on the front panel of the 8pre until peaks in the level meter are as high as possible without clipping (hitting zero dB).
!8pre Manual/Mac Page 34 Tuesday, October 12, 2010 5:52 PM DP project. To export a project to AudioDesk, use DP’s Save As command and choose the AudioDesk 2.0 file format.
!8pre Manual/Mac Page 35 Tuesday, October 12, 2010 5:52 PM CHAPTER 8 AudioDesk OVERVIEW This chapter provides a brief overview of AudioDesk’s basic I/O and synchronization operation with the 8pre hardware. For complete information about all of AudioDesk’s powerful workstation features, see the AudioDesk manual included with your MOTU 8pre system. Setting up your system . . . . . . . . . . . . . . . . . . . . . . . . . . . . . . The 8pre settings . . . . . . . . . . . . . . . . . . . . . . . . . . . . . .
!8pre Manual/Mac Page 36 Tuesday, October 12, 2010 5:52 PM Sample rate Choose the desired overall sample rate for the 8pre system and AudioDesk. Newly recorded audio in AudioDesk will have this sample rate. Imported audio or soundbites in existing files that do not match this sample rate will be displayed in the Soundbites window with a red ‘X’ on its move handle to indicate that it cannot be played. Clock Source This setting is very important because it determines which audio clock the 8pre will follow.
!8pre Manual/Mac Page 37 Tuesday, October 12, 2010 5:52 PM 2 Choose the desired 8pre mic input for the track. 3 Open the Audio Monitor window. 4 As you feed signal to the input, adjust the input’s corresponding trim knob on the front panel of the 8pre until peaks in the level meter are as high as possible without clipping (hitting zero dB).
!8pre Manual/Mac Page 38 Tuesday, October 12, 2010 5:52 PM File menu and choose the AudioDesk 2.0 file format. Then open the resulting AudioDesk 2.0 document in AudioDesk. AUDIODESK AND MIDI SEQUENCING AudioDesk can play audio as a background application, allowing you to run a sequencer at the same time in the foreground.
!8pre Manual/Mac Page 39 Tuesday, October 12, 2010 5:52 PM CHAPTER 9 Other Mac OS X Audio Software OVERVIEW PREPARING MIDI INPUT AND OUTPUT The 8pre provides multichannel audio and MIDI input and output for all Mac OS X audio applications, including Apple’s Logic Pro, Logic Express, SoundTrack Pro and GarageBand. Other third-party software applications are also supported, such as Ableton Live, Propellerhead Reason, Steinberg Cubase and others.
!8pre Manual/Mac Page 40 Tuesday, October 12, 2010 5:52 PM Sample rate Choose the desired overall sample rate for the 8pre system and your host audio software. Newly recorded audio will have this sample rate. Clock Source This setting is very important because it determines which audio clock the 8pre will follow.
!8pre Manual/Mac Page 41 Tuesday, October 12, 2010 5:52 PM Soundtrack Pro In Soundtrack Pro, access the preferences window, click the Recording tab and choose MOTU 8pre from the Input and Monitor menu as shown below in Figure 9-3. Live In Ableton Live, access the preferences window and click the Audio tab. Choose CoreAudio from the Driver Type menu. Choose the MOTU 8pre from the Input Audio Device and Output Audio Device menus as shown below in Figure 9-5.
!8pre Manual/Mac Page 42 Tuesday, October 12, 2010 5:52 PM Reason In Propellerhead Reason, go to the Preferences window, choose Audio preferences from the menu and choose MOTU 8pre from the Audio Card menu as shown below in Figure 9-6. For information about the Buffer Size setting, see “Adjusting the audio I/O buffer” on page 47. Cubase SX and Nuendo Go to the Devices menu and choose Device Setup.
!8pre Manual/Mac Page 43 Tuesday, October 12, 2010 5:52 PM AUDIO INPUT AND OUTPUT NAMES The 8pre CoreAudio driver supplies text string labels for its inputs and outputs to clearly identify each one, but some applications do not display these labels.
!8pre Manual/Mac Page 44 Tuesday, October 12, 2010 5:52 PM NUMBER OF CHANNELS PROCESSING LIVE INPUTS WITH PLUG-INS If your host audio software requires that you specify the number of audio voices or channels you will be using, be sure to choose enough channels to cover the 16 inputs and 12 outputs provided by your 8pre — although the number of channels may depend on how your 8pre is configured: If you patch a live input (such as MIDI synthesizer) through a plug-in effect in your host software, you might
!8pre Manual/Mac Page 45 Tuesday, October 12, 2010 5:52 PM CHAPTER 10 Reducing Monitoring Latency OVERVIEW When operating the 8pre as an audio interface, monitoring latency is that slight delay you hear when you run an input signal through your host audio software. For example, you might hear it when you drive a live mic input signal through a reverb plug-in running in your audio sequencer.
!8pre Manual/Mac Page 46 Tuesday, October 12, 2010 5:52 PM MONITORING LIVE INPUT There are two ways to monitor live audio input with an 8pre: 1) through the computer or 2) via CueMix™ DSP hardware monitoring. Figure 10-1 below shows method 1, which allows you to add effects processing such as reverb and guitar amp effects via plug-ins in your audio software.
!8pre Manual/Mac Page 47 Tuesday, October 12, 2010 5:52 PM ADJUSTING THE AUDIO I/O BUFFER A buffer is a small amount of computer memory used to hold data. For audio interfaces like the 8pre, buffers are used for the process of transferring audio data in and out of the computer. The size of the buffers determines how much delay you hear when monitoring live inputs through your audio software: larger buffers produce more delay; smaller buffers produce less.
!8pre Manual/Mac Page 48 Tuesday, October 12, 2010 5:52 PM ■ How responsive the transport controls are in AudioDesk, Digital Performer or other audio software Figure 10-4: In Cubase SX or Nuendo, choose Devices menu> Device Setup and click VST Audiobay to access the window above and the Audio Buffer Size setting. The buffer setting presents you with a trade-off between the processing power of your computer and the delay of live audio as it is being patched through your software.
!8pre Manual/Mac Page 49 Tuesday, October 12, 2010 5:52 PM Effects processing and automated mixing Reducing latency with the buffer size setting has another benefit: it lets you route live inputs through the real-time effects processing and mix automation of your audio software. CUEMIX DSP HARDWARE MONITORING The 8pre has a more direct method of patching audio through the system. This method is called CueMix DSP. When enabled, CueMix activates hardware patch-thru in the 8pre itself.
!8pre Manual/Mac Page 50 Tuesday, October 12, 2010 5:52 PM Follow the directions below in the section that applies to you. Controlling CueMix DSP from within AudioDesk or Digital Performer To turn on CueMix DSP in AudioDesk and Digital Performer: 1 From the Setup menu, choose Configure Audio System>Input Monitoring Mode. 2 Choose the Direct hardware playthrough option, as shown below in Figure 10-7.
!8pre Manual/Mac Page 51 Tuesday, October 12, 2010 5:52 PM CHAPTER 11 MOTU CueMix Console OVERVIEW When operating the 8pre as an audio interface, MOTU CueMix Console provides access to the flexible on-board mixing features of the 8pre. CueMix lets you route any combination of inputs to any stereo output pair. These mixes can be set up entirely independently of your host audio software. CueMix allows you to set up four completely independent mix configurations with the 8pre.
!8pre Manual/Mac Page 52 Tuesday, October 12, 2010 5:52 PM ADVANTAGES OF CUEMIX MONITORING CueMix Console provides several major advantages over monitoring live inputs through your host audio software: ■ CueMix has no buffer latency. Thanks to the 8pre’s DSP chip, CueMix provides the same throughput performance as a digital mixer. CueMix imposes absolutely no processor drain on the computer’s CPU. ■ ■ CueMix routing can be maintained independently of individual software applications or projects.
!8pre Manual/Mac Page 53 Tuesday, October 12, 2010 5:52 PM Master fader The master fader (Figure 11-1) controls the overall level of the mix (its volume on its stereo output). Use the individual input faders to the left to control individual input levels. Output level meters The OUT level meters show you the output for the mix’s physical output, which may include audio from your host audio software. The clip indicators clear themselves after a few seconds.
!8pre Manual/Mac Page 54 Tuesday, October 12, 2010 5:52 PM the Load Preset and Save Preset commands to get presets from — and save them to — the 8pre itself.) Click the Save button to save the current configuration; click the Load button to open an existing configuration that you have previously saved on disk.
!8pre Manual/Mac Page 55 Tuesday, October 12, 2010 5:52 PM Talkback / Listenback Mic Input Choose the audio input to which your Talkback and/or Listenback mic is connected. These inputs are labeled with a purple and blue swatch, respectively, just above the channel fader. These labels identify the Talkback and Listenback mic inputs. Engaging/disengaging Talkback and Listenback To engage Talk back or Listenback, press on the Talk or Listen buttons and then release to disengage.
!8pre Manual/Mac Page 56 Tuesday, October 12, 2010 5:52 PM When the Mix1 return includes computer menu item is checked, any audio being sent from your audio software on the computer to the same output as Mix1 will be included in the Mix1 return bus. When it is unchecked, computer output is excluded. This menu item is essentially a pre/post switch for the computer audio insert to the stream of audio going to Mix1’s 8pre output pair (and also back to the computer).
!8pre Manual/Mac Page 57 Tuesday, October 12, 2010 5:52 PM Enabled Check this menu item to turn on control surface operation of CueMix Console. Uncheck it to turn off control surface support. Configure… Choose this menu item to configure your control surface product. Launch the on-line help for specific, detailed instructions for configuring CueMix Console for operation with your control surface product.
!8pre Manual/Mac Page 58 Tuesday, October 12, 2010 5:52 PM 58 MOTU CUEMIX CONSOLE
!8pre Manual/Mac Page 59 Tuesday, October 12, 2010 5:52 PM CHAPTER 12 MOTU SMPTE Setup OVERVIEW MOTU SMPTE SETUP The 8pre can resolve directly to SMPTE time code via any analog input, without a separate synchronizer. The 8pre can also generate time code via any analog output. The 8pre provides a DSPdriven phase-lock engine with sophisticated filtering that provides fast lockup times and subframe accuracy. Direct time code synchronization is supported by AudioDesk and Digital Performer on Mac OS X.
!8pre Manual/Mac Page 60 Tuesday, October 12, 2010 5:52 PM and switch to the incoming frame rate, except that it cannot distinguish between 30 fps and 29.97 fps time code. So if you are working with either of these rates, make sure you choose the correct rate from this menu. The 8pre driver updates the frame rate setting in Digital Performer and AudioDesk for you. Freewheel Address Freewheeling occurs when there is a glitch or drop-out in the incoming time code for some reason.
!8pre Manual/Mac Page 61 Tuesday, October 12, 2010 5:52 PM The 8pre cannot freewheel address without clock. Therefore, the Freewheel Address setting will always be lower than or equal to the Freewheel Clock setting, and both menus will update as needed, depending on what you choose. The ‘Infinite’ freewheel setting The Infinite freewheel setting in the Freewheel Clock menu causes the 8pre to freewheel indefinitely, until it receives readable time code again.
!8pre Manual/Mac Page 62 Tuesday, October 12, 2010 5:52 PM SETTING UP FOR SMPTE TIME CODE SYNC Use this setup if you have: In summary, the 8pre system can resolve directly to SMPTE time code. It can also generate time code and a time base, under its own clock or while slaving to time code. Therefore, the 8pre can act both as an audio interface and digital audio synchronizer.
!8pre Manual/Mac Page 63 Tuesday, October 12, 2010 5:52 PM RESOLVING DP OR AUDIODESK TO SMPTE TIME CODE To resolve your Digital Performer/8pre system directly to SMPTE time code with no additional synchronization devices, use the setup shown below in Figure 12-3. Choose Receive Sync from the Setup menu and choose the Sample accurate option. Then make sure that the Slave to External Sync command in the Studio menu is checked. Make sure the Clock Source setting in the MOTU Audio Setup window is set to SMPTE.
!8pre Manual/Mac Page 64 Tuesday, October 12, 2010 5:52 PM 64 MOTU SMPTE SETUP
!8pre Manual/Mac Page 65 Tuesday, October 12, 2010 5:52 PM CHAPTER 13 Troubleshooting Sample accurate sync in AudioDesk and Digital Performer When you first use sample accurate sync, be sure to go to the Receive Sync dialog in Digital Performer or AudioDesk and switch from “MTC” to “Sampleaccurate.” Cubase - MOTU 8pre inputs and outputs are not visible in Cubase You probably need to enable them in Cubase.
!8pre Manual/Mac Page 66 Tuesday, October 12, 2010 5:52 PM TECHNICAL SUPPORT If you are unable, with your dealer’s help, to solve problems you encounter with the 8pre system, you may contact our technical support department in one of the following ways: ■ Tech support hotline: (617) 576-3066 (Monday through Friday, 9 am to 6 pm EST) ■ Tech support 24-hour fax line: (617) 354-3068 ■ Tech support email: techsupport@motu.com ■ Web site: www.motu.
!8pre Manual/Mac Page 67 Tuesday, October 12, 2010 5:52 PM Index kext 21 02R mixer 20 1394 connector 6, 10, 15 24-bit AudioDesk 37 Digital Performer 33 optical 10 recording 11 48V phantom power 5 8pre installing 15 rear panel overview 9 summary of features 9 tab 25 A Ableton Live 41 Activity LEDs 11 ADAT optical 10, 20 clock source setting 26 connecting 16 Analog activity lights 11 Analog inputs/outputs trimming in Digital Performer 32, 36 Apple Garage Band 41 Logic Express 40 Logic Pro 40 Soundtrack Pro
!8pre Manual/Mac Page 68 Tuesday, October 12, 2010 5:52 PM N R Nuendo 25 Mac OS X 42 Reason 42 Regenerate 61 Registration 13 O Optical 2x mode 29 connectors 16 enabling/disabling 27 LEDs 11 overview 10 sync 20 Optical converter mode 29 setup/example 19 Optimization 48 P Packing list 13 Patch thru latency 48 Performance 48 Phantom power 5, 16 Phones 5, 28, 43 AudioDesk 36 Digital Performer 32, 40 Phones 1-2 AudioDesk 37 Digital Performer 33 Phones menu 56 Propellerhead Reason 42 S S/MUX 29 Sample rate