
User Manual
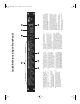
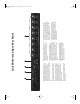
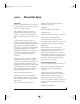

Quick Reference: 8pre Front Panel
1 3
6789
4
1. Each analog input has individual front panel controls,
including an input gain (trim) knob (approximately
40 dB of gain), 48 volt phantom power on/off switch (up
is on) and -20 dB pad switch (down is engaged).
2. The VOLUME knob is a rotary encoder that can be pushed
as well as turned:
■
Turn it to adjust headphone volume. In the LED section
to the right, the row of amber LEDs, second from the
top, provides general feedback regarding the
headphone level as you turn the knob.
■
Push in the knob twice (so that it clicks two times) and
then turn it to adjust the volume of the main outs on
the rear panel. In the LED section to the right, the
middle row of green LEDs, third from the bottom,
provides general feedback regarding the headphone
level as you turn the knob.
■
Push in and hold the knob for 3 seconds to enter a
mode where you can change the clock source. In this
mode, the CLOCK LED flashes, turn the knob to change
the clock mode. Push it again to exit clock mode.
■
Push and hold the knob for 5 seconds to enter a mode
where you can change 2x optical input and output
(88.2 or 96kHz) to Type I (for 2x optical connection to
SMUX-compatible products) or Type II (for 2x optical
connection to MOTU products). The bottom LED in the
“1” or “2” column flashes. Turn the volume knob to
switch between Type I and II, respectively.
3. These eight 5-segment meters show input signal level
for the mic/instrument XLR/combo inputs on the rear
panel. When you turn the volume knob, which is a digital
rotary encoder, the row of amber LEDs, second from the
top, provides general feedback regarding the headphone
level as you turn the knob. The scale goes from left to
right, where all LEDs are illuminated at full headphone
volume. The middle row of green LEDs (third from the
bottom) performance a similar role for the main out
volume adjustment.
4. When the 8pre is connected to computer via FireWire,
and the computer is turned on, the 8pre functions as an
audio interface. When the computer is off or not
connected, the 8pre functions as a digital-to-analog
converter. The
Interface
and
Converter
LEDs indicate
which mode the 8pre is in.
5. The CLOCK LEDs indicate the current clock source and
sample rate. Choose 44.1, 48, 88.2 or 96kHz to operate
the 8pre under its own internal clock at the chosen
sample rate. To resolve the 8pre to another digital audio
device via connection to its optical input, choose either
optical in 1x
(for 44.1 or 48 kHz) or
optical in 2x
(for 88.2
or 96 kHz). If you are resolving to optical at 2x, choose
Type II for MOTU products or Type I for third-party
products, as described earlier in item number 2.
6. This is a standard quarter-inch stereo headphone jack.
From the factory, its output matches the main outs on
the rear panel. But it can be programmed to mirror any
other (optical) output pair. It can even be programmed
to serve as its own independent output. Use the volume
knob above to control its level.
7. These eight trim knobs provide approximately 40 dB of
gain for both the lo-Z XLR mic input and the hi-Z TRS
guitar/instrument input. Both inputs have preamps, so
you can plug just about anything into them: a micro-
phone, a guitar, a synth. Use the trim knob and the
analog input level meters over in the metering section to
calibrate the input signal level. The meters cover both
the TRS and XLR input.
8. The 48V phantom power switches provide phantom
power for condenser microphones. Down is off; up is on.
9. Flip the PAD switch down to apply a -20 dB reduction in
level. Flip it up to disengage the pad.
2
5
!8pre Manual/Mac Page 5 Tuesday, October 12, 2010 5:52 PM