
User Manual-Windows


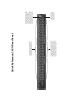

When the METERS light is illuminated (on the right), this section of LEDs
provides metering for 2408mk3’s analog input and output activity. Each
channel has a 5-segment column of LEDs measuring -42 dB to 0 dB.
When the METERS light is not illuminated, The LEDs in this section
indicate the CLOCK, SOURCE, and BOUNCE settings in the 2408mk3.
When the 2408mk3 is under control of the PCI-424 card (and the host
computer), you cannot change the settings using the SELECT and SET
buttons, as they are under control of software running on the computer.
The only thing you can do in this mode is press the SELECT button to
switch between the clock status display and analog metering.
When the 2408mk3 is not under
PCI control (no 2408mk3-
compatible software is running,
or the computer is turned off),
the 2408mk3 operates as a
stand-alone format converter,
and you can use the SELECT and
SET buttons to change the CLOCK,
SOURCE, and BOUNCE settings.
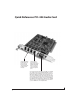
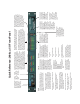
Quick Reference: 2408mk3 I/O Front Panel
Bounce
When the 2408mk3 is operating as a stand-
alone format converter (no 2408mk3-
compatible software is running on the
computer or the computer is turned off),
the BOUNCE setting lets you shift tracks
during a transfer. Use the SELECT button to
activate (illuminate) the BOUNCE LED. Press
the SET button repeatedly to make the
desired bounce setting. Your choices are:
■ No shifting
(1-2)
■ Shift all tracks down by two
(3-4)
■ Shift all tracks down by four
(5-6)
■ Shift all tracks down by six
(7-8)
Tracks that are shifted lower than track 1
wrap around to track 8 and shift down from
there.
The “Swap L to R” option swaps the
channels in each pair, in addition to the
amount they are shifted. This allows you to
copy any source track to any destination
track. For example, you can copy track 4 to
track 1 by choosing “3-4” and “Swap L to R”.
This is a standard quarter-
inch stereo headphone
jack. Its output matches
analog outputs 1 and 2,
but the volume knob to
the right controls the
headphone output only.
Source
When the 2408mk3 is operating as a
stand-alone format converter (no
2408mk3-compatible software is
running on the computer or the
computer is turned off), the Source
setting determines which audio
format (ADAT, Tascam, Analog or
SPDIF) will be the source of the
transfer. Use the SELECT button to
activate (illuminate) the SOURCE
LED. Press the SET button repeatedly
to make the desired source setting.
Your choices are:
■ Analog (all inputs at +4)
■ Analog (all inputs at -10)
■ Analog (mixed input levels)
■ The stereo SPDIF input
■ ADAT Bank A
■ ADAT Bank B
■ ADAT Bank C
■ ADAT banks A, B and C
■ Tascam (with the same bank
choices as shown above for
ADAT)
The setting for Analog with mixed
input levels uses the input level
settings you’ve specified with the
MOTU PCI Audio Console (by clicking
the Interface Options button).
Internally, the 2408mk3 is divided into three banks of I/O:
Banks A, B and C. This section of the 2408mk3’s front panel
shows you the input and output activity for each bank if it has
been assigned to either the ADAT, Tascam or SPDIF digital I/O
formats. When you are operating the 2408mk3 under
computer control, the 2408mk3 always outputs to both ADAT
and Tascam, regardless of which one you have chosen in
AudioDesk or the PCI-424 configuration software. The top
(orange) row of lights show input activity for each channel in
the bank, and the bottom (green) lights show output. At 88.2
or 96 kHz, TDIF and ADAT optical support 4 channels per bank.
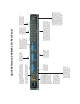
Clock
When the 2408mk3 is operating as a stand-alone format
converter (no 2408mk3-compatible software is running on the
computer or the computer is turned off), the CLOCK setting
determines what digital clock the 2408mk3 is slaving to. The
choices are:
■ 44 / 48 / 88 / 96 - These four LEDs indicate the sample
rate. If the 2408mk3 is set to slave from an external
source, and no clock source is present, these lights blink to
show that the 2408mk3 does not currently detect a clock
signal. If the 2408mk3 is running under its internal clock,
use the SET button to choose the desired sample rate.
■ Int (Internal) - Means that the 2408mk3 is running under
its own internal clock.
■ PCI - This LED means that the 2408mk3 is slaved to the
PCI-424 card. This light is not available when the
2408mk3 is in stand-alone mode.
■ Dig (Digital input) - This option refers to the digital I/O
format being recorded. For example, if you are converting
from ADAT to Tascam, and you have selected ADAT as the
source, the 2408mk3 will slave to the clock supplied by
the ADAT optical digital input.
■ Word - the 2408mk3 is slaved to its word clock input.
■ Vid (video) - the 2408mk3 is slaved to a video signal
received on its VIDEO IN (BNC) connector.
■ LTC (Longitudinal Time Code) - the 2408mk3 is slaved to
SMPTE time code on an analog input.
You can use the SET button
only when the 2408mk3 is
operating as a stand-alone
format converter (no
2408mk3-compatible
software is running on the
computer or the computer
is turned off). When the
2408mk3 is in stand-alone
operation, press the SET
button repeatedly to cycle
through the current CLOCK,
SOURCE or BOUNCE
settings, which control
what the 2408mk3 will do
as a format converter.
When the 2408mk3 is in
stand-alone operation,
press the SELECT button
repeatedly to illuminate
the desired CLOCK,
SOURCE or BOUNCE LED.
Then press the SET
button repeatedly to
make the desired setting.
When the 2408mk3 is
under control of the
computer, press the
SELECT button to toggle
between the clock
display and analog
metering in the ANALOG
OUT section of the front
panel.
When these three lights are illuminated,
they indicate that the 2408mk3 is operat-
ing under control of the PCI-424 card. They
also indicate that the LEDs in the ANALOG
OUT section are displaying the 2408mk3’s
current clock settings (as you have chosen
in the PCI Audio Console software). Press
the Select button to toggle the ANALOG
OUT section between this clock display
and analog output metering.
This knob
controls the
volume of the
headphone
output.
This knob
controls the
volume of the
main outs on
the rear panel.
When the 2408mk3 is resolving
to video or SMPTE time code,
the LOCK light glows green
when lockup has been achieved.
The TACH light blinks once per
second when the 2408mk3 is
successfully reading address
(time code) information.