
User Manual

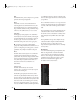


BPM WINDOW
73
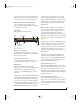
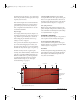
Timeline
The Timeline (Figure 7-38) indicates measure and
beats. For example, 2.3 indicates measure 2, beat 3.
The number of measures is determined by the
Length (in bars).
Zooming the timeline
Click on the time line (Figure 7-38) and drag
vertically to zoom the resolution of the piano roll
grid.
Length
The length setting (Figure 7-38) lets you specify
the length of the time line in the Piano Roll
Sequencer for the part. Each part can have a unique
length. Length is specified in a number of complete
bars.
Grid
The Grid menu (Figure 7-38) lets you specify the
grid resolution for editing, as indicated below:
Snap to Grid
Enable the Snap to Grid option (Figure 7-38) to
cause edits and note insertions to automatically
conform to the current Grid resolution.
Bypass
Click Bypass (Figure 7-38) to turn off the Piano
Roll Sequencer entirely. This lets you use the part
purely as a sound source for an external MIDI
controller or sequencer.
Tools
The Selection tool, Pencil and Eraser (Figure 7-38)
provide standard selection, insertion and deletion
capabilities for the grid. Here is a summary of
techniques:
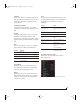
Piano Roll Sequencer menu
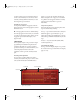
Right-click to access the Piano Roll Sequencer
menu (Figure 7-39).
Figure 7-39: Right-click the piano roll to access its contextual menu.
Resolution Metric value
8 Eighth note
8T Eighth note triplet
16 Sixteenth note
16T Sixteenth note triplet
32 Thirty second note
To do this Do this
Insert a note with the duration
of the current grid
Click with the Pencil, or
Double-click with the Selection
tool
Insert a note of any length Drag with the Pencil
Change the pitch of a note Drag it up or down
Change the pitch of several
notes
Select them and drag up or
down
Change the velocity of one or
more notes
Select them and Shift-drag up
or down
Delete a note Double-click it, or
click it or drag over it with the
Eraser, or
Select it and hit delete.
Delete multiple notes Select them with the Selection
tool and then hit delete.
!BPM Manual.book Page 73 Friday, November 10, 2017 4:27 PM