
User Manual


BPM WINDOW
74
Here is a brief summary of the menu operations:
Drag and drop into the Piano Roll Sequencer
You can drag and drop patterns from the browser
(with AutoLoad turned off), and MIDI files from
your computer desktop, into the Piano Roll
Sequencer. When importing MIDI files, drag and
drop works best when using single-channel MIDI
files of a reasonable length.
Applying grooves
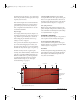
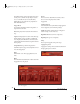
The Apply Grooves menu item (Figure 7-39)
provides many classic drum machine groove
“feels”, including MPC swing and LinnDrum
presets (Figure 7-40). You can also create and apply
your own grooves. See “Saving your own grooves”
on page 63.
Figure 7-40: MPC, LinnDrum and other grooves can be applied to
note data in the Piano Roll Sequencer.
Working with slice loops in the Piano Roll
Sequencer
When you load a slice loop into a part, each slice is
mapped to an individual note and the notes are
automatically loaded into the Piano Roll Editor.
The first loop slice is mapped to note C3 and from
there slices are mapped sequentially in ascending
order, chromatically, up the keyboard. The
resulting cascade of notes is a similar to what is
shown in Figure 7-38. You can edit the slice notes in
the grid to modify the loop. You can play slices
from the on-screen keyboard, a MIDI keyboard, a
pad controller or any other MIDI controller.
Essentially, these mapped slice notes give you a
great deal of control over manipulating the loop.
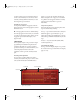
PART EDITOR
The Part Editor (Figure 7-41) provides in-depth
programming of individual rack parts. The Part
Editor provides a wide range of controls (such as
envelopes, multimode- filters, LFOs, and pitch
controls) that allow you to shape and mold the
instrument sound or loop in the currently selected
part.
Accessing the Part Editor
To access the Part Editor, make sure a rack is
currently selected, click the part you wish to edit to
select it and then click the Edit tab in the BPM
window (Figure 7-1 on page 49).
MIDI automation of part editor parameters
Part Editor parameters can be automated by
sending MIDI control messages to BPM. Right-
click any parameter to either choose the desired
controller from a menu or play it from your MIDI
controller (as shown in Figure 7-63 on page 92).
LFOs (1 to 4)
The Part Editor LFO section (Figure 7-41)
provides four LFOs to shape your parts. Click an
LFO button (1, 2, 3 or 4) to select a specific LFO.
Click the LFO menu to choose a waveform for the
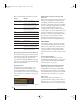
Menu item What it does
Selection Tool / Pencil /
Eraser
Selects the corresponding tool.
Cut Places the currently selected MIDI
data in the clipboard for pasting,
removing the data from the sequence.
Copy Places the currently selected MIDI
data in the clipboard for pasting, leav-
ing the data in the sequence.
Paste Pastes the MIDI data in the clipboard.
Select All/Deselect All Selects or deselects all notes.
Clear Selection Removes all currently selected notes.
Clear All Removes all notes and other data.
Delete All Notes Removes all notes.
Delete All But Notes Removes all data except for notes.
Quantize Moves all notes, or the currently
selected notes, to nearest grid location.
Apply Groove Applies the chosen groove to all notes,
or the currently selected notes.
!BPM Manual.book Page 74 Friday, November 10, 2017 4:27 PM