
User Manual


BPM WINDOW
97
1 Choose the desired input from the Source menu
(Figure 7-71).
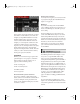
2 Click the Clip button (Figure 7-67 on page 95).
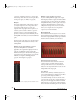
The Clip window appears (Figure 7-73).
Figure 7-73: Sampling via the Clip window.
3 Confirm the source from the menu provided.
4 Click the Sampling button to begin sampling.
5 Click the Sampling button again to stop.
6 Select the desired portion of the waveform, or
double-click to select all.
7 Press Command/Control-C to copy the selected
waveform and then paste the selection into the
sample editor (see “Paste” on page 67), OR
8 Hold down Shift-Option/Alt and then drag the
selection to any destination in the BPM window
that accepts audio clips.
MIXING
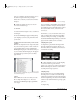
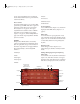
The Mixer (Figure 7-74) provides a complete
environment for mixing all components of BPM
output.
Accessing the mixer
To access the Mixer, click the Mix display tab in the
BPM window (Figure 7-1 on page 49).
Bank and Rack mixer tabs
Click a Bank or Rack mixer tab (Figure 7-74) to
view the individual mixer channel strips for the
each bank pad or rack part. Each bank and rack
has its own tab.
Channel strips
The pad and part channel strips (Figure 7-74)
provide conventional mixer controls for volume,
pan, mute (m), solo (s), and output assignment
Figure 7-74: The Mixer.
Mixer tabs
Level meter
Pad or part name
Pad or part effects
Pan
Volume
Output
Selected pad or
part (darkened
channel strip)
Bank and Rack mixer tabs
Master mixer tab
Pad or part
channel strips
!BPM Manual.book Page 97 Friday, November 10, 2017 4:27 PM