
User Manual


Table Of Contents
- Part 1 Getting Started
- Quick Reference: HDX-SDI Front Panel
- Quick Reference: HDX-SDI Rear Panel
- Quick Reference: MOTU Video Console
- 1 About the HDX-SDI
- 2 Packing List and System Requirements
- 3 Installing the HDX-SDI Windows Software
- 4 Installing the HDX-SDI Hardware
- Overview
- Did you run the software installer first?
- Precautions before you begin
- Installing the PCI Express card
- Installing the ExpressCard adapter
- Connect the HDX-SDI to your computer
- Power-up/power-down sequence
- Connect video inputs and outputs
- Example HDX-SDI video connections
- Connect audio inputs and outputs
- Example HDX-SDI audio connections
- Video sync connections
- Timecode connections
- RS-422 machine control
- Syncing digital audio devices
- Part 2 Using the HDX-SDI
- 5 HDX-SDI Basics
- 6 MOTU Video Console
- 7 Adobe Premiere Pro
- Part 3 Appendices
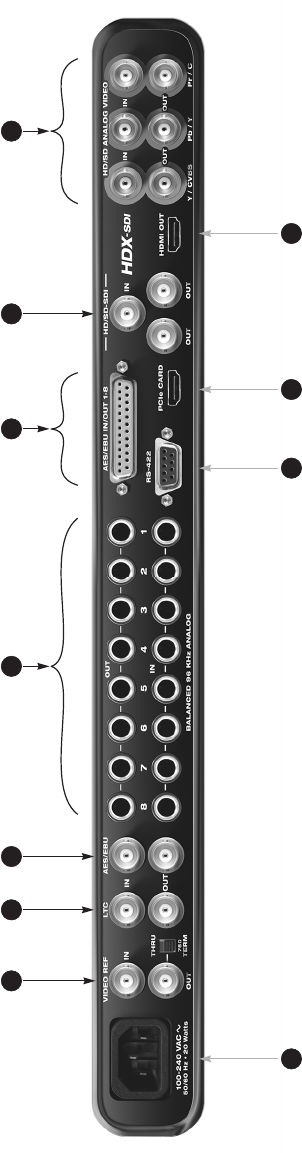
Quick Reference: HDX-SDI Rear Panel
4
1. Connect blackburst or another video reference signal
to the VIDEO REF IN. If the HDX-SDI is at the end of the
video sync daisy chain, flip the THRU/TERM switch to
the 75Ω TERM position. If you are daisy-chaining
another device, flip it to THRU. This jack also supports
HD Tri-level sync.
2. Connect timecode input and output here, to the LTC IN
and LTC OUT. The HDX-SDI supports all standard
timecode formats.
3. If you only need two channels of AES/EBU digital
audio I/O, connect them to these BNC jacks. If you
need eight channels, connect a breakout cable to the
DB-25 connector to the right.
4. These eight gold-plated, balanced +4 dB TRS
(tip/ring/sleeve) quarter-inch analog inputs and
outputs are equipped with 24-bit converters that
support sample rates from 44.1 kHz up to 96 kHz.
These connectors can also accept an unbalanced plug.
5. If you need more than stereo AES/EBU input/output,
connect an 8-channel DB-25 to XLR breakout cable to
this DB-25 connector. When you do so, the BNC
AES/EBU output jack mirrors DB-25channels 1-2. The
BNC inputs, however, are mutually exclusive from the
DB-25inputs, and you must choose one input or the
other in MOTU Video Console. See “Audio tab” on
page 43.
6. Connect HD-SDI or SD-SDI devices here. The SDI
outputs provide the same (duplicated) signal on both
outputs, so you can route SDI output to both a monitor
and a deck, for example.
7. Connect component HD or SD input and output here.
The analog video I/O section of the HDX-SDI is
equipped with 12-bit converters that deliver 10-bit
capture and playback, with support for either RGB or
YPbPr component color space. Alternately, you can
connect a composite video (CVBS) input or output
signal to the Y connectors or an S-Video input or
output signal to the Y/C connectors.
8. Connect a plasma, LCD, DLP or other HDMI-equipped
monitor here. Alternately, you can connect a
DVI-equipped device with an adapter cable. The
HDX-SDI supports 8-channel PCM (uncompressed)
embedded audio over HDMI, so you could also
connect this output to an HDMI-equipped home
theater receiver to deliver both picture and multi-
channel audio.
9. Connect the HDX-SDI to the computer here using any
standard HDMI cable. If you are connecting the inter-
face to an ExpressCard adapter for laptop operation,
use a standard HDMI-to-mini-HDMI cable. In either
case, it is recommended that you use the supplied
cable. If you use another cable, the length should not
exceed six feet, and use a high-quality cable.
10. For 9-pin machine control over an RS-422 equipped
device, such as a VTR or camera, connect it here. This
allows you to control the transport of the device from
Premiere Pro.
11. The HDX-SDI has an internal, international, auto-
switching power supply. Connect any AC power source
from 100V to 240V.
1 2 3 5 7
11
6
8910
HDX-SDI Manual Win Page 6 Friday, April 8, 2011 11:54 AM