
User Manual


CHAPTER
33
4 Hardware Installation
OVERVIEW
Rack installation and heat . . . . . . . . . . . . . . . . . . . . . . . . . . . 33
USB audio interface setup . . . . . . . . . . . . . . . . . . . . . . . . . . . 33
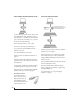
AVB Ethernet audio interface setup. . . . . . . . . . . . . . . . . . 34
Setup for two interfaces . . . . . . . . . . . . . . . . . . . . . . . . . . . . . 34
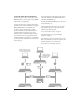
Setup for three to five interfaces . . . . . . . . . . . . . . . . . . . . . 35
Setup for a multi-switch network . . . . . . . . . . . . . . . . . . . . 36
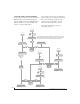
Setup for multiple interfaces. . . . . . . . . . . . . . . . . . . . . . . . . 37
Setup for web app control . . . . . . . . . . . . . . . . . . . . . . . . . . . 38
Audio connections. . . . . . . . . . . . . . . . . . . . . . . . . . . . . . . . . . . 40
Synchronization . . . . . . . . . . . . . . . . . . . . . . . . . . . . . . . . . . . . . 40
Syncing optical devices . . . . . . . . . . . . . . . . . . . . . . . . . . . . . . 41
Syncing word clock devices. . . . . . . . . . . . . . . . . . . . . . . . . . 41
Syncing an AVB network. . . . . . . . . . . . . . . . . . . . . . . . . . . . . 42
Syncing multiple AVB audio interfaces connected to a Mac . . . . 43
RACK INSTALLATION AND HEAT
When installing your MOTU audio interface in a
19-inch rack, leave extra space above, below,
behind and on either side of the unit to provide
adequate ventilation and heat dispersion. Do not
install it near other gear that generates excessive
heat.
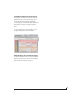
USB AUDIO INTERFACE SETUP
Use this setup if you want to use your MOTU
device as an audio interface.
■ Use a standard USB cable.
■ Connect to any USB port (USB2.0 or 3.0).
■ See “USB2.0 class-compliant operation” on
page 33.
■ No driver installation is necessary (unless you
want to use the web app).