!UltraLite Manual/Win Page 1 Tuesday, September 13, 2005 7:00 PM UltraLite ™ User’s Guide for Windows 1280 Massachusetts Avenue Cambridge, MA 02138 Business voice: (617) 576-2760 Business fax: (617) 576-3609 Technical support: (617) 576-3066 Tech support fax: (617) 354-3068 Tech support email: techsupport@motu.com Web site: www.motu.
!UltraLite Manual/Win Page 2 Tuesday, September 13, 2005 7:00 PM About the Mark of the Unicorn License Agreement and Limited Warranty on Software TO PERSONS WHO PURCHASE OR USE THIS PRODUCT: carefully read all the terms and conditions of the “click-wrap” license agreement presented to you when you install the software. Using the software or this documentation indicates your acceptance of the terms and conditions of that license agreement. Mark of the Unicorn, Inc.
!UltraLite Manual/Win Page iii Tuesday, September 13, 2005 7:00 PM Contents 5 Quick Reference: UltraLite Front Panel 6 Quick Reference: UltraLite Rear Panel 7 Quick Reference: MOTU Audio Setup 9 About the UltraLite 13 Packing List & Windows System Requirements 15 IMPORTANT! Run the UltraLite Software Installer First 17 Installing the UltraLite Hardware 27 MOTU Audio Setup 31 UltraLite Front Panel Operation 37 Cubase, Nuendo and Other ASIO Software 41 SONAR and other WDM Software 47 G
!UltraLite Manual/Win Page iv Tuesday, September 13, 2005 7:00 PM IV
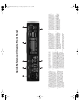
1 2. These two Precision Digital Trim™ knobs provide 24dB of gain in 1dB increments for the front and rear panel Mic/ Instrument inputs. Both have preamps, so you can plug in just about anything: a microphone, a guitar, a synth, or even a +4 signal. Use the trim knob, three-way pad switch and input level meter in the LCD to calibrate the input signal level. 7 8 4. The multi-purpose backlit LCD provides metering for all of the UltraLite’s inputs and outputs.
1 7 3. The UltraLite’s eight analog outputs are gold-plated, balanced +4dB TRS (tip/ring/sleeve) quarter-inch connectors that can also accept an unbalanced plug. They are equipped with 24-bit, 128x oversampling converters. 2. These jacks provide stereo, 24-bit S/PDIF digital input and output at any sample rate up to 96kHz. 6 5. These two balanced, quarter-inch jacks serve as the UltraLite’s main outputs.
!UltraLite Manual/Win Page 7 Tuesday, September 13, 2005 7:00 PM Quick Reference: MOTU Audio Setup CHAPTER Click the tabs to access general MOTU FireWire interface settings or settings specific to the UltraLite (or other connected interface.) Determines the clock source for your UltraLite. If you’re just using the analog ins and outs, set this to ‘Internal’. The other settings are for digital transfers via S/PDIF or synchronization to other audio devices.
!UltraLite Manual/Win Page 8 Tuesday, September 13, 2005 7:00 PM 8
!UltraLite Manual/Win Page 9 Tuesday, September 13, 2005 7:00 PM CHAPTER 1 About the UltraLite OVERVIEW The UltraLite is a computer-based hard disk recording system for Mac OS X and Windows that offers 10 inputs and 14 outputs. Analog recording and playback is offered at any standard sample rate up to 96kHz. All inputs and outputs, both analog and digital, can be accessed simultaneously.
!UltraLite Manual/Win Page 10 Tuesday, September 13, 2005 7:00 PM The headphone outputs can operate as an independent output pair, or they can mirror any other UltraLite output pair, such as the main outs. without the need for a FireWire hub. The UltraLite has the ability to power itself from its FireWire connection to the computer.
!UltraLite Manual/Win Page 11 Tuesday, September 13, 2005 7:00 PM Digital Precision Trim™ rotary encoders The two Digital Precision Trim™ detented rotary encoders provide preamp gain adjustment. When you turn these trim knobs, input gain can be adjusted in 1dB increments, and the LCD display provides active numeric feedback as the adjustment is made. Headphone output and main volume control The UltraLite front panel includes a quarter-inch stereo headphone output jack and volume knob.
!UltraLite Manual/Win Page 12 Tuesday, September 13, 2005 7:00 PM 12 ABOUT THE ULTRALITE
!UltraLite Manual/Win Page 13 Tuesday, September 13, 2005 7:00 PM CHAPTER 2 Packing List & Windows System Requirements PACKING LIST PLEASE REGISTER TODAY! The UltraLite ships with the items listed below. If any of these items are not present in your UltraLite box when you first open it, please immediately contact your dealer or MOTU. Please register your UltraLite today. There are two ways to register.
!UltraLite Manual/Win Page 14 Tuesday, September 13, 2005 7:00 PM 14 P AC K I NG L I ST & W I NDO W S SY ST E M R E Q UI R E M E NT S
!UltraLite Manual/Win Page 15 Tuesday, September 13, 2005 7:00 PM CHAPTER 3 IMPORTANT! Run the UltraLite Software Installer First OVERVIEW Install the UltraLite software first!. . . . . . . . . . . . . . . . . . . . Installing the UltraLite software . . . . . . . . . . . . . . . . . . . . . MOTU Audio Setup . . . . . . . . . . . . . . . . . . . . . . . . . . . . . . . . . . ASIO MOTU Audio Driver . . . . . . . . . . . . . . . . . . . . . . . . . . . . The MOTU Audio WDM driver . . . . . . . . . . . . . .
!UltraLite Manual/Win Page 16 Tuesday, September 13, 2005 7:00 PM MOTU AUDIO SETUP MOTU Audio Setup (available in the Start menu) gives you access to all of the settings in the UltraLite, such as the clock source and sample rate. For complete details, see chapter 5, “MOTU Audio Setup” (page 27). For details about using Cubase and Nuendo with the UltraLite, see chapter 7, “Cubase, Nuendo and Other ASIO Software” (page 37).
!UltraLite Manual/Win Page 17 Tuesday, September 13, 2005 7:00 PM CHAPTER 4 Installing the UltraLite Hardware OVERVIEW IMPORTANT NOTE BEFORE YOU BEGIN! Here’s an overview for installing the UltraLite: Before you begin installing the UltraLite (or any bus-powered device), take these important precautionary measures to avoid damaging the sensitive electrical components in your computer, the UltraLite or other devices being connected: Important note before you begin! . . . . . . . . . . . . . . . . . .
!UltraLite Manual/Win Page 18 Tuesday, September 13, 2005 7:00 PM CONNECT THE ULTRALITE INTERFACE CONNECT AUDIO INPUTS AND OUTPUTS 1 Make sure your computer and the UltraLite are switched off. The UltraLite audio interface has the following audio input and output connectors: 2 Plug one end of the UltraLite FireWire cable (included) into the FireWire socket on the computer as shown below in Figure 4-1.
!UltraLite Manual/Win Page 19 Tuesday, September 13, 2005 7:00 PM the input. The independent three-way pad switch for each input provides zero (down), 18dB (middle) and 36dB (up) pad settings for the XLR jack. When combined with the 24dB digital trim, the full gain range is 60dB. This is the difference between the minimum (trim at zero + pad at 36dB) and maximum (trim at 24dB + pad at zero) gain settings.
!UltraLite Manual/Win Page 20 Tuesday, September 13, 2005 7:00 PM One-way MIDI connections MIDI devices that do not receive MIDI data, such as a dedicated keyboard controller, guitar controller, or drum pad, only need Connection B shown in Figure 4-2. Similarly, devices that never send data, such as a sound module, only need Connection A. Make both connections for any device that needs to both send and receive MIDI data.
!UltraLite Manual/Win Page 21 Tuesday, September 13, 2005 7:00 PM connection to the power supply harness inside your computer. This is the same power supply harness to which you connect internal hard drives, CD/DVD drives, etc. PCMCIA slot adapters — If you plan to connect the UltraLite to a PC card FireWire adapter (inserted in the PC card slot in your laptop), it must provide a 6-pin connection and it must also have its own power supply. Most commonly, these types of products have a DC power adapter.
!UltraLite Manual/Win Page 22 Tuesday, September 13, 2005 7:00 PM A TYPICAL ULTRALITE SETUP Here is a typical UltraLite studio setup. This rig can be operated without an external mixer. All mixing and processing can be done in the computer with audio software. During recording, you can use the UltraLite’s CueMix™ DSP no-latency monitoring mic to listen to what you are recording via the main outs, headphone outs, or any other output pair.
!UltraLite Manual/Win Page 23 Tuesday, September 13, 2005 7:00 PM CONNECTING AND SYNCING S/PDIF DEVICES CONNECTING MULTIPLE MOTU FIREWIRE INTERFACES DAT decks and other devices with S/PDIF digital I/O will sync to the UltraLite in via the S/PDIF connection itself. Just connect it to the UltraLite via the S/PDIF connectors. When the device records a digital audio signal (from the UltraLite), it will simply synchronize to the clock provided by the digital audio input.
!UltraLite Manual/Win Page 24 Tuesday, September 13, 2005 7:00 PM Multiple interfaces cannot be bus-powered Do not run the UltraLite under bus power when connecting it with other devices to the same FireWire bus. See “Power options” and “Bus power requirements” on page 20. Multiple interfaces in MOTU Audio Setup MOTU Audio Setup displays the settings for one interface at a time. To view the settings for an interface, click its tab as shown below in Figure 4-8.
!UltraLite Manual/Win Page 25 Tuesday, September 13, 2005 7:00 PM Operating multiple FireWire interfaces at high sample rates Four MOTU FireWire interfaces can operate at 44.1 or 48kHz on a single FireWire bus. At the 2x samples rates (88.2 or 96kHz), you can operate no more than three FireWire interfaces on a single FireWire bus.
!UltraLite Manual/Win Page 26 Tuesday, September 13, 2005 7:00 PM 26 INSTALLING THE ULTRALITE HARDWARE
!UltraLite Manual/Win Page 27 Tuesday, September 13, 2005 7:00 PM CHAPTER 5 MOTU Audio Setup OVERVIEW Accessing the UltraLite settings. . . . . . . . . . . . . . . . . . . . . . ’General’ tab Settings . . . . . . . . . . . . . . . . . . . . . . . . . . . . . . . . Sample Rate . . . . . . . . . . . . . . . . . . . . . . . . . . . . . . . . . . . . . . . . . Clock Source . . . . . . . . . . . . . . . . . . . . . . . . . . . . . . . . . . . . . . . . . Samples Per Buffer. . . . . . . . . . . . . . . . . . .
!UltraLite Manual/Win Page 28 Tuesday, September 13, 2005 7:00 PM ’GENERAL’ TAB SETTINGS Sample Rate Choose the desired Sample Rate for recording and playback. The UltraLite can operate at 44.1 (the standard rate for compact disc audio), 48, 88.2 or 96 kHz. If you have a S/PDIF device connected to the UltraLite, make sure that it matches the UltraLite’s sample rate. ☛ Mismatched sample rates cause distortion and crackling.
!UltraLite Manual/Win Page 29 Tuesday, September 13, 2005 7:00 PM S/PDIF The S/PDIF clock source setting refers to the S/PDIF RCA input jack on the UltraLite. This setting allows the UltraLite to slave to another S/PDIF device. Use this setting whenever you are recording input from a DAT deck or other S/PDIF device into the UltraLite. It is not necessary in the opposite direction (when you are transferring from the UltraLite to the DAT machine).
!UltraLite Manual/Win Page 30 Tuesday, September 13, 2005 7:00 PM Monitoring live inputs without plug-in effects As mentioned earlier, CueMix Console allows you to monitor dry, unprocessed live inputs with no delay at all. For complete details, see chapter 10, “Reducing Monitoring Latency” (page 51). Enable Pedal This setting applies to other MOTU FireWire audio interfaces, but it does not apply to the UltraLite.
!UltraLite Manual/Win Page 31 Tuesday, September 13, 2005 7:00 PM CHAPTER 6 UltraLite Front Panel Operation OVERVIEW PUSH-BUTTON ROTARY ENCODERS The UltraLite offers complete front-panel programming via six rotary encoders and a 2x16 backlit LCD display. All UltraLite settings can be accessed via these front-panel controls. All of the knobs shown in Figure 6-1 are pushbutton digital rotary encoders.
!UltraLite Manual/Win Page 32 Tuesday, September 13, 2005 7:00 PM MAIN VOLUME Turning the MAIN VOL knob lets you control the volume of the rear-panel main outs. It can also be programmed to provide master volume control over S/PDIF output, or 5.1 and 7.1 surround output via analog outputs 1-6 or 1-8, respectively. See “Main Volume Assign” on page 33. Figure 6-2: In setup mode, the LCD displays a setup parameter in the top row of the LCD and the current setting in the bottom row.
!UltraLite Manual/Win Page 33 Tuesday, September 13, 2005 7:00 PM If the UltraLite is not currently connected to the computer, there are four sample rates available for the Internal clock setting (in kHz): Internal 44.1 (the standard rate for audio CDs), Internal 48, Internal 88.2 and Internal 96. Fader View Time The Fader View Time option lets you control the length of time that an adjusted parameter remains displayed in the LCD before the LCD returns to its previous state.
!UltraLite Manual/Win Page 34 Tuesday, September 13, 2005 7:00 PM are not included. The name can have up to 12 characters. Here is a summary of how to name and save a preset: To do this: Do this: To change the currently flashing character Turn the CURSOR knob. To jump to capital letters, lower case letters, numbers or symbols Turn the VALUE knob. To save the preset. Push VALUE. If you are asked to replace existing preset, push VALUE again to replace it, or turn it to select a different preset.
!UltraLite Manual/Win Page 35 Tuesday, September 13, 2005 7:00 PM PAGE When the LCD display is in mixer mode, the PAGE knob cycles through the mix parameters listed below. Use the CURSOR knob to scroll to a particular channel (until it flashes) and use the VALUE knob to change its setting: Mix parameter Range Comments Gain OFF, -84 to 0 dB Each channel displays a small fader. Push the VALUE knob to toggle between OFF and unity gain (0dB). Pan -64 to +64 Push the VALUE knob to jump to pan center.
!UltraLite Manual/Win Page 36 Tuesday, September 13, 2005 7:00 PM 36 ULTRALITE FRONT PANEL OPERATION
!UltraLite Manual/Win Page 37 Tuesday, September 13, 2005 7:00 PM CHAPTER 7 Cubase, Nuendo and Other ASIO Software OVERVIEW If your audio software doesn’t support ASIO If your host audio software does not support ASIO, but instead supports WDM (or legacy Wave) audio drivers, refer to the next chapter. The UltraLite includes an ASIO driver that provides multi-channel I/O with Steinberg’s Cubase family of digital audio sequencers, including Cubase SX and Nuendo. What is ASIO? . . . . . . . . . . . . . .
!UltraLite Manual/Win Page 38 Tuesday, September 13, 2005 7:00 PM If you have a S/PDIF digital audio device connected to the UltraLite, or if you are not sure about the clock source of your setup, be sure to read “Connecting and syncing S/PDIF devices” on page 23 and “Clock Source” on page 28. Samples Per Buffer The Samples Per Buffer setting can be used to reduce the delay — or monitoring latency — that you hear when live audio is patched through your UltraLite hardware and Cubase.
!UltraLite Manual/Win Page 39 Tuesday, September 13, 2005 7:00 PM the Master ASIO Driver menu as shown below. Make the other settings in the dialog as need for your system and synchronization scenario. Figure 7-3: Creating UltraLite inputs in Nuendo or Cubase SX. Figure 7-2: Activating the UltraLite FireWire ASIO driver in Nuendo and Cubase.
!UltraLite Manual/Win Page 40 Tuesday, September 13, 2005 7:00 PM VIEWING AND MANAGING ULTRALITE OUTPUTS MIDI I/O VIA THE ULTRALITE MIDI PORTS To view and manage UltraLite outputs, click VST Outputs beneath the MOTU Audio item (Figure 7-4). Once you’ve run the UltraLite’s software installer as explained in “Installing the UltraLite software” on page 15, the UltraLite MIDI ports will appear as a input source and output destination in the MIDI input and output menus of your ASIO-compatible host software.
!UltraLite Manual/Win Page 41 Tuesday, September 13, 2005 7:00 PM CHAPTER 8 SONAR and other WDM Software OVERVIEW WDM AND WAVE DRIVER COMPATIBILITY The UltraLite WDM driver provides standard multi-channel input and output for WDMcompatible audio software running under Windows XP. WDM is an acronym for Windows Driver Model. The MOTU WDM Driver allows the UltraLite to provide multi-channel audio input and output for any audio application that supports WDM audio drivers.
!UltraLite Manual/Win Page 42 Tuesday, September 13, 2005 7:00 PM MAKING SETTINGS IN MOTU AUDIO SETUP Before you run your audio software, launch MOTU Audio Setup to configure your UltraLite hardware. MOTU Audio Setup lets you choose the audio clock source, sample rate, buffer size and other hardware settings. For details, see chapter 5, “MOTU Audio Setup” (page 27). The following sections provide a brief explanation of each UltraLite setting for use with SONAR.
!UltraLite Manual/Win Page 43 Tuesday, September 13, 2005 7:00 PM ENABLING THE MOTU AUDIO WDM DRIVER Once you’ve made the preparations described so far in this chapter, you’re ready to run your audio software and enable the MOTU Audio WDM driver. Check the audio system or audio hardware configuration window in your software. Enabling the MOTU Audio WDM driver in SONAR To activate the MOTU Audio WDM driver in SONAR: 1 Choose Audio from the Options menu. 2 Click the Drivers tab.
!UltraLite Manual/Win Page 44 Tuesday, September 13, 2005 7:00 PM 3 In the General tab, click the Wave Profiler button and run the Wave Profiler. This process chooses the optimum settings for the UltraLite hardware. Figure 8-5: Running the Wave Profiler in Cakewalk’s SONAR. Enabling the MOTU Audio WDM driver in Sound Forge To activate the MOTU Audio WDM driver in Sound Forge, go to the Preferences window, click the Audio tab, and then choose MOTU Audio from the Audio device type menu as shown below.
!UltraLite Manual/Win Page 45 Tuesday, September 13, 2005 7:00 PM SYNCHRONIZATION If you have a device connected to the UltraLite S/PDIF digital input, you need to be concerned with the synchronization of the UltraLite’s digital audio clock with other device connected to it. For details, see “Connecting and syncing S/PDIF devices” on page 23.
!UltraLite Manual/Win Page 46 Tuesday, September 13, 2005 7:00 PM 46 SONAR AND OTHER WDM SOFTWARE
!UltraLite Manual/Win Page 47 Tuesday, September 13, 2005 7:00 PM CHAPTER 9 GigaStudio and GSIF OVERVIEW The UltraLite includes a GSIF driver that provides multi-channel I/O with Tascam’s GigaStudio family of virtual sampler products. What is GSIF? . . . . . . . . . . . . . . . . . . . . . . . . . . . . . . . . . . . . . . . . Preparation . . . . . . . . . . . . . . . . . . . . . . . . . . . . . . . . . . . . . . . . . . Run MOTU Audio Setup . . . . . . . . . . . . . . . . . . . . . . . . . . . . .
!UltraLite Manual/Win Page 48 Tuesday, September 13, 2005 7:00 PM If you do not have any digital audio connections to your UltraLite (you are using the analog inputs and outputs only), choose Internal. If you have a S/PDIF digital audio device connected to the UltraLite, or if you are not sure about the clock source of your setup, be sure to read “Connecting and syncing S/PDIF devices” on page 23 and “Clock Source” on page 28.
!UltraLite Manual/Win Page 49 Tuesday, September 13, 2005 7:00 PM Outputs are listed in this order: Output Channels List position Phones 2 1-2 Analog 8 3-10 Main 2 11-12 S/PDIF 2 13-14 ☛ Warning: the Mix1 1-2 input can cause feedback loops! DO NOT assign this input to a track that shares the same UltraLite output pair as MIX1. MIDI I/O VIA THE ULTRALITE MIDI PORTS The “Mix1 1-2” input In the GigaStudio Inputs list, you’ll see an UltraLite input called Mix1 1-2.
!UltraLite Manual/Win Page 50 Tuesday, September 13, 2005 7:00 PM 50 GIGASTUDIO AND GSIF
!UltraLite Manual/Win Page 51 Tuesday, September 13, 2005 7:00 PM CHAPTER 10 Reducing Monitoring Latency OVERVIEW Monitoring latency is that slight delay you hear when you run an input signal through your host audio software. For example, you might hear it when you drive a live mic input signal through a reverb plug-in running in your audio sequencer.
!UltraLite Manual/Win Page 52 Tuesday, September 13, 2005 7:00 PM MONITORING LIVE INPUT There are two ways to monitor live audio input with an UltraLite: 1) through the computer or 2) via CueMix™ DSP hardware monitoring. Figure 10-1 below shows method 1, which allows you to add effects processing such as reverb and guitar amp effects via plug-ins in your audio software.
!UltraLite Manual/Win Page 53 Tuesday, September 13, 2005 7:00 PM ADJUSTING THE AUDIO I/O BUFFER A buffer is a small amount of computer memory used to hold data. For audio interfaces like the UltraLite, buffers are used for the process of transferring audio data in and out of the computer. The size of the buffers determines how much delay you hear when monitoring live inputs through your audio software: larger buffers produce more delay; smaller buffers produce less.
!UltraLite Manual/Win Page 54 Tuesday, September 13, 2005 7:00 PM Lower latency versus higher CPU overhead The buffer setting has a large impact on the following things: ■ Patch thru latency ■ The load on your computer’s CPU ■ Possible distortion at the smallest settings ■ How responsive the transport controls are in your audio software The buffer setting presents you with a trade-off between the processing power of your computer and the delay of live audio as it is being patched through your softwa
!UltraLite Manual/Win Page 55 Tuesday, September 13, 2005 7:00 PM Using MOTU CueMix Console If your host audio software does not support direct hardware monitoring, you run MOTU CueMix Console side-by-side with your audio software and manage your monitor mix in CueMix Console. CueMix Console allows you to create up to four separate UltraLite monitor mixes, or any other desired routing configurations. These routings are independent of your host audio software.
!UltraLite Manual/Win Page 56 Tuesday, September 13, 2005 7:00 PM 56 REDUCING MONITORING LATENCY
!UltraLite Manual/Win Page 57 Tuesday, September 13, 2005 7:00 PM CHAPTER 11 MOTU CueMix Console OVERVIEW MOTU CueMix Console provides access to the flexible on-board mixing features of the UltraLite. CueMix lets you route any combination of inputs to any stereo output pair. These mixes can be set up entirely independently of your host audio software. CueMix allows you to set up four completely independent mix configurations with the UltraLite. You can also save and load mix configurations.
!UltraLite Manual/Win Page 58 Tuesday, September 13, 2005 7:00 PM ADVANTAGES OF CUEMIX MONITORING CueMix Console provides several major advantages over monitoring live inputs through your host audio software: CueMix has no buffer latency. Thanks to the UltraLite’s DSP chip, CueMix provides the same throughput performance as a digital mixer. ■ CueMix imposes absolutely no processor drain on the computer’s CPU.
!UltraLite Manual/Win Page 59 Tuesday, September 13, 2005 7:00 PM These elements are visually grouped together in the lightly shaded area in the lower half of the CueMix Console window. Viewing a mix To view a mix, click its tab at the bottom of the window, as shown in Figure 11-1. The mix name appears in the tab. Naming a mix Double-click the mix name in the tab. Input volume and pan Use the input fader and pan knob (Figure 11-1) to adjust these settings for the input in the mix.
!UltraLite Manual/Win Page 60 Tuesday, September 13, 2005 7:00 PM audio being routed to the computer. For example, if you phase invert an input, your host software will receive the inverted signal for that input as well. Input trim The input trim range is 24dB on the two mic inputs (Analog 1-2). For all other inputs (TRS analog and S/PDIF), the trim range is 18dB. This is the same trim setting as can be made from the front panel, as explained in “PAGE” on page 35.
!UltraLite Manual/Win Page 61 Tuesday, September 13, 2005 7:00 PM Hardware setup Figure 11-2 below shows a typical hardware setup for Talkback and Listenback. For Talkback, set up a dedicated mic in your control room and connect it to a mic input on your MOTU Audio interface. For Listenback, set up a dedicated listenback mic in the live room for the musicians and connect it to another mic input.
!UltraLite Manual/Win Page 62 Tuesday, September 13, 2005 7:00 PM Talkback / Listenback Mic Input Choose the audio input to which your Talkback and/or Listenback mic is connected. These inputs are labeled with a purple and blue swatch, respectively, just above the channel fader. These labels identify the Talkback and Listenback mic inputs. Figure 11-4: The purple label identifies the Talkback mic input; the blue label indicates the Listenback mic. Use the input fader to control the mic volume.
!UltraLite Manual/Win Page 63 Tuesday, September 13, 2005 7:00 PM MIX1 RETURN INCLUDES COMPUTER CONTROL SURFACES MENU The Mix1 return includes computer item in the CueMix Console File menu refers to the Mix1 bus that the UltraLite driver provides as an input to host audio software. This input source delivers the output of CueMix DSP “MIX1” (the first mix bus of the four on-board no-latency monitor mixes in the UltraLite) back to your computer.
!UltraLite Manual/Win Page 64 Tuesday, September 13, 2005 7:00 PM Mackie Control Surfaces CueMix Console includes support for the following control surface products: ■ Mackie Control™ ■ Mackie HUI™ ■ Mackie Baby HUI™ Use the sub-menu commands in the Mackie Control Surfaces menu item to turn on and configure control surface support, as described briefly below. Enabled Check this menu item to turn on control surface operation of CueMix Console. Uncheck it to turn off control surface support.
!UltraLite Manual/Win Page 65 Tuesday, September 13, 2005 7:00 PM CHAPTER 12 Performance Tips & Troubleshooting Things seems like they are working fine, but the UltraLite then just drops off line, and the computer can’t see it anymore on the FireWire bus. This is a common symptom when the problem is that the UltraLite is not getting enough power. Check the power source for the UltraLite. Make sure that the power connection meets the requirements outlined in “Bus power requirements” on page 20.
!UltraLite Manual/Win Page 66 Tuesday, September 13, 2005 7:00 PM CUSTOMER SUPPORT We are happy to provide customer support to our registered users. If you haven’t already done so, please complete the registration card included with your UltraLite. When we receive your card, you’ll be placed on our mailing list for software updates and information about new products.
!UltraLite Manual/Win Page 67 Tuesday, September 13, 2005 7:00 PM +4dB analog input 19 -10dB analog input 19 1394 connector 6, 10, 18 24-bit 3rd party software 45 recording 11 48V phantom power 5 4-pin FireWire 20 5.1 (Analog 1-6) 33 6-pin FireWire 20 7.
!UltraLite Manual/Win Page 68 Tuesday, September 13, 2005 7:00 PM N Nuendo 11, 27 clock source 38 Device setup 7 sample rate 38 O Optimization 54 Outputs analog 6 P Packing list 13 Pad 5, 10, 18 PAGE knob 32, 35 Pair 35 Pan 35 Paste Bus Mix 33 Patch thru latency 29, 54 PCI FireWire adapters 25 PCMCIA adapters 25 Peak Hold Time 62 Performance 54 Phantom power 5, 10, 18, 19 Phase Invert 35, 60 Phones 5, 7, 11, 30 Cubase 38 GigaStudio 48 Nuendo 38 SONAR 42 Phones 1-2 Cubase 40, 44 Phones Assign 33 Phones me