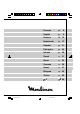
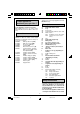
1 2 C b a a B A b D d c A B G F e H 4 E 3 A A4a A5 A1 A4b A4 A3 I 5 B A2 I2 J I1 J1 J2 6 K B L L2 L3 L3a L3b L3c L3d L3e L3f c 7 L1 A b A A a 09 03 30 09 03 30 10 03 24
Français p. 6 English p. 9 Deutsch S. 13 Nederlands p. 17 Español p. 21 Português p. 24 Italiano p. 28 Dansk s. 31 Norsk s. 35 Svenska s. 38 Suomi s. 41 ΕλληνικÀ σ. 45 Türkçe s. 49 56 5 Sommaire.PM6.
Nous vous remercions d’avoir choisi un appareil de la gamme Moulinex. - Vérifiez que la tension d’alimentation de votre appareil correspond bien à celle de votre installation électrique. Toute erreur de branchement annule la garantie. - Votre appareil est destiné uniquement à un usage domestique culinaire, à l’intérieur de la maison et sous surveillance. - Utilisez votre appareil sur une surface plane, propre et sèche.
Introduisez ensuite la vis (A2) (axe long en premier) dans le corps (A1). 1b - Emboîtez le couteau (A3) sur l’axe court en mettant les arêtes tranchantes vers l’extérieur. 1c - Placez la grille choisie (A4a ou A4b) sur le couteau (A3) en faisant correspondre les 2 ergots avec les 2 encoches du corps (A1). 1d - Vissez, à fond sans bloquer, l’écrou (A5) sur le corps (A1). 1e - Vérifiez le montage. L’axe ne doit ni avoir de jeu, ni pouvoir tourner sur lui-même.
COUPE-LÉGUMES (SELON MODÈLE) - Choisissez le dessin en faisant correspondre la flèche et la forme choisie. - Approvisionnez jusqu’à ce que vous ayez obtenu la quantité de biscuits désirée. ENTONNOIR 7 . Montage 7a - Face au bloc moteur (H) débranché, présen- tez le magasin (L1) en l’inclinant vers la droite. - Enfoncez la tige dépassant du magasin (L1) dans l’axe du bloc moteur. - Ramenez la cheminée vers la gauche jusqu’à la verticale.
Thank you for choosing an appliance from the Moulinex range. Si votre appareil ne fonctionne pas, que faire ? Description - Vérifiez le branchement. Votre appareil ne fonctionne toujours pas ? Adressez-vous à un centre service agréé Moulinex (voir liste dans le livret service).
must be connected to the terminal which is marked with the letter ‘N’ or coloured black. The wire which is coloured BROWN must be connected to the terminal which is marked with the letter ‘L’ or coloured red. This appliance is manufactured to conform to the Low Voltage Electrical Equipment (Safety) Regulations 1989 and is designed to comply with BS 3456. It complies with the requirements of the EEC Directive (89/336/EEC). - Your appliance is intended only for indoor, domestic use, for culinary purposes.
- Press position “I” of button (F) to continue mincing. Important: wait until the appliance has stopped completely before pressing the “On” (F) or “Reverse” (G) button. Recipes: Note: For recipes requiring a high power (about 600 W), the appliance should not be run continuously for more than 20 seconds. Recipe example: Mutton with split peas. 150 g mutton, 90 g split peas, 60 g flour, 30 g (ml) water, 1 medium onion, 2 cloves of garlic, salt and pepper.
- Fit the assembled mincer head on the motor unit as shown in 2A. Note: This accessory is used without meat screen and cutter. . Using - Prepare the dough. You will obtain the best results with a slightly soft dough. - Choose the shape by lining up the arrow with the chosen shape. - Keep feeding dough until you have obtained the desired number of biscuits.
Wir freuen uns, dass Sie ein Gerät von Moulinex gewählt haben und danken Ihnen für Ihr Vertrauen. - Never allow water to penetrate the motor unit (H). Simply wipe it with a slightly damp cloth. - Do not put the mincer head (A) in the dishwasher; this applies to the body (A1), the feed screw (A2), the cutter (A3), the meat screens (A4) and the nut (A5). Beschreibung A A1 A2 A3 A4 What to do if your appliance does not work - Check the electrical connection.
DKA1/DKA2 Dernière de couv.PM6.