
User guide


1
1. QUICK START GUIDE
The following steps outline the quickest way to begin using your camera. We
recommend that you scan the remainder of this user’s guide before using
your new camera.
1. Remove camera from packaging.
2. Insert four new AA batteries and an SD card.
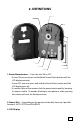
3. Mount the camera so that it is level and aimed at your target.
Use viewfinder to insure accurate aim.
4. Set the Rotary Dial to SETUP and press the Power/Status button
to turn the camera ON.
5. Important: set the date and time before initial use.
6. Turn Rotary Dial to AUTO, close the door and secure the latches.
What Happens Then?
The camera will be in the AUTO Mode. After 10 seconds, the camera will
take its first photo or video and then enter a standby mode and begin to
count down a timelapse interval. At the end of each interval, the camera will
wake-up, take a photo or video, show status for 10 seconds, and then begin
to count down another interval. The camera will continue taking images until
either the memory is depleted or the batteries are drained.