
User guide

TO TURN PHOTO SEQUENCES INTO TIME LAPSE VIDEO cont.
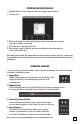
3. Choose a starting image (frame) and an ending image (frame).
Note: The frame limit is 300.
4. Choose the frame rate. Options include 1, 5, 10, 20, and 30 frames
per second (fps).
Note: The frame rate says how many images of a video are displayed every second a video is played. The higher
frame rate a video has the smoother movement appears in the video. However, a higher frame rate video will
create a larger file and will require more memory.
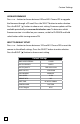
5. Choose the frame size (resolution):
Note: the higher the resolution, the sharper the image. However, higher resolutions create a larger file and will
require more memory.
VGA (640x480)
720p
1080p
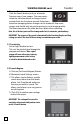
6. Chose Dark picture filter to: None, Low, Medium, High. This will cause the
search to skip certain pictures that meet the selected settings.
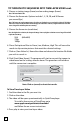
7. Click on (Save Video As). Name the video and choose the location file folder
you wish to save it in.
8. Click (Start Video Export). The program will start to convert the images to
video based on the settings chosen above. The green bars will advance
until the conversion is complete.
Note: Click on (cancel) to abort the transfer.
To View Time Lapse Video
1. Find the video in the file you save it to.
2. Click on the video.
3. The video will be open up automatically in QuickTime player.
To install a free version of QuickTime, go to
www.apple.com/quicktime/download
and follow the on-screen instructions.
4. Press play to view your time lapse video.
19