Mountain Buggy Carrycot Instruction Manual PAS SE D SA FE TY
This manual covers all carrycot attachments – single, double and twin options. Carrycots fit onto the following Mountain Buggy® models: English 1-10 Designed and made in New Zealand by Mountain Buggy Ltd. Manufactured by Tritec Manufacturing Ltd, an ISO 9001 certified company. Models made to BS 7409:1996, AS/NZS 2088:2000. Français 11-20 Conçu et fabriqué en Nouvelle-Zélande par Mountain Buggy Ltd. Fabriqué par Tritec Manufacturing Ltd, une société certifiée ISO 9001.
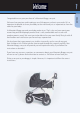
Welcome We know how precious and inspiring a new little person can be in your world. It’s so important to be able to show your baby to the world and just as important to show the world to your baby. At Mountain Buggy you and your baby matter to us. That’s why we have spent years researching and developing a product that is safe, comfortable and in tune with modern parents needs. We want you to be able to live your new family lifestyle with all the freedom and satisfaction you have always experienced.
2 For the sake of your precious passenger, please read these warnings before using your Mountain Buggy Carrycot. Important: Please read instructions carefully, follow them strictly and keep these instructions for future reference. Your child’s safety is your responsibility and may be compromised if you do not follow these instructions. Warning • Carrycot is suitable for newborns through to 6 months old, or until baby can sit up unaided.
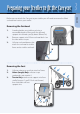
Preparing your Stroller to fit the Carrycot Removing the Sunhood 1. 2. 3. Standing beside your stroller and using a reasonable degree of force, pull the sunhood support wire towards you (by about 50mm/2in). Remove support wire W from sunhood bush J on the side nearest to you. Unfasten sunhood domes that attach the sunhood to stroller frame and to stroller seat back. W J Removing the Seat 1. 2. 3. Unfasten domes on seat that attach to frame. Urban (Jungle) Only: unfasten strap underneath seat at point A.
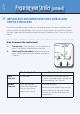
4 ››› Preparing your Stroller (continued) IMPORTANT INFORMATION FOR DOUBLE AND TRIPLE STROLLERS If you have a double or triple stroller you will need to remove the centre metal bars of the frame to release the domed fabric. You may then need to reattach the metal bars without the fabric, depending on whether you are attaching a Double or a Twin Carrycot. See chart below. How to remove the centre bar(s) 1. 2. Terrain only: undo seat base nut with a spanner at point F and remove hinge pin from seat base.
Fitting your Carrycot to your Stroller Single Stroller Double Stroller Triple Stroller Double Carrycot Configuration 2 Configuration 2 Twin Carrycot Configuration 1 Configuration 2 Single Carrycot Configuration 1 Instructions for Configuration 1 are located on pages 6-7 Instructions for Configuration 2 are located on pages 8-10 Examples of Carrycot combinations Double Stroller with 2 Double Carrycots Double Stroller with Twin Carrycot Triple Stroller with 1 Double and 1 Twin Carrycot ENGLISH
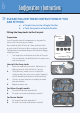
6 ››› Configuration 1 Instructions PLEASE FOLLOW THESE INSTRUCTIONS IF YOU ARE FITTING: a: a Single Carrycot to a Single Stroller b: a Twin Carrycot to a Double Stroller Fitting the Snap Locks to the Carrycot PARTS LIST Preparation Carrycot You will need to have all components on the parts list shown to fit Carrycot to your stroller. Have a look at sides of Carrycot. There are three holes on each side of Carrycot to allow snap locks to be fitted.
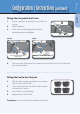
Configuration 1 Instructions (continued) ENGLISH Fitting the Carrycot to the Frame 1. Ensure snap locks are rotated so screw holes are on top. Open snap locks. Place Carrycot onto Buggy frame. Confirm positioning as pictured below. 2. 3. TERRAIN ✘ ✔ URBAN X X Y Y sunhood joint Place snap lock X directly above sunhood joint 4. tube joint Place snap lock Y directly above tube joint Push snap locks firmly down flat, making sure you hear the lock ‘click’, indicating they are fully locked.
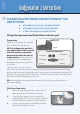
8 ››› Configuration 2 Instructions PLEASE FOLLOW THESE INSTRUCTIONS IF YOU ARE FITTING: a: a Double Carrycot to a Double Stroller b: a Double Carrycot to a Triple Stroller c: a Twin Carrycot to a Triple Stroller Fitting the Snap Locks and Slider Plate to the Carrycot Preparation PARTS LIST Make sure you have all the necessary parts as outlined in this picture.
9 Configuration 2 Instructions (continued) 5. 6. ENGLISH For Urban (Jungle) models URBAN Fit second snaplock to position B. Fit small screw and cover button to hole C. A C B For Terrain Models 5. 6. Fit second snap lock to position C. Fit small screw and cover button to hole B. TERRAIN C A B Fitting the Sliding Plate to the Carrycot • • Position sliding plate on opposite side of Carrycot to snap locks. Sliding plate screws are located at Holes A and C in side of Carrycot. Hole B is not required.
10 Configuration 2 Instructions (continued) Terrain • • Align Hole 1 of sliding plate with Hole A of Carrycot. Align Hole 2 of sliding plate with hole C of Carrycot. Place screws into Holes 1 and 2. Using Allen key, tighten in a clockwise direction. 1 TERRAIN 1 Warning: check that Carrycot attachment devices are correctly engaged before use. Fitting the Carrycot to the Frame 1. 2. 3. Ensure snap locks are rotated so screw holes are on top. Open snap locks.
Bienvenue 11 Congratulation sur l’achat de votre Mountain Buggy Nacelle. Nous savons I’ importance de votre nouveau né et combien il est précieux dans votre univers. Il est très important de pouvoir le montrer au monde mais aussi de lui faire voir le monde. Nous savons aussi que les parents se servent incorrectement des Buggys et les enfants courent le risque d’un accident. Le vous prie de prendre votre temps de lire les instructions avec soin.
12 Afin d’assurer la sécurité de votre précieux petit passager, veuillez consulter ces notes d’avertissement avant d’utiliser votre nacelle Mountain Buggy. Important: lisez ces instructions avec soin, suivez-les à la lettre et conservez-les pour une utilisation ultérieure. La sécurité de votre enfant est votre responsabilité et pourrait être compromise si vous ne les suivez pas.
Préparation de votre poussette pour l’installation de la nacelle 13 Avant d’attacher la nacelle à votre poussette, vous devez d’abord enlever le pare-soleil et le siège en tissu de la poussette. Extraction du pare-soleil 1. 3. FRANÇAIS 2. Positionnez-vous debout près de votre poussette et, en appliquant une force assez modérée, tirez le support métallique du pare-soleil vers vous (d’environ 50 mm/2 pouces).
14 ››› Préparation de votre poussette pour l’installation de la nacelle INFORMATIONS IMPORTANTES POUR LES POUSSETTES DOUBLES ET TRIPLES Si vous avez une poussette double ou triple, vous devez enlever les tiges métalliques centrales du châssis pour retirer le tissu. Vous devrez alors rattacher les tiges sans le tissu, selon le type de nacelle (double ou triple) à poser. Référez-vous à l’illustration çi-dessous. Extraction de(s) la tige(s) centrale(s) 1. 2.
Installation de la nacelle sur votre poussette 15 La pose de la nacelle sur votre poussette est simple, mais il est important de suivre les instructions correctement. Mountain Buggy ayant une large gamme de nacelles et poussettes offrant de nombreuses combinaisons, veuillez consulter les instructions adéquates dans la liste ci-dessous selon le modèle de nacelle que vous désirez poser sur votre poussette.
16 ››› Instructions 1 VEUILLEZ SUIVRE LES INSTRUCTIONS CIDESSOUS SI VOUS INSTALLEZ a: une nacelle simple à une poussette simple b: une nacelle ‘twin’ à une poussette double Pose des fermoirs sur la nacelle LISTE DES PIECES Nacelle Préparation Assurez-vous d’avoir tous les composants de la liste des pièces illustrée pour pouvoir fixer la nacelle sur votre poussette. 4 x Fermoirs Vous trouverez, sur chaque côté de la nacelle, 3 trous pour installer les fermoirs.
17 Instructions 1 Pose de la nacelle sur le châssis 1. 2. 3. TOUT TERRAIN ✘ ✔ URBAN X X Y Y joint du tube pare-soleil Placez le fermoir X directement audessus du joint du pare-soleil. 4. Placez le fermoir Y directement audessus du joint du tube métallique. Poussez les fermoirs à plat solidement et assurez-vous qu’ils ‘cliquent’, indiquant ainsi qu’ils sont bien posés. Installation des pieds de la nacelle 1. 2. 3. 4.
18 ››› Instruction 2 VEUILLEZ SUIVRE LES INSTRUCTIONS SUIVANTES SI VOUS POSEZ: a: une nacelle double à une poussette double b: une nacelle double à une poussette triple c: une nacelle ‘twin’ à une poussette triple Fixation des fermoirs et de la plaque métallique coulissante à la nacelle LISTE DES PIECES Préparation Assurez-vous d’avoir toutes les pièces nécessaires illustrées ci-dessus. Veuillez noter que ce kit n’est pas fourni avec la nacelle ‘twin’.
19 Instruction 2 Modèle Urban (Jungle) 5. 6. Installez le deuxième fermoir à la position B. Installez la petite vis et le couvre bouton dans le trou C. URBAN A C B Modèle tout terrain Installez le deuxième fermoir à la position C. Installez la petite vis et le couvre bouton dans le trou B TERRAIN C A B Installation de la plaque métallique coulissante à la nacelle • • Posez la plaque métallique coulissante sur le côté opposé de la nacelle aux fermoirs.
20 Instruction 2 Modèle tout terrain TERRAIN 1 Alignez le trou 1 de la plaque coulissante avec le trou A de la nacelle. Alignez le trou 2 de la plaque coulissante avec le trou C de la nacelle. • Placez les vis dans les trous 1 et 2. A l’aide de la clé 2 1 Allen, vissez-les dans le sens des aiguilles d’une montre. Avertissement: vérifiez que les attaches de la nacelle sont correctement engagées avant de l’utiliser. • Pose de la nacelle sur le châssis 1.
Willkommen 21 Wir gratulieren ihnen zum Kauf eines Mountain Buggy Babytragekorb (Carrycot). Wir wissen wie wertvoll und inspirierend eine neugeborene kleine Person in ihrer Welt sein kann. Es ist so wichtig ihr Baby der Welt zu zeigen und ganz genauso wichtig, ihrem Baby die Welt zu zeigen.. Bei Mountain Buggy sind Sie und ihr Baby wichtig für uns. Deshalb haben wir jahrelang geforscht und ein Produkt entwickelt, welches sicher, komfortabel und im Einklang mit den Wünschen moderner Eltern ist.
22 Bitte lesen Sie, ihrem wertvollen Passagier zu Liebe, diese Warnungen bevor Sie ihren Mountain Buggy Babytragekorb (Carrycot) benutzen. Wichtig: Lesen Sie die Anweisungen sorgfältig, befolgen Sie diese strikt und bewahren Sie die Anleitung zum Nachlesen für den Zukunft auf. Die Sicherheit ihres Kindes liegt in ihrer Verantwortung und kann beeinträchtigt werden, wenn Sie den Anweisungen nicht folgen.
Vorbereitung des Kinderwagens zur Benutzung mit dem Babytragekorb 23 Bevor Sie den Tragekorb auf dem Kinderwagen befestigen können, müssen Sie den Stoff Sonnenschutz und den Sitz ihres Kinderwagens entfernen. Entfernen des Sonnenschutzes 1. 2. DEUTSCH 3. Wenn Sie neben ihrem Kinderwagen stehen bringen Sie ein angemessenes Maß an Kraft auf und ziehen Sie den Sonnenschutz-Stützdraht zu sich (um ca. 50mm/2in).
24 ››› Vorbereitung des Kinderwagens zur Benutzung mit dem Babytragekorb WICHTIGE INFORMATIONEN FÜR DOPPEL- UND DREISITZER KINDERWAGEN Falls Sie einen Zwei- oder Dreisitzer-Kinderwagen besitzen, müssen Sie die zentralen Metallstäbe vom Rahmen entfernen um den gewölbten Stoff abziehen zu können. Eventuell müssen Sie dann die Metallstäbe ohne den Stoff wieder anbringen, je nachdem ob Sie eine Doppel- oder Zwillings-Babytragekorb befestigen. Bitte beachten Sie die folgende Darstellung.
25 Anbringen des Tragekorbs an den Kinderwagen Die Anbringung des Tragekorbs an den Kinderwagen ist einfach. Trotzdem ist es wichtig dass Sie die Anleitungen korrekt befolgen. Mountain Buggy bietet eine Reihe von Kombinationsmöglichkeiten von Tragekörben und Kinderwagen an. Wählen Sie deshalb bitte die richtige Anleitung für die Modelle die Sie kombinieren möchten, aus nachfolgender Liste aus.
26 ››› Anleitung 1 BITTE BEFOLGEN SIE DIESE ANLEITUNG WENN SIE EINE DER FOLGENDEN KOMBINATIONEN ANPASSEN/ANBRINGEN: a: b: Einzel-Tragekorb auf einem Einzel-Kinderwagen Ein Zwillings-Tragekorb auf einem Doppel-Kinderwagen Anbringen der Schnappschlösser an den Tragekorb Vorbereitung Sie müssen alle Teile der unten aufgeführten Teileliste bereitliegen haben, um den Tragekorb am Kinderwagen anzubringen. Werfen Sie einen Blick auf die Seiten des Tragekorbs.
27 Anleitung 1 TERRAIN Für Terrain Modelle 5. 6. Bringen Sie das zweite Schnappschloss an Position C an. Montieren Sie die kleine Schraube und den Abdeckknopf an der Öffnung B B ✘ Befestigung des Tragekorbs am Rahmen 1. Stellen Sie sicher dass die Schnappschlösser gedreht sind, so dass die Schraubenlöcher oben sind. Öffnen Sie die Schnappschlösser. ✔ Platzieren Sie den Tragekorb auf dem Kinderwagenrahmen. Stellen Sie sicher dass die Position so wie unten abgebildet ist.
28 ››› Anleitung 2 BITTE BEFOLGEN SIE DIESE ANLEITUNGEN WENN SIE FOLGENDE MODELLE ANBRINGEN/ANPASSEN: a: b: c: Einen Doppel- Tragekorb an einem Doppel-Kinderwagen Einen Doppel-Tragekorb an einem Dreifach-Kinderwagen Einen Zwillings-Tragekorb an einem Dreifach-Kinderwagen Anbringung der Schnappschlösser und Gleitplatte an den Tragekorb Vorbereitung Stellen Sie sicher dass Sie alle notwendigen Teile, wie im obigen Bild dargestellt, zur Verfügung haben.
29 Anleitung 2 A Anbringung der Schnappschlösser 1. 2. 3. Platzieren Sie ein Schnappschloss über der Öffnung A. Stellen Sie sicher dass es genau bündig ist mit der Öffnung im Tragekorb. Benutzen Sie den Inbusschlüssel und drehen Sie die Schraube im Schnappschloss im Uhrzeigersinn so lange bis die Schraube festsitzt. Das Schnappschloss wird weiterhin rotieren können, ist aber fest angebracht. Bringen Sie das zweite Schnappschloss wie in den unten beschriebenen Modellanleitungen an.
30 Anleitung 2 Modell Terrain TERRAIN 1 Justieren Sie Loch 1 der Gleitplatte mit dem Loch A des Tragekorbs. Justieren Sie Loch 2 der Gleitplatte mit Loch C des Tragekorbs. • Platzieren Sie die Schrauben in den Löchern 1 und 3. 2 1 Benutzen Sie den Inbusschlüssel um die Schrauben im Uhrzeigersinn fest zu ziehen. Warnung: Überprüfen Sie vor Benutzung, ob die Tragekorb Befestigungsvorrichtungen sicher eingerastet sind.
Benvenuto 31 Ci congratuliamo con voi per aver acquistato un Mountain Buggy Carrycot. Ben sappiamo quanto prezioso sia l’arrivo di un bambino nel vostro mondo! È così importante poter mostrare il nuovo arrivo al mondo e mostrare il mondo al vostro bambino. Da noi a Mountain Buggy voi e il vostro bambino siete di grande importanza. Per questo abbiamo impiegato anni alla ricerca e sviluppo di un prodotto che sia sicuro, confortevole e in tono con i bisogni dei genitori moderni.
32 Per la sicurezza del vostro prezioso “passeggero”, per favore leggete le avvertenze che seguono prima di usare il lettino portatile del vostro Mountain Buggy Carrycot. Importante: leggere le istruzioni attentamente e seguirle rigorosamente e conservare queste istruzioni per futuri riferimenti. La sicurezza del vostro bambino è la vostra responsabilità e questa sicurezza può essere compromessa se le istruzioni non sono seguite alla lettera.
Come preparare il passeggino prima di collocare il Carrycot 33 Prima di attaccare il Carrycot (lettino portatile) al passeggino bisogna rimuovere il cappuccio parasole di stoffa e il sedile del passeggino. Rimozione del cappuccio parasole 1. 2. 3. Mettetevi di fianco al passeggino, in piedi, e usando una forza moderata tirate il filo metallico di supporto al cuppuccio, verso di voi (di circa cm 5).
34 ››› Come preparare il passeggino prima di collocare il Carrycot IMPORTANTE INFORMAZIONE PER I PASSEGGINI DOPPI E TRIPLI Se voi avete un passeggino doppio o triplo, dovrete rimuovere le barre metalliche di centro del telaio per liberare la stoffa coi bottoni automatici. Poi forse dovrete riattaccare le barre metalliche senza la stoffa: questo dipende dal Carrycot (lettino portatile) che state attaccando, se il Double (doppio) o il Twin (gemelli). Vedere il diagramma qui sotto.
Come collocare il carrycot (lettino portatile) al passeggino 35 Collocare il carrycot al suo buggy è semplice ma è molto importante seguire le istruzioni correttamente.
36 ››› Istruzioni 1 PER FAVORE SEGUITE LE ISTRUZIONI SOTTOELENCATE SE DOVETE COLLOCARE: a: b: un lettino portatile singolo su un passeggino singolo un lettino portatile gemelli su un passegginoo doppio Come applicare le serrature a scatto al lettino portatile Preparazione LISTA DELLE PARTI Avrete bisogno di avere tutti i componenti della lista delle parti mostrate nella foto qui sotto per attaccare il Carrycot (lettino portatile) al vostro passeggino. Carrycot Guardate i lati del Carrycot.
37 Istruzioni 1 Come collocare il Carrycot (lettino portatile) al telaio 1. Assicuratevi che le serrature a scatto sono ruotate in modo che i buchi si trovino in alto. Aprite le serrature a scatto. Collocare il Carrycot (lettino portatile) sul telaio del Buggy. Confermare che l’impostamento è uguale ai diagrammi qui sotto. 2. 3.
38 ››› Istruzione 2 COME ATTACCARE LE SERRATURE A SCATTO E PIASTRA SCORREVOLE AL CARRYCOT a: un lettino portatile doppio a un passeggino doppio b: un lettino portatile doppio a un passeggino triplo c: un lettino portatile gemelli a un triplo passeggino Per favore eseguite queste istruzioni se volete collocare: Preparazione LISTA DELLE PARTI Assicurarsi di avere tutti i pezzi necessari come mostrato nella foto sopra.
39 Istruzione 2 Solo per i modelli Urban (Jungle) 5. 6. URBAN Collocare la seconda serratura a scatto alla posizione B Collocare la seconda vite e la sua protezione al buco C A C B Solo per modelli Terrain 5. 6.
40 Istruzione 2 Terrain • • Allineare Buco 1 della piastra scorrevole con Buco A del Carrycot (lettino portatile). Allineare Buco 2 della piastra scorrevole con Buco C del Carrycot (lettino portatile). Collocare le viti nei Buchi 1 e 2. Con la chiave Allen stringere bene in senso orario. 1 TERRAIN 1 2 Come collocare il Carrycot (lettino portatile) al telaio 1. Assicuratevi che le serrature a scatto sono ruotate in modo che i buchi si trovino in alto. 2. Aprite le serrature a scatto. 3.
Bienvenida 41 Felicitaciones por comprar uno de los productos “Mountain Buggy Cuna” Este coche para bebe. Nosotros sabemos cuan preciosa e inspiradora una personita pequeña puede ser en nuestro mundo. Es muy importante para usted mostrar su bebé al mundo entero, pero mas importante aún, mostrar el mundo a su bebé. En “Mountain Buggy” usted y su bebé son importantes. Es por eso que hemos pasado años buscando y desarrollando un producto seguro, cómodo y a tono con las necesidades de los padres modernos.
42 Para la seguridad de su valioso pasajero, por favor lea las siguientes precauciones antes de usar la cuna portable para bebe. Importante: Importante: Lea las instrucciones cuidadosamente, sígalas estrictamente y consérvelas para futuras referencias. La seguridad de su bebe es su responsabilidad y puede ser comprometida si usted no sigue estas instrucciones. Precauciones • Este coche para bebe es recomendado para recién nacidos hasta 6 meses o hasta que el bebe pueda sentarse sin ayuda.
4 3 Preparando su coche para colocar la cuna Antes de instalar la cuna al marco del coche necesita remover la gorra de tela para el sol y el asiento del coche. Removiendo la gorra para el sol 1. 2. 3. Parándose al lado del coche y usando algo de fuerza, empuje el soporte de alambre de la gorra para el sol contra suyo (acerca de 50mm/2 pulgadas) Remueva el soporte de alambre (W) desde el doblez de la gorra (J) en el lado mas cercano a usted.
44Preparando su coche para colocar la cuna ››› IMPORTANTE INFORMACION PARA COCHES DOBLES Y TRIPLES Si usted tiene un coche doble o triple, usted necesita remover las barras de metal del centro del marco para soltar la tela asegurada. Tal vez necesite reafirmar las barras de metal sin la tela, dependiendo si esta Armando un coche doble o triple. Vea el cuatro a continuación. Como remover la(s) barra(s) del centro 1. 2.
Ensamblando los soportes a la cuna portable45 Ensamblar los soportes a la cuna portable es simple. Sin embargo, es importante seguir las instrucciones correctas. Los productos ‘Mountain Buggy’ ofrecen una variedad de cunas portables y coches para bebe con varias combinaciones. Por favor elija las instrucciones que usted necesita seguir basadas en que modelo de cuna es la que desea adjuntar a su coche.
46 ››› Instrucciones 1 POR FAVOR LEA ESTAS INSTRUCCIONES SI USTED ESTA PENSANDO EN ENSAMBLAR: a: una cuna individual a un coche individual. b: una cuna “Twin” (para gemelos) a un coche doble. Instalando los soportes a la cuna Preparación LISTA DE LAS PARTES Usted necesita tener todos los componente indicados en las lista de partes mostrada en el diagrama, para poder instalar la cuna al coche. Cuna Observe los lados de la cuna portable.
47 Instrucciones 1 TERRAIN Para Modelo Terrain 5. 6. Haga entrar el soporte en la posición C. Ponga el tornillo pequeño y cubra con el boton de recubrimiento en el hueco B. C A B Paso tres: Instalando la cuna portable a los marcos del coche 1. Asegúrese que los soportes sean girados de modo que los huecos para los tronillos estén arriba. Abra los soportes Ponga la cuna portable encima del marco del coche. Conforme que la posición este correcta acorde a los diagramas a continuación. 2. 3.
48 ››› Instruccion 2 POR FAVOR SIGA ESTAS INSTRUCCIONES SI USTED ESTA PENSANDO EN ENSAMBLAR: a: una cuna doble a un coche doble. b: una cuna doble a un coche triple. c: una cuna “twin” (para gemelos) a un coche triple. Ensamblando los soportes a la cuna portable y la placa de deslizamiento al coche LISTA DE LAS PARTES Preparación: Asegúrese que tiene todas las partes necesarias detalladas en el diagrama arriba.
49 Instruccion 2 3. manecillas del reloj hasta que el tornillo este firme. El soporte se movera en forma rotativa pero debe estar firmemente asegurado. Conecte el segundo soporte acorde al modelo de las instrucciones anteriormente mencionadas. Para Modelo Urban (Jungle) 5. 6. Haga entrar el segundo soporte en la posición B. Ponga el tornillo pequeño y cubra con el boton de recubrimiento en el hueco C. Para Modelo Terrain 5. 6. Haga entrar el segundo soporte en la posición C.
50 Instruccion 2 Modelo Terrain 1 TERRAIN • Alinee el hueco 1 de la placa de deslizamiento con el hueco A de la cuna portable. Alinee el hueco 2 de la placa de deslizamiento con el hueco C de la cuna portable. 1 • Ponga los tornillos en los huecos 1 y 2. Usando la herramienta Allen asegúrelos hasta que estén firmes. Precaución: Compruebe que los seguros y soportes de la cuna portable han sido correctamente instalados antes de usarla. 2 Instalando la cuna portable al marco del coche 1.
Welkomstgroet 51 Proficiat met de aankoop van een Mountain Buggy Reiswieg. We zijn er ons van bewust hoe dierbaar en inspirerend een nieuwe kleine persoon kan zijn in uw leven. Het is zo belangrijk om uw baby de wereld te tonen, maar ook om de wereld uw baby te laten zien. Bij Mountain Buggy spelen U en uw baby een belangrijke rol.
52 Voor het eigen goed van uw dierbare passagier, gelieve deze waarschuwingen te lezen alvorens de Mountain Buggy Reiswieg te gebruiken. Belangrijk: lees de instructies aandachtig, volg hen strict en houd ze voor toekomstige raadpleging. De veiligheid van uw kind is uw verantwoordelijkheid en kan in gevaar worden gebracht als u deze instructies niet volgt Waarschuwing • De babywieg is geschikt voor pasgeborenen tot en met 6 maanden, of tot de baby zonder hulp rechtop kan zitten.
Voorbereiding van uw wandelwagen om de reiswieg te doen passen 53 Alvorens u de reiswieg kan aanbrengen moet u eerst het gestel van het zonnescherm en het zitje van uw wandelwagen verwijderen. Verwijderen van het zonnescherm 1. 2. 3. Sta naast uw wandelwagen en gebruik wat kracht, trek de steundraad van het zonnescherm naar u toe (ca 50 mm). Verwijder de steundraad (W) van de bus (J) aan de kant die het dichtst bij u is.
54 ››› Voorbereiding van uw wandelwagen om de reiswieg te doen passen BELANGRIJKE INFORMATIE VOOR DUBBELE EN TRIPLE WANDELWAGENMODELLEN Indien u een tweevoudige of drievoudige wandelwagen hebt zal u de centrale metalen stangen van het frame moeten verwijderen om de kap van het materiaal te los te maken. U moet dan de metalen stangen opnieuw vastmaken zonder het materiaal, afhankelijk of u een Dubbele of Triple reiswieg vastmaakt. Zie grafiek onderaan. Hoe de centrale stang(en) te verwijderen 1. 2.
5 5 Uw reiswieg op de wandelwagen plaatsen Het plaatsen van een reiswieg op uw wandelwagen is zeer eenvoudig. Maar het is belangrijk om de juiste instructies te volgen. Mountain Buggy biedt een aantal wandelwagen- en reiswiegcombinaties aan, dus kies de instructies die u nodig heeft van onderstaande lijst, gebaseerd op het reiswiegmodel dat u op de wandelwagen wil plaatsen.
56 ››› Instructies 1 GELIEVE DEZE INSTRUCTIES TE VOLGEN BIJ HET AANBRENGEN VAN: a: b: een single reiswieg op een single wandelwagen een twin reiswieg op een dubbele wandelwagen Aanbrengen van de knipsloten op de reiswieg LIJST ONDERDELEN Voorbereiding U heeft alle onderdelen nodig die op de onderdelenljst staan om uw reiswieg aan uw wandelwagen vast te maken. Reiswieg Kijk naar de zijkant van uw reiswieg.
57 Instructies 1 Reiswieg op het Frame monteren 1. ✘ Zorg ervoor dat de knipsloten gedraaid zitten zodat de schroefopeningen zich bovenaan bevinden. Open de knipsloten. Plaats de reiswieg op het frame van de Buggy. Bevestig plaatsing zoals hier onder is weergegeven. 2. 3. TERRAIN ✔ URBAN X X Y Y verbindingsstuk zonnekap aanhechtingspont Plaats klem X direct boven het aanhechtingspont voor de zonnekap 4.
58 ››› Instructie 2 GELIEVE DEZE INSTRUCTIES TE VOLGEN WANNEER U HET VOLGENDE MONTEERT: a: b: c: een dubbele reiswieg op een dubbele wandelwagen een dubbele reiswieg op een trippel wandelwagen een twin reiswieg op een trippel wandelwagen Voorbereiding Monteren van de Knipsloten en de Schuifplaten op de reiswieg Voorbereiding Zorg ervoor dat u alle noodzakelijke delen hebt zoals weergegeven in de tekening bovenaan.
59 Instructie 2 de schroef vastzit. Het knipslot zal nog steeds kunnen draaien, maar is stevig vastgemaakt. Maak het tweede knipslot vast volgens de modelinstructies onderaan. 3. URBAN A C B Voor Urban (Jungle) modellen 5. 6. Breng 2de knipslot in positie B aan Breng kleine moer en afsluitdop aan in opening C. Voor Terrain Modellen 5. 6. TERRAIN C A B Breng 2de knipslot in positie C aan Breng kleine moer en afsluitdop aan in opening B.
60 Instructie 2 Terrain TERRAIN 1 Pas Opening 1 van de schuifplaat aan aan Opening A van de reiswieg. Pas Opening 2 van de schuifplaat aan aan Opening C van de reiswieg. • Plaats schroeven in Openingen 1 en 2. Gebruik de 2 1 zeskantsleutel, maak vast met de wijzers van de klok mee. Waarschuwing: controleer of de monteerbare elementen van de reiswieg correct zijn vastgemaakt alvorens te gebruiken. • Monteren van de reiswieg op het Frame 1.
Vvälkomna 61 Grattis till ditt köp av en Mountain Buggy Babylift barnvagn. Vi vet hur värdefull och inspirerande en ny liten person kan vara i Ditt liv. Det är ganska viktigt att ha möjligheten att visa världen för Din bebis, men lika viktigt är det att även visa Din bebis för världen. På Mountain Buggy är Du och Din bebis av betydelse. Därför har vi spenderat årtal av forskning för att utveckla en produkt som är trygg, bekväm och i stil med moderna föräldrars behov.
62 För ditt barns skull, vänligen läs dessa varningar innan du börjar använda din Mountain Buggy Babylift. Viktig: läs instruktionerna noga, tillämpa dem strikt och behåll denna manual som framtida referens. Ditt barns säkerhet är ditt ansvar och kan äventyras om du inte följer dessa instruktioner. Varning • Babyliften tillämpar sig för spädbarn upp till 6 månader eller till och med bebisen kan sitta rak utan hjälp.
Förberedelse av din barnvagn för att montera babyliften. 63 Innan du kan montera babyliften bör du först ta bort solskyddens ram och barnvagnens säte. Att ta bort solskyddet 1. 2. 3. Stå bredvid din barnvagn och använd lite styrka, dra solskyddets stödtråd mot dig 8ca 50 mm). Ta bort stödtråden (W) från solskyddets hylsa (J) mot sidan som är närmast dig. Lossa solskyddets huv som fästas vid barnvagnens ram och sätets stolrygg. W J Att ta bort sätet 1. 2. 3.
64 ››› Förberedelse av din barnvagn för att montera babyliften. VIKTIG INFORMATION FÖR DUBBEL OCH TRIPPEL BARNVAGNSMODELLER IOm du har en dubbel eller trippel barnvagn måste du ta bort de centrala metallstänger från ramen för att lossa materialets huv. Sedan måste du åter fästa de metallstänger utan materialet, beroende om du fästar en Dubbel eller Trippel babylift. Se figur nedan. Hur ta bort den centrala stången/stänger Mittrör 1. 2.
Att montera din babylift på barnvagnen 65 Att montera din babylift på barnvagnen är ganska enkelt. Det är dock viktigt att följa de rätta instruktionerna. Mountain Buggy bjuder en hel del kombinationer för babylift och barnvagnar, så välj de instruktioner som du behöver följa från listan nedan, som är baserad på den babyliftmodell som du vill montera på barnvagnen.
66 ››› Instruktionerna 1 VÄNLIGEN FÖLJ INSTRUKTIONERNA OM DU VILL MONTERA: a: b: en singel babylift på en single barnvagn en twin babylift på en dubbel barnvagn Att montera trycklåsen på babyliften LISTA MED DE OLIKA DELAR Förberedelse Babylift Du behöver alla delar som finns med på listan med delar, för att fästa din babylift på din barnvagn. Titta på babyliftens sida. Det finns re öppningar på varje sida av babyliften, som tillåter att trycklås fästas.
67 Instruktionerna 1 Att montera babyliften på ramen 1. Se till att trycklåsen är svängda så att skruvöppningarna befinner sig överst. Öppna trycklåsen. Placera babyliften på barnvagnens ram. Placera den såsom det återges här nedan. 2. 3. TERRAIN ✘ ✔ URBAN X X Y Y hållaren Placera snap lock X direkt ovanför sufletten enligt bild 4.
68 ››› Instruktion 2 VÄNLIGEN FÖLJ DE HÄR INSTRUKTIONERNA OM DU VILL MONTERA a: en dubbel babylift på en dubbel barnvagn b: en dubbel babylift på en trippel barnvagn c: en twin babylift på en trippel barnvagn Att montera trycklåsen och skjutplåtan på babyliften Förberedelse LISTA MED DE OLIKA DELAR Se till att du har alla nödvändiga delar såsom det står på bilden ovan.
69 Instruktion 2 URBAN För Urban (Jungle) modeller 5. 6. Montera andra trycklåset på position B Montera liten skruv och skyddsknappen på öppning C För Terrain Modeller 5. 6. A C B TERRAIN Montera andra trycklåset på position C Montera liten skruv och skyddsknappen på öppning B C A B Att montera skjutplåtan på babyliften • • Placera skjutplåtan på trycklåsen på barnvagnens motsatta sida. Skjutplåtans muttrar placeras på babyliftens Öppning A och C. Öppning B behövs inte. Det finns 4 skruvöppningar.
70 Instruktion 2 Terrain • Anpassa skjutplåtans Öppning 1 till babyliftens Öppning A. Anpassa öppning 2 till babyliftens Öppning C. • Placera skruvarna i Öppningarna 1 och 2. Använd 6kantnyckel, fästa medurs. Varning: kontrollera om babyliftens monterbara delar är fästade på ett korrekt sätt innan användning. 1 TERRAIN 1 Att montera Babyliften på Ramen 1. 2. 3. Se till att trycklåset är omvänt så att skruvarna ses ovanpå.
INTERNATIONAL DISTRIBUTORS Australia Mountain Buggy Australia 223A East Boundary Road East Bentleigh, Victoria 3165, Australia Ph: (03) 9570 2833 Fax: (03) 9570 1362 Email: info@mountainbuggy.com.au www.mountainbuggy.com.au U.K. & Ireland Mountain Buggy (UK) Ltd Mill Farm, Fairmile, Ottery St Mary Devon EX11 1LS, England Ph: ++44 01 404 815 555 or 07000 4 BUGGY (07000 428 449) Fax: ++44 01 404 815 444 Email: info@mountainbuggy.co.uk www.mountainbuggy.co.