
Manual
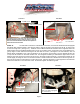

STEP 5: You will need to remove the coil bracket from the block , the lower Alt. bracket bolt and if equipped
the starter cable retainer bracket. It may also be easier to remove the wiring from the back of the Alt. to gain access
for the new longer bolt. ( see figure 4 ) Install the new PS Block Bracket and the Motor mount together, attach the
block bracket using the supplied hardware using loc-tite on the bolts, This is a tight fit and may require lifting the en-
gine up higher on this side and loosening the AC line filter for access. ( See Figure 5 for bolt locations). The coil
bracket will be reinstalled on top of the new bracket ( do not forget the ground wires), The new bracket will also set
on top of the Alt. bracket on the lower forward hole. Do not tighten the bolts yet. Reinstall the original motor mount
bolts and nuts and check to see if the motor mount is in the same location as before, if not the block bracket can be
moved slightly to realign the mount to the frame bracket. The DS bracket has a slotted hole for the through hole on
the motor mount this is to help align the mounts side to side. After the alignment is correct tighten the block bracket
bolts and the bolts and nut on the motor mount. Go back and tighten the DS through bolt.
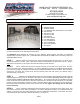
3 OEM Holes
12x.125 metric hole
New Holes 3/8x16
12-.125x30mm
3/8-16x1-1/4
3/8-16x1.5
FIGURE 1 FIGURE 2
FIGURE 3
3 OEM Holes
Coil Bracket ALT. Bracket
Back Hole
FIGURE 4
Page 2
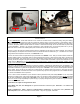
A/C Line Filter equipped
on earlier XJ’s
Alt. Wiring
3/8-16x1
Depending on your year of XJ you may not have the
bracket attaching to your block as shown. If your XJ
does not have this bracket install the thin spacer be-
tween the block and bracket.