INSTALLATION INSTRUCTION Max VESA: 600X400 mm/24X16" MODEL:MD2295 Please read this instruction carefully before installation. Fits for most 42-70 inches Plasma, LCD and LED TVs. Weight capacity: 35.5 kg (78 LBS).
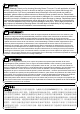
US WARNING! Safety Warning: Thank you for choosing Mounting Dream TV mount. For safe application of model MD2295, and preventing yourself or others from danger or property loss, please read through this manual before use. If you do not understand these instructions or have any doubt over safety of installation, please contact qualified contractor or Mounting Dream customer service. Please check carefully before assembly to ensure no parts missed or damaged.
Before getting started, let's make sure this mount is perfect for you! 1 Is your TV VESA equal to/greater than 200x100mm/8x4in and equal to /less than VESA 600x400mm/24x16"? MAX:600mm/24" Yes --- Perfect! MAX: 400mm/16" No --- This mount is NOT compatible. 2 Does your TV (including accessories) weigh more than 78 lbs (35.5kg)? 78 lbs (35.5kg) NO --- Perfect! Yes --- This mount is NOT compatible.
Installation tools: 2M Bubble level Socket wrench 1/2"(13mm) Stud finder Hammer Band tape 2m Pencil 3/8" 7/32" Masonry Drill Bit Wood Drill Bit Screwdriver Electrodrill Gifts: Velcro cable tie 3pcs Bubble level 1pc Part list: -Extension arm 2pcs -Wall plate unit 1pc -TV bracket 2pcs Bubble level MOUNTING TEMPLATE 16"(406mm) 8"(203mm) ① -Extension arm 2pcs Mounting template 1pc
Wall mounting and TV bracket assembly hardware: --Lag bolt 4pcs --4mm Allen key 1pc --M6X10 Bolt 4pcs --M6X15 Bolt 2pcs TV mounting hardware: a--M4X12 bolt 4 pcs b--M6X12 bolt 4 pcs c--M8X25 bolt 4 pcs d--M4X30 bolt 4 pcs e--M6X35 bolt 4 pcs f--M8X45 bolt 4 pcs g--M6 spacer 4pcs h--M8 spacer 4pcs i--10mm spacer 4pcs j--2.
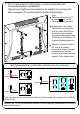
Step 1 Assemble extension arms ( , ) as picture shows, align the extension arm holes with the wall plate unit, then fasten by using Allen key . it with bolt Step 2 Wall plate installation: Option 1 Wall plate installation in wood stud CAUTION drywall with wood stud To avoid potential body injury or property damage: 1. Wall mount must be installed into wood stud's center, not drywall alone. 2. Drywall covering the wood stud must not exceed 16 mm (5/8 in.). 3.
16" ③ ④ 7/32" along the centerlines, Place Mounting template level it , and use pencil to mark 4 hole locations on the wall. Use 7/32" diameter drill bit to drill 4 pilot holes at marked positions to a depth of 2.5". ⑤ Make sure the BOLT HEAD on the wall plate is upward UP Take down the Mounting template, put 4 lag bolts into the drilled holes, and tighten each bolt by using a socket wrench to mount the wall plate securely.
Step 3 Select TV hardware (diameter / length / combination) 1 Bolt diameter: hand thread bolts into threaded inserts on the back of TV to determine correct bolt diameter (M4, M5, M6, M8). 2 Bolt length: verify adequate thread engagement with bolts or bolts/spacers combination. We recommend thread engagement by at least 5 turns. - Too short will not hold the TV. - Too long will damage the TV.
Step 4 Attach brackets to the back of the TV: ① For the TV with flat back, mount the brackets with bolt/washer/spacer combination. Tips: Make sure the ends of TV brackets with round holes are facing upward. Round hole is for upper VESA hole, and long slot hole for lower VESA hole. Please try best to locate brackets symmetrically (top & bottom) at the back of TV to avoid brackets stick out.
② For TV with inset mounting holes, mount the brackets with bolt/washer/spacer combination. (Spacers are highly recommended to be added, thus enlarge the space between TV and brackets for better functionality.) Tips: Make sure the ends of TV brackets with round holes are facing upward. Round hole is for upper VESA hole, and long slot hole for lower VESA hole. Please try best to locate brackets symmetrically (top & bottom) at the back of TV to avoid brackets stick out.
Step 5 Hang the pre-assembled TV unit onto the horizontal bars of the wall plate unit. Two people are recommended to hold and position the TV. And cables are recommended to plug in before hanging the TV. Step 6 Fasten the tube clips with brackets by using bolts with a screwdriver. Step 7 Make sure the TV unit is horizontal, you can adjust the TV plate a little bit (+/-3 degrees) to level the TV, then fasten TV plate by leveling bolts with Allen key .
Step 8 Adjust the tilting angle with spring loaded handle: Hold the TV and adjust it to your desired position, and fasten the handle and the bolt opposite to the handle. ±90° Handle Bolt ±3° To fasten the handle: Push Pull Step A Step B Turn handle clockwise until stopped by mount. Pull out the handle. Step C While holding handle away from mount, turn it counterclockwise. Step D Push and release the handle. Tips:Keep handle parallel with wall.
Step 9 Manage TV cables orderly and tie them with velcro cable ties.