
User Manual
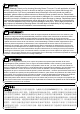


To avoid potential personal injury or property damage:
1. Make sure the BOLT HEAD on the wall plate is upward as the picture shows.
2. Solid c
oncrete wall's thickness should be more than 100mm/4", and the wall must be
capable of supporting five times the weight of the TV plus the mount.
3. All anchors/lag bolts MUST BE firmly tightened to prevent unwanted movement of the wall plate.
Ensure the wall plate is securely fastened to the wall before continuing on to the next step.
C
oncrete wall
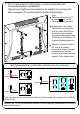
Option 2 Wall plate installation on concrete wall
①
CAUTIO
N
M
ake sure the BOLT HEAD on the wall plate is upward
put on your desire position,
adjust it make it level .
3/8"
Use 3/8" diameter
drill bit to drill 4 holes
at marked positions
to a depth of 2.5".
Ta
ke down the Mounting template, put 4 Concrete Wall
Anchors (not included in the package) into drilled holes,
and tap each anchor flush with the wall by using a
hammer. Then put 4 lag bolts into the anchors, and
tighten each bolt by using a socket wrench to mount the
wall plate securely. Before totally tightening the lag bolt
please attach the bubble level on the wall plate to check
whether it is level.
④③
16"
7/32"
④
Place Mounting template along the centerlines,
level it , and use pencil to mark 4 hole locations on
the wall.
Use 7/32" diameter drill bit to drill 4 pilot holes at
marked positions to a depth of 2.5".
⑤
M
ake sure the BOLT HEAD on the wall plate is upward
Take down the Mounting template, put 4 lag bolts into the
drilled holes, and tighten each bolt by using a socket wrench
to mount the wall plate securely.
Before totally tightening the lag bolt please attach the bubble
level on the wall plate to check whether it is level.
UP
②
③
UP