ThinkCore W311/321/341 Linux User’s Manual Second Edition, March 2007 www.moxa.com/product MOXA Systems Co., Ltd. Tel: +886-2-2910-1230 Fax: +886-2-2910-1231 Web: www.moxa.com MOXA Technical Support Worldwide: support@moxa.
ThinkCore W311/321/341 Linux User’s Manual The software described in this manual is furnished under a license agreement and may be used only in accordance with the terms of that agreement. Copyright Notice Copyright © 2007 Moxa Systems Co., Ltd. All rights reserved. Reproduction without permission is prohibited. Trademarks MOXA is a registered trademark of The Moxa Group. All other trademarks or registered marks in this manual belong to their respective manufacturers.
Table of Contents Chapter 1 Introduction ..................................................................................................1-1 Overview.................................................................................................................................. 1-2 Software Architecture .............................................................................................................. 1-2 Journaling Flash File System (JFFS2)....................................................
Chapter 4 Managing Communications ........................................................................4-1 Telnet / FTP ............................................................................................................................. 4-2 DNS ......................................................................................................................................... 4-2 Web Service—Apache .............................................................................................
Appendix A System Commands..................................................................................... A-1 busybox (V0.60.4): Linux normal command utility collection............................................... A-1 File manager.............................................................................................................. A-1 Editor......................................................................................................................... A-1 Network....................
1 Chapter 1 Introduction The MOXA ThinkCore W311/321/341 are RISC-based ready-to-run wireless embedded computers with 802.11a/b/g WLAN, one 10/100 Mbps Ethernet port, an internal SD socket, 1/2/4 RS-232/422/485 serial ports, two USB 2.0 hosts, one relay output channel, and pre-installed Linux operating system. The W311/321/341 offer high performance communication and unlimited storage in a super compact, palm-size ARM9 box.
ThinkCore W311/321/341 Linux User’s Manual Introduction Overview The ThinkCore W311/321/341 wireless embedded computers support 802.11a/b/g wireless LANs with data encryption functions, including the common WEP and powerful WPA and WPA2, to establish a secure transmission tunnel over a WLAN. ThinkCore W300 Series Embedded Computers use a MOXA ART 192 Mhz RISC CPU.
ThinkCore W311/321/341 Linux User’s Manual Introduction Factory Default Image file. The user directory saves the user’s settings and application. To improve system reliability, the W311/321/341 have a built-in mechanism that prevents the system from crashing. When the Linux kernel boots up, the kernel will mount the root file system for read only, and then enable services and daemons. At the same time, the kernel will start searching for system configuration parameters via rc or inittab.
ThinkCore W311/321/341 Linux User’s Manual Introduction Software Package Moxa Boot Loader (v1.2) Linux 2.6.9 ARP, PPP, CHAP, PAP, IPv4, ICMP, TCP, UDP, DHCP, FTP, SNMP V1/V3, HTTP, NTP, NFS, SMTP, SSH 1.0/2.
2 Chapter 2 Getting Started In this chapter, we explain how to connect the W311/321/341, how to turn on the power, how to get started programming, and how to use the W311/321/341’s other functions.
ThinkCore W311/321/341 Linux User’s Manual Getting Started Powering on the W311/321/341 Connect the SG wire to the shielded contact located in the upper left corner of the W311/321/341, and then power on the computer by connecting it to the power adaptor. It takes about 30 to 60 seconds for the system to boot up. Once the system is ready, the Ready LED will light up. NOTE After connecting the W311/321/341 to the power supply, it will take about 30 to 60 seconds for the operating system to boot up.
ThinkCore W311/321/341 Linux User’s Manual Getting Started The following window will open when a connection has been established. To log in, type the Login name and password as requested. The default values are both root: Login: root Password: root Telnet Console If you know at least one of the two IP addresses and netmasks, then you can use Telnet to connect to the W311/321/341’s console utility.
ThinkCore W311/321/341 Linux User’s Manual Getting Started You can proceed with configuring the network settings of the target computer when you reach the bash command shell. Configuration instructions are given in the next section. ATTENTION Serial Console Reminder Remember to choose VT100 as the terminal type. Use the cable CBL-4PINDB9F-100, which comes with the W311/321/341, to connect to the serial console port.
ThinkCore W311/321/341 Linux User’s Manual Getting Started Linux Users From a Linux machine, use the “ssh” command to access the W311/321/341’s console utility via SSH. #ssh 192.168.3.127 Select yes to complete the connection. [root@bee_notebook root]# ssh 192.168.3.127 The authenticity of host ‘192.168.3.127 (192.168.3.127)’ can’t be established. RSA key fingerprint is 8b:ee:ff:84:41:25:fc:cd:2a:f2:92:8f:cb:1f:6b:2f.
ThinkCore W311/321/341 Linux User’s Manual 2. Getting Started Type #vi interfaces to edit the network configuration file with vi editor. You can configure the Ethernet ports of the W341 for static or dynamic (DHCP) IP addresses. Static IP addresses As shown in the table below, 4 network addresses must be modified: address, network, netmask, and broadcast. The default IP address for LAN1 is 192.168.3.127, with default netmask of 255.255.255.0.
ThinkCore W311/321/341 Linux User’s Manual Getting Started /etc/wireless.conf Format: DEVICE=eth1 MODE=managed ESSID=any KEY=any /etc/wireless.
ThinkCore W311/321/341 Linux User’s Manual Default Setting for WIRLESS LAN iface eth1 inet static address 192.168.4.127 network: 192.168.4.0 netmask 255.255.255.0 broadcast 192.168.4.255 Getting Started Dynamic Setting using DHCP iface eth1 inet dhcp After the boot settings of the LAN interface have been modified, issue the following command to activate the LAN settings immediately: #/etc/init.d/networking restart 3.
ThinkCore W311/321/341 Linux User’s Manual Channel—Sets the channel Using iwconfig eth1 channel Setting Note: Infrastruct couldn’t set channel Freq—Sets the channel frequence Using iwconfig eth1 freq Setting(G,M,K) Note: Infrastruct couldn’t set freq 802.11b,g Channel and Frequency Table Channel Freqence 1 2412(K) 2 2417(K) 3 2422(K) 4 2427(K) 5 2432(K) 6 2437(K) 7 2442(K) 8 2447(K) 9 2452(K) 10 2457(K) 11 2462(K) 12 2467(K) 13 2472(K) 14 2484(K) 802.
ThinkCore W311/321/341 Linux User’s Manual 140 184 188 192 196 8 12 16 34 38 42 46 149 153 157 161 165 Getting Started 5700 (K) 4920 (K) 4940 (K) 4960(K) 4980 (K) 5040 (K) 5060 (K) 5080 (K) 5170 (K) 5190 (K) 5210 (K) 5230 (K) 5745 (K) 5765 (K) 5785 (K) 5805 (K) 5825 (K) AuthMode—Sets the authentication mode Using iwpriv eth1 set_auth Setting Setting Explanation 0 OPEN 1 SHARED 2 AUTO(default) KeyStr—Sets Key Support string key and hex key EncrypType—Just Support NONE , WEP64 and WEP128 depend on yo
ThinkCore W311/321/341 Linux User’s Manual Getting Started Using WPA_SUPPLICANT to Support WPA and WPA2 This embedded computer supports the WPA and WPA2 functions using the /bin/wpa_supplicant program. We wrote a shell script to help you use this function: Step 1: Edit the ssid and psk variables in the file etc/wpa_supplicant.conf. network={ ssid=”12345678901” key_mgmt=WPA-PSK proto=WPA RSN pairwise=TKIP CCMP group=TKIP CCMP psk=”0987654321234” } Step 2: Type /etc/init.d/wpa.sh eth1 start /etc/init.
ThinkCore W311/321/341 Linux User’s Manual Getting Started W341 The SD slot is located on the front panel of the W341. To install an SD card, you must first remove the SD slot’s protective cover to access the slot, and then plug the SD card directly into the slot. The SD card will be mounted at /mnt/sd. Detailed installation instructions are shown below: Step 1: Use a screwdriver to remove the screws holding the SD slot’s outer cover, and then remove the cover. Step 2: Insert the SD memory card as shown.
ThinkCore W311/321/341 Linux User’s Manual Getting Started Test Program—Developing Hello.c In this section, we use the standard “Hello” programming example to illustrate how to develop a program for the W311/321/341. In general, program development involves the following seven steps. Step 1: Connect the W311/321/341 to a Linux PC. Step 2: Install Tool Chain (GNU Cross Compiler & glibc). Step 3: Set the cross compiler and glibc environment variables. Step 4: Code and compile the program.
ThinkCore W311/321/341 Linux User’s Manual Getting Started If there isn’t enough “Available” space for your application, you will need to delete some existing files. To do this, connect your PC to the W311/321/341 with the console cable, and then use the console utility to delete the files from the W311/321/341’s flash memory. To check the amount of free space available, look at the directories in the read/write directory /dev/mtdblock3.
ThinkCore W311/321/341 Linux User’s Manual NOTE Getting Started Since Moxa’s tool chain places a specially designed Makefile in the directory /tmp/example/hello, be sure to type the #make command from within that directory. This special Makefile uses the mxscale-gcc compiler to compile the hello.c source code for the Xscale environment. If you type the #make command from within any other directory, Linux will use the x86 compiler (for example, cc or gcc). Refer to Chapter 5 to see a Makefile example.
ThinkCore W311/321/341 Linux User’s Manual Getting Started Testing Environment The tcps2 example demonstrates a simple application program that delivers transparent, bi-directional data transmission between the W311/321/341’s serial and Ethernet ports. As illustrated in the following figure, the purpose of this application is to transfer data between PC 1 and the W311/321/341 through an RS-232 connection.
ThinkCore W311/321/341 Linux User’s Manual Getting Started Compiling tcps2.c The source code for the tcps2 example is located on the CD-ROM at CD-ROM://example/TCPServer2/tcps2.c. Use the following commands to copy the file to a specific directory on your PC. We use the direrctory /home/w341/1st_application/. Note that you need to copy 3 files—Makefile, tcps2.c, tcpsp.c—from the CD-ROM to the target directory. #mount –t iso9660 /dev/cdrom /mnt/cdrom #cp /mnt/cdrom/example/TCPServer2/tcps2.
ThinkCore W311/321/341 Linux User’s Manual Getting Started Uploading and Running the “tcps2-release” Program Use the following commands to upload tcps2-release to the W311/321/341 through an FTP connection. 1. From the PC, type: #ftp 192.168.3.127 2. Next, use the bin command to set the transfer mode to Binary, and the put command to initiate the file transfer: ftp> bin ftp> cd /home ftp> put tcps2-release root@server11:/home/w341/1st_application [root@server11 1st_application]# ftp 192.168.3.
ThinkCore W311/321/341 Linux User’s Manual Getting Started 4. The program should start running in the background. Use the #ps –ef command to check if the tcps2 program is actually running in the background. #ps // use this command to check if the program is running 192.168.3.
ThinkCore W311/321/341 Linux User’s Manual NOTE Use the kill -9 Getting Started command for PID 728 to terminate this program: #kill -9 %728 Testing Procedure Summary 1. 2. 3. 4. 5. 6. 7. 8. 9. Compile tcps2.c (#make). Upload and run tcps2-release in the background (#./tcps2-release &). Check that the process is running (#jobs or #ps -ef). Use a serial cable to connect PC1 to the W311/321/341’s serial port 1. Use an Ethernet cable to connect PC2 to the W311/321/341.
3 Chapter 3 Managing Embedded Linux This chapter includes information about version control, deployment, updates, and peripherals. The information in this chapter will be particularly useful when you need to run the same application on several W311/321/341 units.
ThinkCore W311/321/341 Linux User’s Manual Managing Embedded Linux System Version Information To determine the hardware capability of your W311/321/341, and what kind of software functions are supported, check the version numbers of your W311/321/341’s hardware, kernel, and user file system. Contact Moxa to determine the hardware version. You will need the Production S/N (Serial number), which is located on the W311/321/341’s bottom label. To check the kernel version, type: #kversion 192.168.3.
ThinkCore W311/321/341 Linux User’s Manual Managing Embedded Linux Since different Flash disks have different sizes, it is a good idea to check the size of your Flash disk before upgrading the firmware, or before using the disk to store your application and data files. Use the #df –h command to list the size of each memory block and how much free space is available in each block. 192.168.3.127 – PuTTY root@Moxa:~# df -h Filesystem Size Used Available Use% /dev/mtdblock2 8.0M 6.0M 2.0M /dev/ram0 499.0k 16.
ThinkCore W311/321/341 Linux User’s Manual Managing Embedded Linux 2. Type the following commands to use the W311/321/341’s built-in FTP client to transfer the firmware file (W341-x.x.x.frm) from the PC to the W311/321/341: /mnt/ramdisk> ftp Login Name: xxxx Login Password: xxxx ftp> bin ftp> get -x.x.x.frm 192.168.3.127 – PuTTY root@Moxa:/mnt/ramdisk# ftp 192.168.3.193 Connected to 192.168.3.193 (192.168.3.193). 220 TYPSoft FTP Server 1.10 ready… Name (192.168.3.
ThinkCore W311/321/341 Linux User’s Manual Managing Embedded Linux ATTENTION The upfirm utility will reboot your target after the upgrade is OK. Loading Factory Defaults To load the the factory default settings, you must press the reset-to-default button for more than 5 seconds. All files in the /home & /etc directories will be destroyed. Note that while pressing the reset-to-default button, the Ready LED will blink once every second for the first 5 seconds.
ThinkCore W311/321/341 Linux User’s Manual Managing Embedded Linux Deploying the User Directory to Additional W311/321/341 Units For some applications, you may need to ghost one W311/321/341 user file system to other W311/321/341 units. Back up the user file system to a PC (refer to the previous subsection, Backing Up the User File System, for instructions), and then type the following commands to copy the backup to additional W311/321/341 units. #upramdisk #cd /mnt/ramdisk #upfirm usrfs-backup 192.168.3.
ThinkCore W311/321/341 Linux User’s Manual Managing Embedded Linux Type the command “ps –ef” to list all processes currently running. 192.168.3.
ThinkCore W311/321/341 Linux User’s Manual Managing Embedded Linux The enabled daemons will be available after you reboot the system. 192.168.3.
ThinkCore W311/321/341 Linux User’s Manual Managing Embedded Linux 192.168.3.127 – PuTTY root@Moxa:/ect/rc.d/rc3.d# ls S19nfs-common S25nfs-user-server S99showreadyled S20snmpd S55ssh S24pcmcia S99rmnologin root@Moxa:/ect/rc.d/rc3.d# ln –s /home/tcps2-release S60tcps2 root@Moxa:/ect/rc.d/rc3.d# ls S19nfs-common S25nfs-user-server S99rmnologin S20snmpd S55ssh S99showreadyled S24pcmcia S60tcps2 root@Moxa:/etc/rc.d/rc3.d# KxxRUNFILE stands for K: start the run file while linux shuts down or halts.
ThinkCore W311/321/341 Linux User’s Manual Managing Embedded Linux The following figure illustrates how to update thesystem time and set the RTC time. 192.168.3.127 – PuTTY root@Moxa:~# date Fri Jun 23 23:30:31 CST 2000 root@Moxa:~# hwclock Fri Jun 23 23:30:35 2000 -0.557748 seconds root@Moxa:~# date 120910002004 Thu Dec 9 10:00:00 CST 2004 root@Moxa:~# hwclock –w root@Moxa:~# date ; hwclock Thu Dec 9 10:01:07 CST 2004 Thu Dec 9 10:01:08 2004 -0.
ThinkCore W311/321/341 Linux User’s Manual Managing Embedded Linux How to run the shell script automatically when the kernel boots up Copy the example shell script fixtime to directory /etc/init.d, and then use to change the shell script mode. Next, use vi editor to edit the file Add the following line to the bottom of the file: chmod 755 fixtime /etc/inittab. ntp : 2345 : respawn : /etc/init.d/fixtime Use the command #init q to re-init the kernel.
4 Chapter 4 Managing Communications In this chapter, we explain how to configure the W311/321/341’s various communication functions.
ThinkCore W311/321/341 Linux User’s Manual Managing Communications Telnet / FTP In addition to supporting Telnet client/server and FTP client/server, the W311/321/341 also support SSH and sftp client/server. To enable or disable the Telnet/ftp server, you first need to edit the file /etc/inetd.conf. Enabling the Telnet/ftp server The following example shows the default content of the file /etc/inetd.conf.
ThinkCore W311/321/341 Linux User’s Manual Managing Communications /home/httpd/cgi-bin/ Before you modify the homepage, use a browser (such as Microsoft Internet Explorer or Mozilla Firefox) from your PC to test if the Apache Web Server is working. Type the LAN1 IP address in the browser’s address box to open the homepage. E.g., if the default IP address is still active, type http://192.168.3.127 in the address box. To open the default CGI page, type http://192.168.3.
ThinkCore W311/321/341 Linux User’s Manual Managing Communications To open the default CGI test script report page, type http://192.168.3.127/cgi-bin/test-cgi in your browser’s address box. NOTE The CGI function is enabled by default. If you want to disable the function, modify the file /etc/apache/conf/httpd.conf. When you develop your own CGI application, make sure your CGI file is executable. 192.168.3.
ThinkCore W311/321/341 Linux User’s Manual Managing Communications Step 2: Type ‘upramdisk’ to get the free space ram disk to save the package. 192.168.3.127 – PuTTY root@Moxa:/bin# upramdisk root@Moxa:/bin# df -h Filesystem Size /dev/mtdblock2 8.0M /dev/ram0 499.0k /dev/mtdblock3 6.0M /dev/mtdblock3 6.0M /dev/mtdblock3 6.0M tmpfs 30.4M /dev/ram1 16.0M root@Moxa:/bin# Used Available Use% Mounted on 6.0M 2.0M 75% / 18.0k 456.0k 4% /var 488.0k 5.5M 8% /tmp 488.0k 5.5M 8% /home 488.0k 5.5M 8% /etc 0 30.
ThinkCore W311/321/341 Linux User’s Manual Managing Communications Step 5: Run ‘install.sh’ and select to install php 192.168.3.127 – PuTTY root@Moxa:/mnt/ramdisk# ./install.sh Press the number: 1. Install PHP package 2. Uninstall PHP package 3. Exit. 1 Start to install PHP. Please wait ... Starting web server: apache. PHP install sucess. root@Moxa:/mnt/ramdisk# Step 6: Test it. Use the browser to access http://192.168.3.127/phpinfo.
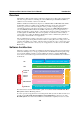
ThinkCore W311/321/341 Linux User’s Manual Managing Communications IPTABLES IPTABLES is an administrative tool for setting up, maintaining, and inspecting the Linux kernel’s IP packet filter rule tables. Several different tables are defined, with each table containing built-in chains and user-defined chains. Each chain is a list of rules that apply to a certain type of packet. Each rule specifies what to do with a matching packet.
ThinkCore W311/321/341 Linux User’s Manual Managing Communications Incoming Packets Mangle Table PREROUTING Chain NAT Table PREROUTING Chain Local Host Packets Other Host Packets Mangle Table INPUT Chain Mangle Table FORWARD Chain Filter Table INPUT Chain Filter Table FORWARD Chain Local Process Mangle Table POSTROUTING Chain Mangle Table OUTPUT Chain NAT Table OUTPUT Chain Filter Table OUTPUT Chain NAT Table POSTROUTING Chain Outgoing Packets The W311/321/341 support the following sub-modules.
ThinkCore W311/321/341 Linux User’s Manual NOTE Managing Communications The W311/321/341 do NOT support IPV6 and ipchains. The basic syntax to enable and load an IPTABLES module is as follows: #lsmod #insmod ip_tables #insmod iptable_filter Use lsmod to check if the ip_tables module insmod to insert and enable the module. has already been loaded in the W311/321/341 unit.
ThinkCore W311/321/341 Linux User’s Manual Managing Communications Define policy for chain rules Usage: # iptables [-t tables] [-P] [INPUT, OUTPUT, FORWARD, PREROUTING, OUTPUT, POSTROUTING] [ACCEPT, DROP] -P: Set the policy for the chain to the given target. INPUT: For packets coming into the W311/321/341. OUTPUT: For locally-generated packets. FORWARD: For packets routed out through the W311/321/341. PREROUTING: To alter packets as soon as they come in.
ThinkCore W311/321/341 Linux User’s Manual Managing Communications Example 8: Drop all packets from MAC address 01:02:03:04:05:06. # iptables –A INPUT –i eth0 –p all –m mac -–mac-source 01:02:03:04:05:06 –j DROP NOTE: In Example 8, remember to issue the command ipt_mac. #insmod ipt_mac first to load module NAT NAT (Network Address Translation) protocol translates IP addresses used on one network to different IP addresses used on another network.
ThinkCore W311/321/341 Linux User’s Manual Managing Communications Enabling NAT at Bootup In most real world situations, you will want to use a simple shell script to enable NAT when the W341 boots up. The following script is an example. #!/bin/bash # If you put this shell script in the /home/nat.sh # Remember to chmod 744 /home/nat.sh # Edit the rc.local file to make this shell startup automatically. # vi /etc/rc.d/rc.local # Add a line in the end of rc.local /home/nat.
ThinkCore W311/321/341 Linux User’s Manual Managing Communications optional. #pppd connect ‘chat -v “ “ ATDT5551212 CONNECT “ “ ogin: username word: password’ /dev/ttyM0 115200 debug crtscts modem defaultroute If the PPP server does not prompt for the username and password, the command should be entered as follows. Replace username with the correct username and replace password with the correct password.
ThinkCore W311/321/341 Linux User’s Manual Managing Communications Example 2: Connecting to a PPP server over a hard-wired link If a username and password are not required, use the following command (note that noipdefault is optional): #pppd connect ‘chat –v “ “ “ “ ‘ noipdefault /dev/ttyM0 19200 crtscts If a username and password is required, use the following command (note that noipdefault is optional, and root is both the username and password): #pppd connect ‘chat –v “ “ “ “ ‘ user root password root
ThinkCore W311/321/341 Linux User’s Manual Managing Communications This should show three routes, something like this: Kernel routing table Destination Gateway iface 129.67.1.165 0.0.0.0 ppp0 127.0.0.0 0.0.0.0 0.0.0.0 129.67.1.165 ppp0 Genmask Flags Metric Ref Use 255.255.255.255 UH 0 0 6 255.0.0.0 0.0.0.0 U UG 0 0 0 0 0 lo 6298 If your output looks similar but doesn’t have the destination 0.0.0.
ThinkCore W311/321/341 Linux User’s Manual Managing Communications 4. Edit the file /etc/ppp/pap-secrets and add the following: “username@hinet.net” *“password” * “username@hinet.net” is the username obtained from the ISP to log in to the ISP account. “password” is the corresponding password for the account. 5.
ThinkCore W311/321/341 Linux User’s Manual Managing Communications 6. Add one of two files: /etc/ppp/options.eth0 or /etc/ppp/options.eth1. The choice depends on which LAN is connected to the ADSL modem. If you use LAN1 to connect to the ADSL modem, then add /etc/ppp/options.eth0. If you use LAN2 to connect to the ADSL modem, then add /etc/ppp/options.eth1. The file context is shown below: 7. 8. 9. 10.
ThinkCore W311/321/341 Linux User’s Manual NOTE Managing Communications Click on the following links for more information about NFS: http://www.tldp.org/HOWTO/NFS-HOWTO/index.html http://nfs.sourceforge.net/nfs-howto/client.html http://nfs.sourceforge.net/nfs-howto/server.html Setting up the W311/321/341 as an NFS Client The following procedure is used to mount a remote NFS Server. 1. 2. 3. To know the NFS Server’s shared directory. Establish a mount point on the NFS Client site.
ThinkCore W311/321/341 Linux User’s Manual 3: sysUpTime.0 (timeticks) 0 days 03h:50m:11s.00th (1381100) 4: sysContact.0 (octet string) Moxa Systems Co., LDT. 5: sysName.0 (octet string) Moxa 6: sysLocation.0 (octet string) Unknown 7: sysServices.0 (integer) 6 8: ifNumber.0 (integer) 6 9: ifIndex.1 (integer) 1 10: ifIndex.2 (integer) 2 11: ifIndex.3 (integer) 3 12: ifIndex.4 (integer) 4 13: ifIndex.5 (integer) 5 14: ifIndex.6 (integer) 6 15: ifDescr.1 (octet string) eth0 16: ifDescr.
ThinkCore W311/321/341 Linux User’s Manual 70: ifInUcastPkts.2 (counter) 28224 71: ifInUcastPkts.3 (counter) 0 72: ifInUcastPkts.4 (counter) 0 73: ifInUcastPkts.5 (counter) 0 74: ifInUcastPkts.6 (counter) 0 75: ifInNUcastPkts.1 (counter) 0 76: ifInNUcastPkts.2 (counter) 0 77: ifInNUcastPkts.3 (counter) 0 78: ifInNUcastPkts.4 (counter) 0 79: ifInNUcastPkts.5 (counter) 0 80: ifInNUcastPkts.6 (counter) 0 81: ifInDiscards.1 (counter) 0 82: ifInDiscards.2 (counter) 0 83: ifInDiscards.
ThinkCore W311/321/341 Linux User’s Manual Managing Communications 137: ifSpecific.3 (object identifier) (null-oid) zeroDotZero 138: ifSpecific.4 (object identifier) (null-oid) zeroDotZero 139: ifSpecific.5 (object identifier) (null-oid) zeroDotZero 140: ifSpecific.6 (object identifier) (null-oid) zeroDotZero 141: atIfIndex.1.192.168.27.139 (integer) 1 142: atIfIndex.2.192.168.4.127 (integer) 2 143: atPhysAddress.1.192.168.27.139 (octet string) 00.90.E8.10.02.41 (hex) 144: atPhysAddress.2.192.168.4.
ThinkCore W311/321/341 Linux User’s Manual Managing Communications 204: ipNetToMediaPhysAddress.1.192.168.27.139 (octet string) 00.90.E8.10.02.41 (hex) 205: ipNetToMediaPhysAddress.2.192.168.4.127 (octet string) 00.90.E8.10.02.40 (hex) 206: ipNetToMediaNetAddress.1.192.168.27.139 (ipaddress) 192.168.27.139 207: ipNetToMediaNetAddress.2.192.168.4.127 (ipaddress) 192.168.4.127 208: ipNetToMediaType.1.192.168.27.139 (integer) static(4) 209: ipNetToMediaType.2.192.168.4.
ThinkCore W311/321/341 Linux User’s Manual Managing Communications 271: tcpConnLocalAddress.192.168.27.139.1025.0.0.0.0.0 (ipaddress) 192.168.27.139 272: tcpConnLocalAddress.192.168.4.127.1025.0.0.0.0.0 (ipaddress) 192.168.4.127 273: tcpConnLocalAddress.192.168.27.139.2049.0.0.0.0.0 (ipaddress) 192.168.27.139 274: tcpConnLocalAddress.192.168.4.127.2049.0.0.0.0.0 (ipaddress) 192.168.4.127 275: tcpConnLocalAddress.192.168.27.139.1026.0.0.0.0.0 (ipaddress) 192.168.27.139 276: tcpConnLocalAddress.192.168.4.
ThinkCore W311/321/341 Linux User’s Manual Managing Communications 338: tcpConnRemPort.192.168.4.127.9.0.0.0.0.0 (integer) 0 339: tcpConnRemPort.192.168.27.139.111.0.0.0.0.0 (integer) 0 340: tcpConnRemPort.192.168.4.127.111.0.0.0.0.0 (integer) 0 341: tcpConnRemPort.192.168.27.139.80.0.0.0.0.0 (integer) 0 342: tcpConnRemPort.192.168.4.127.80.0.0.0.0.0 (integer) 0 343: tcpConnRemPort.192.168.27.139.21.0.0.0.0.0 (integer) 0 344: tcpConnRemPort.192.168.4.127.21.0.0.0.0.0 (integer) 0 345: tcpConnRemPort.192.
ThinkCore W311/321/341 Linux User’s Manual 405: rs232PortOutSigNumber.2 (integer) 2 406: rs232PortOutSigNumber.3 (integer) 2 407: rs232PortOutSigNumber.4 (integer) 2 408: rs232PortInSpeed.1 (integer) 38400 409: rs232PortInSpeed.2 (integer) 38400 410: rs232PortInSpeed.3 (integer) 38400 411: rs232PortInSpeed.4 (integer) 38400 412: rs232PortOutSpeed.1 (integer) 38400 413: rs232PortOutSpeed.2 (integer) 38400 414: rs232PortOutSpeed.3 (integer) 38400 415: rs232PortOutSpeed.
ThinkCore W311/321/341 Linux User’s Manual Managing Communications 472: rs232OutSigPortIndex.1.4 (integer) 1 [1] 473: rs232OutSigPortIndex.2.4 (integer) 2 [2] 474: rs232OutSigPortIndex.3.4 (integer) 3 [3] 475: rs232OutSigPortIndex.4.4 (integer) 4 [4] 476: rs232OutSigName.1.1 (integer) rts(1) 477: rs232OutSigName.2.1 (integer) rts(1) 478: rs232OutSigName.3.1 (integer) rts(1) 479: rs232OutSigName.4.1 (integer) rts(1) 480: rs232OutSigName.1.4 (integer) dtr(4) 481: rs232OutSigName.2.
ThinkCore W311/321/341 Linux User’s Manual Managing Communications OpenVPN OpenVPN provides two types of tunnels for users to implement VPNS: Routed IP Tunnels and Bridged Ethernet Tunnels. To begin with, check to make sure that the system has a virtual device /dev/net/tun. If not, issue the following command: # mknod /dev/net/tun c 10 200 An Ethernet bridge is used to connect different Ethernet networks together. The Ethernets are bundled into one bigger, “logical” Ethernet.
ThinkCore W311/321/341 Linux User’s Manual Managing Communications NETMASK= BROADCAST= # it is not a great idea but this system doesn’t support # /etc/sysconfig/network-scripts/ifcfg-eth1 ifcfg_vpn() { while read f1 f2 f3 f4 r3 do if [ “$f1” = “iface” -a “$f2” = “$iface” -a “$f3” = “inet” -a “$f4” = “static” ];then i=`expr 0` while : do if [ $i -gt 5 ]; then break fi i=`expr $i + 1` read f1 f2 case “$f1” in address ) IPADDR=$f2 ;; netmask ) NETMASK=$f2 ;; broadcast ) BROADCAST=$f2 ;; esac done break fi do
ThinkCore W311/321/341 Linux User’s Manual Managing Communications mname=tun module_up mname=bridge module_up # create an ethernet bridge to connect tap devices, internal interface brctl addbr br0 brctl addif br0 $iface # the bridge receives data from any port and forwards it to other ports. i=`expr 0` while : do # generate a tap0 interface on tun openvpn --mktun --dev tap${i} # connect tap device to the bridge brctl addif br0 tap${i} # null ip address of tap device ifconfig tap${i} 0.0.0.
ThinkCore W311/321/341 Linux User’s Manual Managing Communications ;; restart) stop start ;; *) echo “Usage: $0 [start|stop|restart]” exit 1 esac exit 0 #---------------------------------- end ----------------------------- Create link symbols to enable this script at boot time: # ln -s /etc/openvpn/openvpn-bridge /etc/rc.d/rc3.d/S32vpn-br # for example # ln -s /etc/openvpn/openvpn-bridge /etc/rc.d/rc6.d/K32vpn-br # for example 3. Create a configuration file named A-tap0-br.
ThinkCore W311/321/341 Linux User’s Manual Managing Communications 5. On each OpenVPN machine, check the routing table by typing the command: # route Destination 192.168.4.0 192.168.2.0 192.168.8.0 Gateway * * * Genmsk 255.255.255.0 255.255.255.0 255.255.255.0 Flags U U U Metric 0 0 0 Ref 0 0 0 Use 0 0 0 Iface br0 br0 eth0 Interface eth1 is connected to the bridging interface br0, to which device tap0 also connects, whereas the virtual device tun sits on top of tap0.
ThinkCore W311/321/341 Linux User’s Manual 2. Managing Communications The configuration procedure is almost the same as for the previous example. The only difference is that you will need to comment out the parameter “up” in “/etc/openvpn/A-tap0-br.conf” and “/etc/openvpn/B-tap0-br.conf”. Setup 3: Routed IP 1. Set up four machines as shown in the following diagram: Host A local net LAN1: 192.168.2.173 OpenVPN A LAN1: 192.168.2.171 Internet LAN2: 192.168.8.173 LAN1: 192.168.8.174 LAN1: 192.168.4.
ThinkCore W311/321/341 Linux User’s Manual Managing Communications # value after “-net” is the subnet behind the remote peer route add -net 192.168.2.0 netmask 255.255.255.0 gw $5 #--------------------------------- end ----------------------------- Note that the parameter “ifconfig” defines the first argument as the local internal interface and the second argument as the internal interface at the remote peer. Note that $5 is the argument that the OpenVPN program passes to the script file.
5 Chapter 5 Tool Chains for Application Development This chapter describes how to install a tool chain in the host computer that you use to develop your applications. In addition, the process of performing cross-platform development and debugging are also introduced. For clarity, the W311/321/341 embedded computer is called a target computer.
ThinkCore W311/321/341 Linux User’s Manual Tool Chains for Application Development Linux Tool Chain The Linux tool chain contains a suite of cross compilers and other tools, as well as the libraries and header files that are necessary to compile your applications. These tool chain components must be installed in your host computer (PC) running Linux. We have confirmed that the following Linux distributions can be used to install the tool chain. Fefora core 1 & 2.
ThinkCore W311/321/341 Linux User’s Manual Tool Chains for Application Development The following cross compiler tools are provided: ar Manages archives (static libraries) as Assembler c++, g++ C++ compiler cpp C preprocessor gcc C compiler gdb Debugger ld Linker nm Lists symbols from object files objcopy Copies and translates object files objdump Displays information about object files ranlib Generates indexes to archives (static libraries) readelf Displays information about ELF fil
ThinkCore W311/321/341 Linux User’s Manual Tool Chains for Application Development Windows Tool Chain The Windows tool chain is a cross development environment that simulates the Linux root file system, allowing users to develop applications in a Windows PC environment. The following figure shows an example of what the tool chain looks like. / Your group is currently “mkpasswd”.
ThinkCore W311/321/341 Linux User’s Manual Tool Chains for Application Development 1. Double click on the tool chain file to start the installtion process, and choose Next. 2. Browse to the directory where you prefer to set the root directory for the tool chain. Options of All Users and Unix are recommended. Then, choose Next. If you have installed a tool chain before, its root directory would show up in the Root Directory text field.
ThinkCore W311/321/341 Linux User’s Manual Tool Chains for Application Development 3. Navigate to the directory where the packages of the tool chain reside. By default, it is on the CD-ROM: \\tool-chain\windows. Choose Next to proceed. It may take anywhere from 5 to 20 minutes to check the packages in the CD-ROM. 4. All packages are selected by default. Choose Next to continue. y Category column: Shows a hierarchical display of packages with category name highest and package name lowest.
ThinkCore W311/321/341 Linux User’s Manual Tool Chains for Application Development y Base Category: List all packages that will be installed by default (along with any dependencies). If you view the Base column for the Base category, you should see every package selected for installation. y Packages: In the packages listing field, package names are arranged by Category/Full/Partial according to the View by button.
ThinkCore W311/321/341 Linux User’s Manual Tool Chains for Application Development 6. Checkmark Create icon on Desktop to place a Moxa BASH Shell icon on your desktop, and then click on Finish. 7. Click on OK to complete the installation process.
ThinkCore W311/321/341 Linux User’s Manual Tool Chains for Application Development Using the BASH Shell A command-line interface is used to develop applications with the tool chain. To access the command line, you need to launch a BASH shell window. To open a BASH shell window, choose Start Menu Æ Programs Æ UC Tool Chain Æ Moxa Bash Shell, or click on the desktop Moxa Bash Shell icon. / Your group is currently “mkpasswd”.
ThinkCore W311/321/341 Linux User’s Manual Tool Chains for Application Development Compilation for Applications Windows tool chain is a cross compiler that can be used to compile Linux source code on a Windows operating system, allowing programmers to develop projects on a Windows-based PC. In this section, we describe the procedures you should follow to compile a project with the Windows tool chain. First, copy the source code of your project in the Windows tool chain’s installation directory.
ThinkCore W311/321/341 Linux User’s Manual Tool Chains for Application Development Next, enter the hello directory and invoke the make program that will execute the compilation instructions written in the Makefile to compile the hello project.
ThinkCore W311/321/341 Linux User’s Manual Tool Chains for Application Development On-Line Debugging with Insight Insight is a graphical user interface that accompanies GDB, the GNU Debugger was written in Tcl/Tk by people working at Red Hat, Inc., and Cygnus Solutions. Red Hat was generous enough to make Insight available for public use, and continues to maintain the program. Click on http://sources.redhat.
6 Chapter 6 Programmer’s Guide This chapter includes important information for programmers.
ThinkCore W311/321/341 Linux User’s Manual Programmer’s Guide Flash Memory Map Partition sizes are hard coded into the kernel binary. To change the partition sizes, you will need to rebuild the kernel. The flash memory map is shown in the following table. Address 0x00000000 – 0x0003FFFF 0x00040000 – 0x001FFFFF 0x00200000 – 0x009FFFFF 0x00A00000 – 0x00FFFFFF Size 256 KB 1.
ThinkCore W311/321/341 Linux User’s Manual Programmer’s Guide Buzzer The device node is located at /dev/console. The W311/321/341 support Linux standard buzzer control, with the W311/321/341’s buzzer running at a fixed frequency of 100 Hz. You must include . Function: KDMKTONE ioctl(fd, KDMKTONE, unsigned int arg); Description: The buzzer’s behavior is determined by the argument arg.
ThinkCore W311/321/341 Linux User’s Manual Programmer’s Guide int swtd_enable(int fd, unsigned long time) Description Enable application sWatchDog. And you must do ack after this process. Input int fd - the file handle, from the swtd_open() return value. unsigned long time - The time you wish to ack sWatchDog periodically. You must ack the sWatchDog before timeout. If you do not ack, the system will be reboot automatically. The minimal time is 50 msec, the maximum time is 60 seconds.
ThinkCore W311/321/341 Linux User’s Manual Programmer’s Guide int swtd_ack(int fd) Description Acknowledge sWatchDog. When the user application enable sWatchDog. It need to call this function periodically with user predefined time in the application program. Input int fd - the file handle from swtd_open() return value. Output OK will be zero. The other has some error, to get error code from errno(). int swtd_close(int fd) Description Close the file handle.
ThinkCore W311/321/341 Linux User’s Manual } The makefile is shown below: all: arm-linux-gcc –o xxxx xxxx.c –lmoxalib Example 2: #include #include #include #include #include #include #include #include #include static void mydelay(unsigned long msec) { struct timeval time; time.tv_sec = msec / 1000; time.
ThinkCore W311/321/341 Linux User’s Manual Programmer’s Guide The makefile is shown below: all: arm-linux-gcc –o xxxx xxxx.c –lmoxalib UART The normal tty device node is located at /dev/ttyM0 … ttyM3. The W311/321/341 support Linux standard termios control. The Moxa UART Device API allows you to configure ttyM0 to ttyM3 as RS-232, RS-422, 4-wire RS-485, or 2-wire RS-485. The W311/321/341 support RS-232, RS-422, 2-wire RS-485, and 4-wire RS485.
ThinkCore W311/321/341 Linux User’s Manual Programmer’s Guide if ( (term.c_cflag & (CBAUD|CBAUDEX)) != B4000000 ) { // follow the standard termios baud rate define } else { ioctl(fd, MOXA_GET_SPECIAL_BAUD_RATE, &speed); } Baudrate inaccuracy Divisor = 921600/Target Baud Rate. (Only Integer part) ENUM = 8 * (921600/Targer - Divisor) ( Round up or down) Inaccuracy = (Target Baud Rate – 921600/(Divisor + (ENUM/8))) * 100% E.g., To calculate 500000 bps Divisor = 1, ENUM = 7, Inaccuracy = 1.
7 Chapter 7 Software Lock “Software Lock” is an innovative technology developed by the Moxa engineering team. It can be adopted by a system integrator or developer to protect his applications from being copied. An application is compiled into a binary format bound to the embedded computer and the operating system (OS) that the application runs on. As long as one obtains it from the computer, he/she can install it into the same hardware and the same operating system.
8 Chapter 8 UC Finder UC Finder comes in handy if you forget the IP address of the target computer while you have a demand for troubleshooting field problems. This utility works by sending a broadcast message over the LAN to search for IP addresses of target computers. Two versions of UC Finder are provided. The GUI version works in Windows environments, and the command line utility works in Linux environments.
ThinkCore W311/321/341 Linux User’s Manual UC Finder Windows UC Finder The UC Finder utility is used to search the LAN or intranet for Moxa embedded computers. Installing the Software 1. Once the Setup program starts running, click on Next to proceed. 2. Click on Next when the Select Additional Tools window opens to proceed with the installation.
ThinkCore W311/321/341 Linux User’s Manual UC Finder 3. Click on Next to install program files in the default directory, or select an alternative location. 4. Click on Finish to complete the installation of UC Finder. Broadcast Search The Broadcast Search function is used to locate all W311/321/341 units that are connected to the same LAN as your Windows computer.
ThinkCore W311/321/341 Linux User’s Manual NOTE UC Finder 1. Click o n the Broadcast Search button to start searching. 2. The Searching window displays the Model, MAC Address, and IP Address of devices that were located.. 3. When the search is complete, the same information is displayed in the UC Finder window. UC Finder is designed to determine the IP addresses of all UC units connected to the same LAN the host that is running UC Finder.
A Appendix A System Commands busybox (V0.60.4): Linux normal command utility collection File manager 1. 2. 3. 4. 5. 6. 7. 8. 9. 10. 11. 12. 13. 14.
ThinkCore W311/321/341 Linux User’s Manual Process 1. kill 2. ps kill process display now running process 1. 2. 3. 4. 5. 6. 7. 8. 9. 10. 11. 12. 13. dump kernel log message to set serial port dump .
B Appendix B Service Information This appendix shows you how to contact Moxa for information about this and other products, and how to report problems.
ThinkCore W311/321/341 Linux User’s Manual Service Information MOXA Internet Services Customer satisfaction is our number one concern, and to ensure that customers receive the full benefit of our products, Moxa Internet Services has been set up to provide technical support, driver updates, product information, and user’s manual updates. The following services are provided E-mail for technical support................................support@moxa.com World Wide Web (WWW) Site for product information: ......
ThinkCore W311/321/341 Linux User’s Manual Service Information Problem Report Form MOXA ThinkCore W311/321/341 Customer name: Company: Tel: Fax: Email: Date: 1. Moxa Product: ThinkCore W311 ThinkCore W321 ThinkCore W341 2. Serial Number: _________________ Problem Description: Please describe the symptoms of the problem as clearly as possible, including any error messages you see.
ThinkCore W311/321/341 Linux User’s Manual Service Information Product Return Procedure For product repair, exchange, or refund, the customer must: Provide evidence of original purchase. Obtain a Product Return Agreement (PRA) from the sales representative or dealer. Fill out the Problem Report Form (PRF). Include as much detail as possible for a shorter product repair time. Carefully pack the product in an anti-static package, and send it, pre-paid, to the dealer.