
User`s manual

UC-8410/8416/8418/8430 Getting Started
2-8
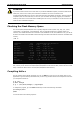
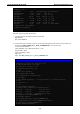
[root@localhost hello]# make
xscale-linux-gcc –o hello-release hello.c
xscale-linux-strip –s hello-release
xscale-linux-gcc –ggdb -o hello-debug hello.c
[root@localhost hello]# _
Next, execute hello.exe to generate hello-release and hello-debug, which are described below:
hello-release—an IXP platform execution file (created specifically to run on the UC-8410/8416/8418/8430)
hello-debug—an IXP platform GDB debug server execution file (see Chapter 5 for details about the GDB
debug tool).
ATTENTION
Be sure to type the #make command from within the /tmp/example/hello directory, since the
UC-8410/8416/8418/8430’s tool chain puts a specially designed Makefile in that directory. This special
Makefile uses the xscale-linux-gcc
compiler to compile the hello.c source code for the Xscale environment. If
you type the #make com
mand from any other directory, Linux will use the x86 compiler (for example, cc or
gcc). Refer to Chapter 5 to see a Make file example.
Uploading and Running the “Hello” Program
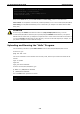
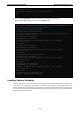
Use the following command to upload hello-release to the UC-8410/8416/8418/8430/8430 via FTP.
From the PC, type:
#ftp 192.168.3.127
Use the bin command to set the transfer mode to binary mode, and then put command to initiate the file
transfer:
ftp> cd /home
ftp> bin
ftp> put hello-release
From the UC-8410/8416/8418/8430, type:
# chmod +x /home/hello-release
# ./home/hello-release
The word Hello will be printed on the screen.
root@Moxa:~# ./home/hello-release
Hello