
Installation Guide


- 9 -
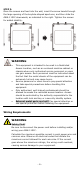
NOTE
Before connecting the AWK-1151C DC power inputs, make sure
the DC power source voltage is stable.
•
The wiring for the input terminal block shall be installed by
a skilled person.
•
Wire type: Cu
•
Only use 16-28 AWG wire size.
•
Use only one conductor in a clamping point between the DC
power source and the power input.
ATTENTION
If the
AWK-1151C
is connected to a motor or other similar type
of equipment, be sure to use power isolation protection. Before
connecting the
AWK-1151C to the DC power inputs, make sure
the DC power source voltage is stable.
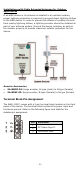
Communication Connections
10/100/1000BaseT(X) Ethernet Port Connection
The 10/100/1000BaseT(X) ports located on the AWK-1151C’s front
panel are used to connect to Ethernet-enabled devices.
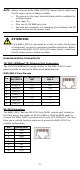
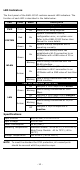
MDI/MDI-X Port Pinouts
Pin
1000BaseT
MDI/MDI-X
10/100BaseT(X)
MDI
10/100BaseT(X)
MDI-X
1
TRD(0)+
TX+
RX+
2
TRD(0)–
TX-
RX-
3
TRD(1)+
RX+
TX+
4
TRD(2)+
–
–
5
TRD(2)-
–
–
6
TRD(1)-
RX-
TX-
7
TRD(3)+
–
–
8
TRD(3)-
–
–
RS-232 Connection
The AWK-1151C has one RS-232 (8-pin RJ45) console port located on
the front panel. Use either an RJ45-to-DB9 or RJ45-to-DB25 cable to
connect the AWK-1151C’s console port to your PC’s COM port. You may
then use a console terminal program to access the AWK-1151C for
console configuration.
Pin
Description
1
DSR
2
NC
3
GND
4
TXD
5
RXD
6
NC
7
NC
8
DTR