
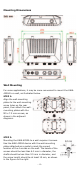
Installation Guide


- 5 -
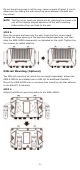
Do not drive the screws in all the way—leave a space of about 2 mm to
allow room for sliding the wall-mounting panel between the wall and
the screws.
NOTE
Test the screw head and shank size by inserting the screws
into
one of the keyhole shaped apertures of the wall
-mounting
plates before they are fixed to the wall.
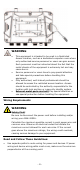
STEP 3:
Once the screws are fixed into the wall, insert the four screw heads
through the large opening of the keyhole-shaped apertures, and then
slide the AWK-4252A downwards, as indicated on the right. Tighten the
four screws for added stability.
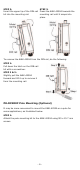
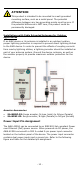
DIN-rail Mounting (Optional)
The DIN-rail mounting kit, which can be bought separately, allows the
AWK-4252A to be installed onto a DIN rail for additional flexibility.
Mount the AWK-4252A onto a corrosion-free mounting rail that adheres
to the EN 60715 standard.
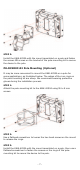
STEP 1:
Attach the DIN-rail mounting plates to the AWK-4252A.