
Installation Guide
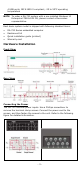
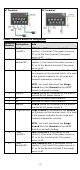

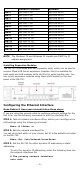

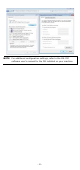
Table Of Contents

- 6 -
Default IP Address
Netmask
LAN 1
192.168.3.127
255.255.255.0
LAN 2
192.168.4.127
255.255.255.0
LAN 3
192.168.5.127
255.255.255.0
LAN 4
192.168.6.127
255.255.255.0
LAN 5
192.168.7.127
255.255.255.0
LAN 6
192.168.8.127
255.255.255.0
LAN 7
192.168.9.127
255.255.255.0
LAN 8
192.168.10.127
255.255.255.0
LAN 9
192.168.11.127
255.255.255.0
LAN 10
192.168.12.127
255.255.255.0
LAN 11
192.168.13.127
255.255.255.0
LAN 12
192.168.14.127
255.255.255.0
LAN 13
192.168.15.127
255.255.255.0
LAN 14
192.168.16.127
255.255.255.0
NOTE
The
Windows 7E and Windows 10 models use DHCP for IP
address assignment.
Installing Expansion Modules
The DA-720 is provided with two expansion slots, which can be used to
connect Moxa’s DE Series expansion modules. Slot A is available for
both serial and LAN modules while slot B is for serial module only. You
can mount expansion modules using these slots located on the rear
panel of the DA-720.
Configuring the Ethernet Interface
Moxa Debian 8 Linux users should follow these steps:
If you are using the console cable to configure network settings for the
first time, use the following commands to edit the interfaces file:
STEP 1: Take all network interfaces offline, before you reconfigure the
LAN settings using the following command:
Moxa:~# ifdown –a
STEP 2: Edit the network interfaces file.
You can use a text editor of your choice, but VI is the default text editor
on the DA-720.
Moxa:~#vi /etc/network/interfaces
STEP 3: Set the DA-720 for either dynamic IP addressing or static
addressing.
To set it for dynamic IP addressing, enter the following lines into
the network interfaces file:
# The primary network interface
auto eth0