
Installation Guide

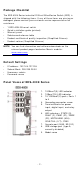
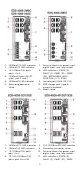
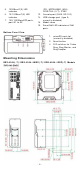
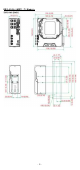
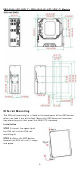
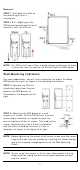
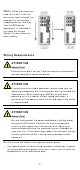

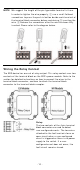
Table Of Contents
- EDS-4008 Series Quick Installation Guide
- Package Checklist
- Default Settings
- Panel Views of EDS-4008 Series
- Mounting Dimensions
- DIN-rail Mounting
- Wall Mounting (Optional)
- Wiring Requirements
- Grounding the Moxa EDS Series
- Suggested Wire Type for Wiring Relay Contact (RELAY), Digital Input (DI), and Power Inputs (P1/P2)
- Wiring the Relay Contact
- Wiring the Redundant Power Inputs
- Wiring the Digital Inputs
- Rotating the Power Module
- Communication Connections
- Reset Button
- Turbo Ring DIP Switch Settings
- LED Indicators
- Specifications

- 8 -
STEP 3 —Once t he scr ew s ar e
fixed
to the w all, insert t he
four scr ew heads t hrough the
wide part s of the keyhole
-
shaped aper tures, and then
slide
the EDS device
dow nwards, as indicat ed
in
the figure
at the right .
Tighten t he four screw s for
m or e
st abilit y.
W irin g Re quir e m e n t s
ATTEN TI ON
Sa fe t y Fir st !
Ext ernal m etal part s are hot . Take
the necessar y pr ecaut ion s if
you are r equired t o handle t he device.
ATTEN TI ON
I n order t o ensure reliable oper at ions, please m ake sure the
operat ing t em perat ur e of t he en vironm ent does not exceed t he
specificat ions. When m ount ing an EDS device wit h ot her
operat ing unit s in a cabinet w it hout forced vent ilation, a
m in im u m of
4 cm spac
e on bot h t he left and right of t he sw it ch
is recom m ended.
ATTEN TI ON
Sa fe t y Fir st !
Be sure t o disconnect the power cord before in stalling and/ or
wiring your EDS device. Calculat e t he m axim u m possible
current in each
pow er w ire and com m on w ire. Obser ve all
elect rical codes dict ating the m axim um current allow able for
each wir e size. I f t he current goes above t he m axim um rat ings,
the w iring could overheat , causing ser ious dam age to your
equipm ent .
Be sur e to read and follow t hese im por t ant point s below :
• Use separat e pat hs t o rout e wir ing for pow er and devices. I f pow er
wiring and device w iring pat hs m ust cr oss, m ake sure t he wires are
per pendicular at the intersect ion point.