
User`s manual


EDS-P510 Series Featured Functions
3-67
STEP 1
Set up those Ethernet-enabled devices connected to the EDS-P510
for which you would like IP addresses to be assigned automatically.
The devices must be configured to obtain their IP address
automatically.
The devices’ configuration utility should include a setup page that
allows you to choose an option similar to Obtain an IP address
automatically.
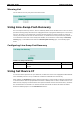
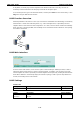
For example, Windows’ TCP/IP Properties
window is shown at the
right. Although your device’s configuration utility may look quite a bit
different, this figure should give you some idea of what to look for.
You also need to decide to which of the EDS-P510’s ports your
Ethernet-enabled devices will be connected. You will need to set up
each of these ports separately, as described in the following step.
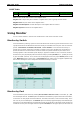
STEP 2
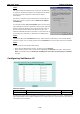
Configure the EDS-P510’s Set device IP function, either from the Console utility or from the Web Browser
interface. In either case, you simply need to enter the Desired IP for each port that needs to be configured.
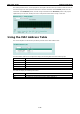
STEP 3
Be sure to activate your settings before exiting.
• When using the Web Browser interface, activate by clicking Activate.
• When using the Console utility, activate by first highlighting the Activate menu option, and then press
Enter. You should receive the Set device IP settings are now active! (Press any key to continue)
message.
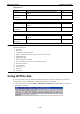
Configuring Set Device IP
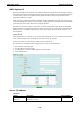
Desired IP Address
Setting Description Factory Default
IP Address Set the desired IP of connected devices. None
The DHCP Relay Agent makes it possible for DHCP broadcast messages to be sent over routers. The DHCP Relay
Agent enables DHCP clients to obtain IP addresses from a DHCP server on a remote subnet, or those that are
not located on the local subnet.