
User Manual


- 5 -
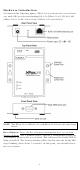
In addition to placing the
NPort 5100
on a desktop or
other horizontal surface,
you may also make use of
the DIN
-Rail or Wall Mount
options, as illustrated here.
Wall Mount
DIN-Rail
Software Installation Information
To install NPort Administration Suite, insert the NPort Document &
Software CD into your computer’s CD-ROM drive. Once the NPort
Installation CD window opens, click on the Installation button, and
then follow the instructions on the screen.
To view detailed information about NPort Administration Suite, click
on the Documents button, and then select “NPort 5100 Series User’s
Guide” to open the pdf version of the user’s guide.
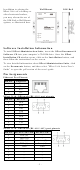
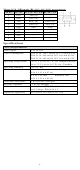
Pin Assignments
Ethernet Port Pinouts
Pin No.
Ethernet
1
Tx+
2
Tx-
3
Rx+
6
Rx-
NPort 5110—DB9 male (RS-232) port pinouts
Pin No.
RS-232
1
DCD
2
RxD
3
TxD
4
DTR
5
GND
6
DSR
7
RTS
8
CTS
9
–
NPort 5130—DB9 male (RS-422/485) port pinouts
Pin No.
RS-422/485-4W
RS-485-2W
1
TXD-(A)
–
2
TXD+(B)
–
3
RXD+(B)
Data+(B)
4
RXD-(A)
Data-(A)
5
GND
GND
6
–
–
7
–
–
8
–
–
9
–
–