
Installation Guide

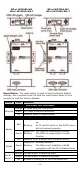
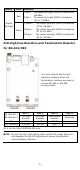
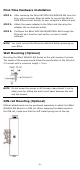

Table Of Contents

- 6 -
First-Time Hardware Installation
STEP 1:
After removing the NPort W2150A-W4/W2250A-W4 from the
box, use a crossover Ethernet cable t
o connect the NPort’s
RJ45 Ethernet port directly to your comput
er’s Ethernet port.
STEP 2:
Attach the power adapter to the NPort and then plug the
adapter into an electrical outlet.
STEP 3:
Configure the NPort W2150A-W4/W2250A-W4 through the
Etherne
t port. See the next section on how to install
software.
NOTE
You
must connect the Ethernet cable first before powering up
your NPort.
Wall Mounting (Optional)
Mounting the NPort W2x50A-W4 Series on the wall requires 2 screws.
The heads of the screws should follow the specification of the M3 pitch
0.5 screws with a minimum length > 7mm.
NOTE
Do not screw the screws in all the way—leave about 2 mm to
allow room for sliding the
wall mount panel between the wall
and the screws.
DIN-rail Mounting (Optional)
DIN-rail attachments can be purchased separately to attach the NPort
W2x50A-W4 Series to a DIN rail. When snapping the attachments to
the DIN rail, make sure that the stiff metal springs are at the top.