
User`s manual

RNAS-1200 Series Hardware Connection Description
3-4
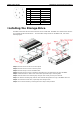
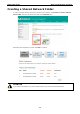
Installing the RNAS-1200 into a Wall-mounting
Frame
An optional wall-mounting kit is available for the RNAS-1200. To install, follow the steps below.
Step 1: Remove the eight screws that fasten the wall-mount ears to the RNAS-1200.
Step 2: Replace the wall-mount ears with two rails (which run the length of the device) using the same eight
screws.
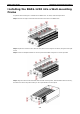
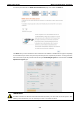
Step 3: Fasten the faceplate brackets to the front panel of the RNAS using the four screws provided.
Step 4: Align the tracks with the fixed rails within the wall-mounting frame, slide the RNAS-1200 into the tray,
and fasten the device using the brackets you have just affixed to the front panel.