UC-7122/7124 User’s Manual Third Edition, May 2009 www.moxa.com/product © 2009 Moxa Inc. All rights reserved. Reproduction without permission is prohibited.
UC-7122/7124 User’s Manual The software described in this manual is furnished under a license agreement and may be used only in accordance with the terms of that agreement. Copyright Notice Copyright © 2009 Moxa Inc. All rights reserved. Reproduction without permission is prohibited. Trademarks MOXA is a registered trademark of Moxa Inc. All other trademarks or registered marks in this manual belong to their respective manufacturers.
Table of Contents Chapter 1 Introduction ..................................................................................................1-1 Overview.................................................................................................................................. 1-2 Model Descriptions and Package Checklist.................................................................. 1-2 UC-7122/7124 Features.............................................................................................
1 Chapter 1 Introduction The UC-7122/7124 are pocket size embedded computers with 2 or 4 serial ports, dual 10/100 Mbps Ethernet, an SD socket, and a USB 2.0 host port. The UC-7122/7124 are ideal for front-end device monitoring, data acquisition, and protocol conversion. Wide temperature models are also available to provide reliable performance in harsh operating environments. The RISC-based UC-7122/7124 embedded computers come with the Windows® CE operating system pre-installed.
UC-7122/7124 User’s Manual Introduction Overview The UC-7122/7124 embedded computers come with 2 or 4 RS-232/422/485 serial ports and dual 10/100 Mbps Ethernet LAN ports to provide users with a versatile communication platform, making these RISC-based embedded computers ideal for your embedded applications. The UC-7122/7124 embedded computers use the Cirrus Logic EP9302 ARM9 200 MHz RISC CPU.
UC-7122/7124 User’s Manual Introduction UC-7122/7124 Features The UC-7122/7124 embedded computers have the following features: y y y y y y y y y y y y Cirrus Logic EP9302 ARM9 32-bit 200 MHz processor 32 MB on-board RAM 16 MB built-in flash memory RS-232/422/485 serial ports with software selectable interface Baudrates between 50 bps and 921.
UC-7122/7124 User’s Manual Introduction Power Consumption (Without USB device plugged in) UC-7122: 340 mA @ 12 VDC UC-7124: 360 mA @ 12 VDC (With USB device plugged in) UC-7122: 667 mA @ 12 VDC UC-7124: 700 mA @ 12 VDC Mechanical Dimensions UC-7122/7124: 77 x 111 x 26 mm (without wall mount ears) (W x D x H) Construction Material UC-7122/7124: aluminum, 1 mm Mounting DIN-rail, wall Environment Operating -10 to 60°C (14 to 140°F), 5 to 95% RH Temperature -40 to 75°C (-40 to 167°F) is optional for –T models
UC-7122/7124 User’s Manual Introduction Networking and Communications Capabilities y Simple Network Management Protocol (SNMP)—Monitors remote connections to the network. y Simple Network Time Protocol (SNTP) Client—Provides support for synchronizing the device’s system time with an SNTP server, and supports Daylight Savings Time.
UC-7122/7124 User’s Manual Introduction Obtaining the Firmware Build Version There are two ways to obtain the firmware version of UC-7122/7124 embedded computers. This information is particularly important for identifying the features supported by the computer. y y Examine the welcome message after you log on to the computer. Log on to the web-based management system (described in a later chapter) to view the system information. Memory and File Systems The 32 MB of SDRAM is divided into two main parts.
UC-7122/7124 User’s Manual Introduction An SD card has its own life cycle. Since most SD cards are made from a NAND Flash, their hardware controllers implement BBM. This feature allows FAT to skip bad blocks if they exist. Furthermore, the memory space of an SD card is much larger than that of the NOR Flash. Using this space cautiously will ensure that its life cycle is not exceeded. When creating a file for storing log data, we suggest creating a large empty file (e.g.
UC-7122/7124 User’s Manual Introduction The following table lists USB mass storage devices that have been tested successfully for compatibility. Vendor CRUZER Intel Abocom PQI Transcend Transcend Device Name mini Flash memory Size 128 MB 128 MB 128 MB 256 MB 512 MB 1 GB JetFlash JetFlash ATTENTION Some USB storage devices may not be detected by the system.
2 Chapter 2 Getting Started In this chapter, we explain how to use a PC to operate a UC-7122/7124 embedded computer. We will refer to the PC that connects to the UC-7122/7124 as a development workstation, and the UC-7122/7124 embedded computer will be called a target computer.
UC-7122/7124 User’s Manual Getting Started Starting Your UC-7122/7124 Computer Connect the SG wire to the shielded contact located in the upper left corner of the UC-7122/7124 computer, and then power it up by connecting it to the power adaptor. It takes about 30 to 60 seconds for the system to boot up. Once the system is ready, the “Ready” LED will light up. The light will stay lit until you shut down the computer.
UC-7122/7124 User’s Manual Getting Started Step 6: Type “4” for “Format Flash Disk and Reset OS” and then press Enter. Step 7: After a few seconds, you will see the bootloader menu again. Unplug the power line and then plug it back again. It takes about 3 minutes to reset the operating system.
UC-7122/7124 User’s Manual Getting Started Changing the Network Settings The UC-7122/7124 computer comes with two or four network interfaces. The default IP addresses and netmasks of the network interfaces are shown in the following table: LAN1 LAN2 Default IP Address 192.168.3.127 192.168.4.127 Netmask 255.255.255.0 255.255.255.0 For most applications, you will need to change the network settings to math the local network to which the development workstation is connected.
UC-7122/7124 User’s Manual Getting Started After logging on through the console port or through a Telnet client, a list of busybox commands are available to operate the computer. Use “HELP” to display all of the commands and type “HELP [command name]” to display extended help for the given command. Some of these commands, such as “DATE” and “TIME” are very useful for managing the computer’s system time. Other commands, such as “DIR” and “MKDIR” are good utilities for file management.
UC-7122/7124 User’s Manual Getting Started Current password: New password: Retype new password: Password has been changed User List: Use the command userlist to list all users. \> userlist List all users System Time Management Setting the System Time Manually: Use the date and time commands to query the current system date/time, or to set a new system date/time.
UC-7122/7124 User’s Manual Getting Started Subnet Mask: 255.255.255.0 Default Gateway: 192.168.27.254 Adapter Name: AX887961 Description: AX887961 Adapter Index: 3 Address: 00 90 e8 00 d1 24 DHCP Enabled: YES DHCP Server: 192.168.1.95 Primary WINS: 192.168.1.98 Secondary WINS: 192.168.1.99 Lease obtained on: Wednesday, April 11 ,2007 23 : 6 : 46 Lease expires on: Sunday, April 15 ,2007 23 : 10 : 46 AutoConfig Enabled: YES Host name: UC7124 Domain Name: moxa.com DNS Servers: 192.168.1.99 192.168.1.
UC-7122/7124 User’s Manual Getting Started Simple Network Management Protocol (SNMP) SNMP is the standard Internet protocol for network management, and belongs to the TCP/IP protocol suite. SNMP was developed to monitor and manage networks. It uses a distributed architecture that consists of agents and managers: y y The SNMP agent is an SNMP application that monitors network traffic and responds to queries from SNMP manager applications.
3 Chapter 3 Web-based Management System Note: You must use Internet Explorer 5.5 or above to access the web-based management system. The UC-7122/7124 ready-to-run embedded computers are network-centric platforms designed to be used as front-end computers for data acquisition and industrial control. Due to the distributed characteristics of the devices that these computers control, they often reside in harsh environments away from the system administrator.
UC-7122/7124 User’s Manual Web-based Management System Logging onto the Web-based Management System The web-based management system installed in the UC-7122/7124 computer incorporates often-used features into CGI pages, and categorizes them on a menu bar. Before attempting to connect to the management system, make sure the network connection from your PC to the target computer active, and you are able to use the PC’s Internet browser. The following steps describe how to log on to the web-based system. 1.
UC-7122/7124 User’s Manual Web-based Management System Networking/Server Configuration The target computer has two network interfaces. To view or change the settings, click the Networking item on the menu bar. After the page loads, enter the relevant details in the corresponding text fields and then click Update to activate the changes. Serial Port Configuration The target computer has several high-performance serial ports, each of which supports RS-232, RS-422, and RS-485.
UC-7122/7124 User’s Manual Web-based Management System Binary/Text File Management PC users enjoy the convenience of using Windows’ friendly windows-based file manager to browse, delete, and organize files and directories. Moxa’s web-based management system provides the same kind of convenience for managing files on the target computer. Click File Manager to view the directory tree of your target computer.
UC-7122/7124 User’s Manual Web-based Management System Monitoring and Controlling Processes (Threads) At runtime, the target computer manages up to 32 applications that you can monitor and control with the management system. To view current processes, click the Processes item on the main menu bar. You can kill a process by clicking the kill button next to the process name.
A Appendix A Firmware Upgrade Procedure The latest firmware for Moxa’s embedded computers can be downloaded from the download center on Moxa’s website. For the UC-7122/7124, we provide a solution to upload the firmware file by TFTP, and upgrade the firmware using boot loader utilities. The following steps show how to upgrade the firmware: Setting up the TFTP server 1. Connect LAN1 of the UC-7122/7124 to your PC using a cross-over Ethernet cable. 2.
UC-7122/7124 User’s Manual Firmware Upgrade Procedure 6. Type “2” TFTP Config and press “Enter”. This will guide you to the TFTP configuration menu. 7. Select “2” and then press “Enter”. You will be asked to provide a local IP and server IP. The local IP is the IP address of your UC-7122/7124 and the server IP is the IP address of your TFTP server. Since the TFTP server is located on your PC, the server IP is the same as your PC’s IP address.
UC-7122/7124 User’s Manual Firmware Upgrade Procedure 8. After providing both IP addresses, you may check the settings by typing “3” on the command line. 9. Click “Esc” to return to the previous menu.
UC-7122/7124 User’s Manual Firmware Upgrade Procedure Upgrading the Firmware 1. From the main menu of the boot loader utility, select “1” for Firmware Upgrade to start the firmware upgrade process. 2. Type “1” to load firmware image from your PC. When prompted to provide the file name of the firmware file, input the firmware file name.
UC-7122/7124 User’s Manual Firmware Upgrade Procedure 3. Press “Enter” and then wait a few seconds for the firmware image to download. Restart the computer after the file has been downloaded.
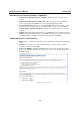
B Appendix B Frequently Asked Questions FAQ 1 Can I change the connection port for the web server (HTTPD) to something other than 80? Answer 1 Yes, you can change the web server port. For example, suppose that your embedded computer’s IP address is 192.168.3.127 and you wish to assign 81 as the HTTPD port number. The following steps explain how to do this: Step 1: Start IE (Internet Explorer), navigate to the IP address shown below, and then log in as administrator (default: admin/admin).
UC-7122/7124 User’s Manual Frequently Asked Questions Step 8: Log in to the embedded computer using a Telnet client and then restart the web server. /> services stop HTP0: /> services start HTP0: Step 9: Try connecting to the server with the new URL, as follows: http://192.168.3.127:81/ FAQ 2 What type of file system is supported by the embedded computers? Answer 2 Moxa embedded computers support TFAT (Transaction-safe File Allocation Table) file systems on the on-board flash memory.
UC-7122/7124 User’s Manual Frequently Asked Questions Answer 8 Yes. Log on to the computer from a remote client, and then use the “reboot” command to reboot the system. FAQ 9 Which USB specifications do the embedded computers support? Answer 9 The embedded computers support USB 2.0 and 1.1 mass storage devices. If you cannot find the USBDisk directory, unplug the device and then plug it in again.
UC-7122/7124 User’s Manual Frequently Asked Questions Step 2: Enter the full path of the application in the first text field. If there any arguments are required, enter them in the second text field. Click “Add”. Step.3: Repeat Steps 1 and 2 if additional applications need to be executed on bootup.
UC-7122/7124 User’s Manual FAQ 12 Frequently Asked Questions How do I monitor processes on the embedded computer? Answer 12 From the Telnet/serial console, enter the command “ps” to monitor current processes. The web console here is a “Processes” page. You can monitor processes or you can “kill” a pending application running on the system.