
User`s manual


UC-7408 User’s Manual Managing Communication
4-11
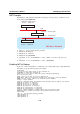
NAT Example
The IP address of all packets leaving LAN1 are changed to 192.168.3.127 (you will need to load
the module ipt_MASQUERADE):
UC-7408
PC1 (Linux or Windows)
IP/Netmask:
Gateway:
192.168.3.100/24
192.168.3.127
PC2 (Linux or Windows)
IP/Netmask:
Gateway:
192.168.4.100/24
192.168.4.127
LAN1
LAN2
LAN1:ixp0 192.168.3.127/24
LAN2:ixp1 192.168.4.127/24
NAT Area / Private IP
1.
#ehco 1 > /proc/sys/net/ipv4/ip_forward
2.
#
modprobe iptable_nat
3.
#
modprobe ip_conntract
4.
#
modprobe ipt_MASQUERADE
5.
#iptables -t nat –A POSTROUTING –o ixp0 –j SNAT --to-source 192.168.3.127
or
6.
#iptables –t nat –A POSTROUTING –o ixp0 –j MASQUERADE
Enabling NAT at Bootup
In the most of real world situations, you will want to use a simple shell script to enable NAT when
UC-7408 boots up. The following script is an example.
#!/bin/bash
# If you put this shell script in the /home/nat.sh
# Remember to chmod 744 /home/nat.sh
# Edit the rc.local file to make this shell startup automatically.
# vi /etc/rc.d/rc.local
# Add a line in the end of rc.local /home/nat.sh
EXIF=‘ixp0’ #This is an external interface for setting up a valid IP address.
EXNET=‘192.168.4.0/24’ #This is an internal network address.
# Step 1. Insert modules.
# Here 2> /dev/null means the standard error messages will be dump to null device.
modprobe ip_tables 2> /dev/null
modprobe ip_nat_ftp 2> /dev/null
modprobe ip_nat_irc 2> /dev/null
modprobe ip_conntrack 2> /dev/null
modprobe ip_conntrack_ftp 2> /dev/null
modprobe ip_conntrack_irc 2> /dev/null
# Step 2. Define variables, enable routing and erase default rules.
PATH=/bin:/sbin:/usr/bin:/usr/sbin:/usr/local/bin:/usr/local/sbin
export PATH
echo “1” > /proc/sys/net/ipv4/ip_forward
/sbin/iptables -F
/sbin/iptables -X
/sbin/iptables -Z