
User Manual
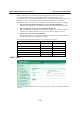

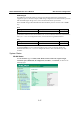


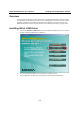
Table Of Contents
- Chapter 1 Introduction
- Chapter 2 Getting Started
- Chapter 3 Initial IP Configuration
- Chapter 4 Choosing the Proper Operation Mode
- Chapter 5 Web Console Configuration
- Chapter 6 Installing and Configuring the Software
- Appendix A SNMP Agents with MIB II & RS-232 Like Groups
- Appendix B Well Known Port Numbers
- Appendix C Federal Communication Commission Interference Statement
- Appendix D FCC Warning Statement
- Appendix E Service Information

NPort W2250/2150 Plus User’s Manual Web Console Configuration
5-23
NPort W2250/2150 uses an IP address based filtering method to control access to itself.
Accessible IP Settings allows you to add or block remote host IP addresses to prevent
unauthorized access. Access to NPort W2250/2150 is controlled by IP address. That is, if a host’s
IP address is in the accessible IP table, then the host will be allowed to access the NPort
W2250/2150. You can set up one of the following cases by setting the parameters accordingly.
y Only one host with a specific IP Address can access the NPort W2250/2150
Enter the specific IP address (e.g., 192.168.1.1), and enter 255.255.255.255 for Netmask.
y Hosts on the specific subnet can access the NPort W2250/2150
Enter an IP address (e.g., 192.168.1.0), and enter the Netmask (e.g., 255.255.255.0). Note
that this type of setting will allow access to all network hosts on a particular subnet.
y Any host can access the NPort W2250/2150
Disable this function by un-checking the “Enable the accessible IP list” checkbox. Refer to
the following table for more configration examples.
The following “Allowable Hosts” table gives five configuration examples.
Allowable Hosts IP Address Netmask
Any host blank blank
192.168.1.120 192.168.1.120 255.255.255.255
192.168.1.1 to 192.168.1.254 192.168.1.0 255.255.255.0
192.168.0.1 to 192.168.255.254 192.168.0.0 255.255.0.0
192.168.1.1 to 192.168.1.126 192.168.1.0 255.255.255.128
192.168.1.129 to 192.168.1.254 192.168.1.128 255.255.255.128
SNMP Agent
To enable the SNMP Agent function, select the enable option, and enter a Community Name (e.g.,
“public”).