
User's Manual


WAPA003 User’s Manual Getting Started
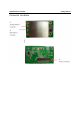
Hardware Installation
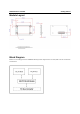
The WAPA003 can be installed into all Moxa wireless system board series. It can be located
below the CPU.
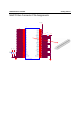
Step for Installation
1. Attach the Main WLAN antenna to connector J1.
2. If using an Auxiliary WLAN antenna, attach it to connector J2.
3. Install the WAPA 003 miniPCI card on the system board. Apply pressure to both bus
connectors and gently press the board onto the stack. The board should slide into the matching
bus connectors. Do not attempt to force the board, as this can lead to bent/broken pins.
4. Screw on the WAPA003 miniPCI card.
5. If any power boards are to be stacked above the WAPA003, install them.
6. Screw on the all the necessary chassis.
Software Installation
After physically installing the WAPA003, your operating system must be configured to recognize
the new system board.
Step for Installation
1. Apply power to the system board.
2. Connect system board and PC with Ethernet cable.
3. Open a browser and type: 192.168.127.253 to open the system login webpage.
4. Login the webpage with default password: root in order to verify that all of the hardware is
install properly.