
Quick Installation Guide


- 4 -
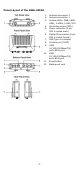
Mounting Dimensions
Wall Mounting
For some applications, it may be more convenient to mount the AWK-
4252A to a wall, as illustrated below.
STEP 1:
Align the wall-mounting
plates to the wall-mounting
screw holes on the rear
panel, then attach the wall-
mounting plates with the
M5 screws, as shown in the
adjacent diagrams.
STEP 2:
Mounting the AWK-4252A to a wall requires 4 screws.
Use the AWK-4252A device with the wall-mounting
plates attached as a guide to mark the correct location
of the 4 screws on the wall. The heads of the screws
should be less than 6.0 mm in diameter, the shafts
should be less than 3.5 mm in diameter, and the screw
length should be at least 15 mm, as shown in the figure
on the right.