
User's Manual
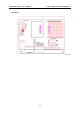

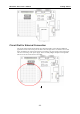

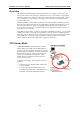
Table Of Contents

WE-2100T Series User’s Manual Getting Started
3-2
Wiring Requirements
This section describes some important safety precautions that you should pay attention to before
proceeding with any installation.
Safety First!
Be sure to disconnect the power cord before installing and/or wiring your evaluation boards for the
WE-2100T module.
Wiring Caution!
Calculate the maximum possible current in each power wire and common wire. Observe all electrical
codes dictating the maximum current allowable for each wire size.
If the current goes above the maximum ratings, the wiring could overheat, causing serious damage to
your equipment.
Temperature Caution!
Please take care when handling the evaluation boards. When plugged in, the evaluation boards’
internal components generate heat, and consequently the board may feel hot to the touch.
You should also pay attention to the following points:
z Use separate paths to route wiring for power and devices. If power wiring and device wiring
paths must cross, make sure the wires are perpendicular at the intersection point.
NOTE: Do not run signal or communication wiring and power wiring in the same wire
conduit. To avoid interference, wires with different signal characteristics should be routed
separately.
z You can use the type of signal transmitted through a wire to determine which wires should be
kept separate. The rule of thumb is that wiring that shares similar electrical characteristics can
be bundled together.
z Keep input wiring and output wiring separate.
z Where necessary, it is strongly advised that you label wiring to all devices in the system.
Attaching WE-2100T to the Evaluation Board
Before connecting your WE-2100T-ST to the power supply, network, and serial device, you first
need to attach WE-2100T to the WE-2100T-ST evaluation board. In the center of the evaluation
boards, there is a square with 2 rows of male pins on one of its sides. The WE-2100T board also
has 2 rows of female sockets on its bottom. When attaching your WE-2100T to WE-2100T-ST,
make sure the pins and the socket match with each other, as shown in the following figure.