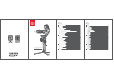
ࣹڢ Contents MOZA AirCross II Overview 1 ઍજAirCross II 20 Quick Start 2 ڽବ҅ऀ Battery 2 ऄࡐङ҅ऀ Tripod Installation 3 І߫ङ؍ 21 21 22 Motor Locks 3 ऄߑ୧ङ҅ऀ 22 Mounting Camera with L-Bracket 4 ҅ऀ2ڥ⡕䵩؍बߑ Mounting the Follow Focus Baseplate and Lens Support 4 ؍૦ࢾڇڂՃ୶߫ݵף 23 23 Balance Adjustment 4 23 Button Functions 5 ٵ੫લਭ ܷ୰ؔУ OLED Display 7 ުٳىॐ 26 Feature Description User Manual ऀۯ۴ӆ ԅਈપޢ 24 27 Vertical shooting mode 8 ॺܠԅਈ 27 Two Camera Mou
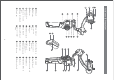
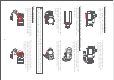
AirCross II Overview 11 12 13 14 21 19 20 24 25 26 27 Pan Motor 17 16 Battery Level 15 25 24 23 22 Multi-CAN Port USB Port Pan Motor Lock Dial Wheel Joystick 15 22 23 18 3/8” Screw Hole 18 USB Type-C 26 Battery 10 16 Trigger Tilt Motor Lock 27 17 Tilt Knob 10 Roll Motor Lock 19 Roll Motor Battery Lock 28 Tilt Motor 11 Pan Knob 20 28 Power Button Tilt Arm 12 Smart Wheel OLED Screen Charging Port Reset Hole Indicator Quick Release Baseplate 13 21 Camera Co
Quick Start Battery a. Charging With a USB Type-C charging interface, MOZA AirCross 2 smart battery is able to be charged via the standard USB Type-C cable. The charger head needs to be prepared separately, whose output should not be less than 5V 2A. The battery supports QC3.0 fast charging, which will shorten the charging time. b. Battery indicator The smart battery has 4 indicators that will automatically light up when charging or using.
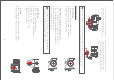
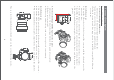
Tripod Installation a. Screw the tripod tightly into the 1/4" hole at the bottom of the gimbal. b. Expand three support feet, place the gimbal on a flat surface. Unfolding Storage Motor Locks The AirCross 2 gimbal has 3 locks which are used to lock motors to prevent rotation. 3 Motor Locks Notes: Please unlock all motor locks before turning on the gimbal, otherwise motors will get overheated or enter the protection mode.
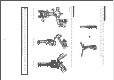
Mounting Camera with L-Bracket a. Place the longer side of the L-Bracket under the camera, and lock the camera with a 1/4”screw. b. Loosen the quick release knob screw, insert the shorter end of the L-Bracket into the quick release baseplate, and then lock the knob. a. Mount the follow focus rod on follow focus baseplate, adjust its position, and lock the knob. d. Mount the lens support on the lens support baseplate, slightly push up against the lens, and then lock the lens support screw. b.
c. Loosen the knob of the roll arm, adjust roll arm leftwards and rightwards until it remains horizontal, and then lock the knob. d. Hold the gimbal horizontally to make the pan arm level with the ground, then loosen the knob on the pan arm, adjust the pan arm leftwards and rightwards until it remains level, and then lock the knob. Note: Please release the motor locks before balance adjustment, otherwise it can’t be adjusted accurately.Please ensure that the MOZA AirCross 2 is balanced well before use.
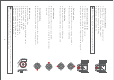
Dial Wheel Center Button Single Press:Camera recording control Double Press:Photo taking control Triple Press:Language switching Long Press:Enter/exit menu Note: Please refer to the camera compatibility list for more details of camera control.
52+* *OYVRG_ Remote status :ORZ 2 8URR , 6GT 7 Follow focus status Camera status Wheel modes Tilt follow status Roll follow status Pan follow status Bluetooth status Battery level Camera connection icon: This icon is displayed after camera is connected to camera. Follow focus connection icon: This icon is displayed when an external focus motor is connected. Remote controller connection icon: This icon is displayed when the remote controller is connected.
Quick Start Features Description Vertical Shooting Mode a. Vertical shooting with L-Bracket Advantages of vertical shooting with the L-Bracket: Landscape/vertical mode can be quickly switched. Follow focus motor and lens support can be installed, compatible with more accessories.
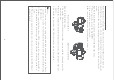
Rightward installation Two Camera Mounting Ways By default, the camera handle side is located near the tilt motor to allow an unobstructed access to the camera control ports; however under some special circumstances, the camera control ports side should be located near the tilt motor. Rightward installation is required under the following situations: The camera size is too wide like BMPPC. A specialized camera cage is used.
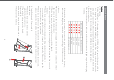
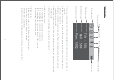
Menu L1 Ca me ra Gi mb al tilt heavy medium light on/off 0-100 0-100 0-100 0-100 0-100 0-100 * * * * * ;/ok on/off * * * * * switch on/off roll axis follow switch on/off tilt axis follow set pan motor filter set roll motor filter set tilt motor filter set pan motor power set roll motor power set tilt motor power set motor level to ultra-heavy set motor level to heavy set motor level to medium set motor level to light set motor level to minimum auto -tuning /done turn
L1 L2 operati on Advanced iFocus L3 wheel trigger FPV lock follow none shutter none roll Focus -E Focus -2 Focus -1 * * * * * * * * * * +/- 0-100 * * * * enter sport gear mode enter all -locked mode enter pan -tilt follow mode none enter FPV mode enter sport gear mode enter all -locked mode enter pan -tilt follow mode none take photo none control forward/reverse direction Wheel sensitivity control roll axis control the electronic follow focus control the follo
Menu type introduction: If there is a “>”mark at the right side of the selected item, press the dial right button for the next menu. If the selected item has a “【】”and contains a number, rotate the dial to adjust its value. If the selected item has a “()”and contains an option, press the right button to switch among options. Notes: 1.If there is a “*” at the right side of one item, the current list is the final option, press the dial right button to launch it. 2.
Camera Control The AirCross 2 gimbal can control the camera's recording, photo taking and electronic follow focus. For the supported camera models and functions, please refer to the camera compatibility list. When using the camera control function, please note the 3 points as follows: a. Select the correct camera model b. Connect the camera control cable correctly c. Set the camera parameters correctly Operation Steps: Refer to the menu and camera compatibility list to select the correct camera type.
After selecting the camera type and connecting the camera control cable, press the menu button once to achieve recording and press it twice to achieve photo taking. Note:When connected via the camera control cable, some Canon cameras’ (such as 5D3) AirCross 2 control function could only be available after pressing the camera's 'Start' button; some cameras (such as Sony A7S) can't work for photo taking in some special modes.
Follow Modes The AirCross 2 gimbal has 4 follow modes: a. Pan follow mode: The pan axis will follow operator’s left and right movements to achieve following shots with left and right turns. b. Tilt follow mode: The tilt axis follows the operator's up and down movements to achieve shots from low angle to high angle. c. Pan-tilt follow mode: Both the pan and tilt axis will follow the operator's movements. d. All lock mode: The camera's shooting direction is fixed and will not follow the operator's movements.
'J\GTIKJ ,[TIZOUTY UQ Sensor Calibration a. Gyroscope Calibration Turn on the gimbal and leave it quietly for about 5 minutes, the gyroscope calibration is required when the gimbal drifts obviously.
,URRU] LUI[Y ;V *U]T ,XUTZ (GIQ Balance Check The gimbal can check the balance status of each axis automatically and guide the user to adjust correctly. a. Attach a tripod to the gimbal, turn on the gimbal and place it on a horizontal tabletop. b. Enter the menu, select advanced>Balance chk, and the gimbal begins to check the balance adjustment.
Firmware Upgrade Upgrade via computer: a. Turn off the gimbal. b. Long press the joystick, then press the power button with the other hand until the prompt ‘Boot Mode’ appears on the screen. c. Connect the gimbal to the computer with a USB Type-C cable. d. The software will automatically identify the device and load the firmware. Press the ‘Upgrade’ button and wait for about 30s. e. Restart the gimbal after the upgrade. Upgrade via App: a. Turn off the gimbal. b.
96+) Body weight (g) Payload (g) Dimension (mm) Camera Tray Dimension (mm) Mechanical Endpoint Range(°) Operation Temperature (℃) Operation Voltage Operation Current Battery Connections * For KOL only USB in 2.
)&& &DXWLRQ $Q\ FKDQJHV RU PRGLILFDWLRQV QRW H[SUHVVO\ DSSURYHG E\ WKH SDUW\ UHVSRQVLEOH IRU FRPSOLDQFH FRXOG YRLG WKH XVHU V DXWKRULW\ WR RSHUDWH WKLV HTXLSPHQW 7KLV GHYLFH FRPSOLHV ZLWK SDUW RI WKH )&& 5XOHV 2SHUDWLRQ LV VXEMHFW WR WKH IROORZLQJ WZR FRQGLWLRQV WKLV GHYLFH PD\ QRW FDXVH KDUPIXO LQWHUIHUHQFH DQG WKLV GHYLFH PXVW DFFHSW DQ\ LQWHUIHUHQFH UHFHLYHG LQFOXGLQJ LQWHUIHUHQFH WKDW PD\ FDXVH XQGHVLUHG RSHUDWLRQ 7KLV GHYLFH DQG LWV DQWHQQD V PXVW QRW EH FR ORFDWHG RU RSHUDWLQJ