
Operation Manual


4
picture.
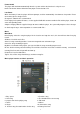
Submenu
When manually browse to a picture, click on the touch [Menu ]to enter the sub-menu, the options are as follows:
1. <Rotate>: Select the desired rotation angle: 90,180,270 degrees.
2. <Zoom>: You can zoom in or zoom out the picture. Press the return key and return, press / to move up
and down to view pictures, press Menu to exit the zoom icon, (When the picture is under zoomed in or
zoomed out status you can not choose the previous or next file when is zooming.
Note: It is invalid for GIF format images. For less than 320 * 240 pixel image is invalid
4 Slide interval: see the main menu descriptions.
5. <Slide Interval>: see the main menu descriptions.
6. <Set as Desktop> The current picture can be set as your desktop background, boot animation, shutdown
animation. Also, you can choose “Restore background” to recover the initial settings.
7. <Delete>: Delete the current image file.
8. <Information>: You can view information about the current picture.
Camera
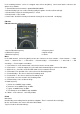
CD interface and basic operation
1. Camera mode 2. Self-timer mode 3.Brightness settings
4. White balance mode 5. Photographs sound mode 6: Zoom in / Zoon out mode
7. Return to previous menu 8. DC menu settings 9.Save
10. Number of photos 11. Photo resolution
DC menu
Press the MENU key to enter the camera submenu, menu are as follows :
1 . <Picture Playback>: View pictures that was taken.
2 . < White Balance >: automatic, sunny, cloudy, incandescent and fluorescent lamps.
3 . <Brightness> range is from -3 to +3.
4 . <Exposure Mode>: Auto, indoor, outdoor.
5 . <Face Detection> open, close.
6 . <Sticker Photo>you can choose different background for the picture,
7 . <Special Effect> Off, Black & White, Retro, Negative.
8 . <Save Path>: the built-in memory and external memory (no card is not displayed).
9. Resolution: 2048x1536, 1600 × 1200,1280 × 1024,1024 × 768,640 x480.