PC 20 Mini Digital Camcorder Instruction Manual Please read this manual carefully before operation
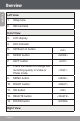
Table of Contents English Package Contents............................................4 Overview..............................................................5 Unit Overview.................................................................... 5 Display Overview............................................................. 6 Getting Started..................................................8 Installing the Batteries..................................................... 8 Inserting a Memory Card..............
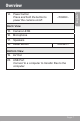
Connecting to a TV........................................25 Additional Features........................................26 Using Your Digital Video Camera as a Webcam...... 26 Troubleshooting.............................................28 Specifications..................................................
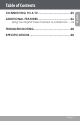
Package Contents English Thank you for purchasing this PC20 Mini Digital Video Camera. Please read these instructions before using your camcorder, and retain them for future reference. This package includes: PC20 digital video camera AV cable USB cable Installation CD Detachable hand strap Should any of the above items be missing, please contact the dealer from whom you purchased this product.
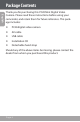
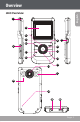
Overview English Unit Overview 1 3 4 5 2 9 14 6 10 7 11 8 12 13 15 17 16 18 19 20 Page 5
Overview English Left View 1. Strap hole 2. SD Card slot Front View 3. LCD display 4. LED indicator 5. UP/Zoom in button 6. MODE button 7. LEFT button 8. Press the button to change the recording quality in Vidoe or Photo mode. < DISP > MENU button
14. Power button Press and hold the button to power the camera on/off. Back View 15. Camera LENS 16. Microphone 17. Speakers 18. Reset Button Bottom View 19. AV Out 20. USB Port Connect to a computer to transfer files to the computer.
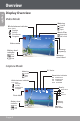
Overview English Display Overview Video Mode Metering Center Multi Spot White balance indicator Auto Auto Daylight Cloudy Fluorescent Tungsten Movie Size 640 AUTO 320 00 : 06 : 12 320 640 x 480 320 x 240 Video mode Memory capacity Battery level indicator Full Half Low Memory card insert Capture Mode EV Value Metering Center Multi Spot Resolution indicator 5M 2592X1944 3M 2048X1536 1M 1280X960 VGA 640X480 White balance indicator Auto Auto Daylight Cloudy Fluorescent Tungsten Photo Mode B
Please read and complete the following steps to begin using your digital video camera. Charging the Battery Your camera has an integrated rechargeable battery. Upon initial use, the battery should be charged fully to ensure optimal performance and battery life. If the camera has not been used in a while, the battery may need to be recharged. Upon initial use, the battery should be charged fully (8 hours) to ensure optimal performance and battery life.
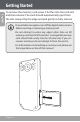
Getting Started English To remove the memory card, press it further into the card slot and then release. The card should automatically eject from the slot. Grasp it by the edge and pull gently to fully remove To avoid data corruption, turn off the digital video camera before inserting or removing a memory card. Do not attempt to place any object other than an SD memory card into the SD card slot.
Basic Operation To turn the camera on, press and hold the button until the screen turns on. To turn the camera off, press and hold the button until the screen turns off. English Turning the Digital Video Camera On/Off Camera Modes Your digital video camera includes three modes. Press the button to toggle between them.
Basic Operation English During recording, the total elapsed recording time is displayed in the upper righthand corner of the LCD screen. When the camera is in video mode and not recording, the estimated available recording time will be displayed in the upper righhand corner. Recording will stop automatically when the memory card is full. Zoom Use the or button to effect the camera’s digital zoom function. Press to zoom in, down to zoom out.
Basic Operation Turn on the video camera and press the button to enter Photo Mode. Hold the camera steady, then press the button to take a picture. After you take a picture, the estimated number of pictures remaining on the camera memory or memory card will be displayed in the upper righthand corner of the LCD screen.
Playback English To review your video or image files, press the button to select Playback Mode. The most recently recorded video or image file will appear on the LCD screen. Video Playback After setting the video camera to Playback Mode, press the or button to scroll through the available files. Video files are indicated by the [ ] icon on the upright corner of the LCD screen. When the desired video clip appears on screen, press the button to begin playback.
Playback To return the image to full screen view, press the MENU button. Thumbnail View To view thumbnail images of all available files, press < DISP >. The screen will display files in thumbnail mode. Press , , , or to select your desired file. Press the button to view the selected file in full screen. The video files will be indicated with a symbol < the left-down corner of the thumbnail image. > at Page 15 English the picture.
Menu Options English You can access a variety of additional options by pressing the
Item Description Metering Adjust the exposure of the image by designating a reference area within the frame. Options include: Center: The exposure will be calculated based on light in the central area of the frame. This option is suitable for general use. Multi: The exposure will be calculated based on the average light throughout the frame. Spot: The exposure will be calculated based on the light in the very center of the frame. White Balance Adjust the white balance to current light conditions.
Menu Options English Item Description Metering Adjust the exposure of the image by designating a reference area within the frame. Options include: Center: The exposure will be calculated based on light in the central area of the frame. This option is suitable for general use. Multi: The exposure will be calculated based on the average light throughout the frame. Spot: The exposure will be calculated based on the light in the very center of the frame.
Item Date Stamp Description This function can be used to add a date or date/ time stamp to your pictures as you take them. Options include: Off: No date/time data displayed. Date: Date is displayed. Date & Time: Date and time are displayed. Playback Mode Menu Item Description Lock Lock files to protect them from accidental deletion. A locked file cannot be deleted. Options include: Lock/Unlock One: Lock/Unlock current file. Lock All: Lock all files. Unlock All: Unlock all files.
Menu Options English Item Effect Description Change the image effect, the settings are: B&W, Sepia, Negative, Red, Green, Blue, Binarize, Sunset, Warm, Cold, and Contrast. Press or to select a setting. Press to confirm and save it as a new image. Rotate Rotate an image file in increments of 90º. For more information, please refer to the Additional Image Playback Options section of this manual’s Playback chapter. Resize Resize an image file.
Item Description Sounds Change or disable the sounds associated with your camera’s functions. Options include: Shutter: Turn the shutter sound On/Off. Start-up: Select a start-up sound (None, 1, 2, or 3.) Beep: Turn the operating sound On/Off. Volume: Adjust the sound volume. Auto Review Adjust the time that a captured image remains on-screen. Options include Off (no auto-review), 1 second, or 3 seconds. Power frequency Set the frequency to either 50Hz or 60Hz depending on your region.
Menu Options English Item Description USB Set this option to use your digital camera as a PC camera or removable disk. Options include: PCCAM: Use as a PC camera; MSDC: Use as a removable disk. Start-up Image Select an image to display on your video camera’s LCD screen immediately upon startup. Options include: Off: No start-up image. System: Use the default image as the start-up image. My image: Use your selected image as the startup image.
Managing Files on the Video Camera Lock Files After you have taken a video clip or still image, you may wish to lock the file/s to protect them from accidental deletion. To lock your file(s): 1. In Playback Mode, press the
Managing Files English Transferring Files to a Computer Connect your digital video camera to a computer to transfer files from the camera onto your hard drive. 1. Power on your video camera. In the Setup Menu, set the USB Mode to “MSDC”. (Please see the Menu Options section for additional information.) 2. Connect one end of the supplied USB cable to the USB port on your digital video camera. Connect the other end to your computer. 3.
To view your video and image files on a bigger screen, use the included cable to connect your digital video camera to a television. 1. 2. Power on the video camera and place it in the desired mode. Select Video Mode if you want to use your television to preview content as you record it. Select Playback Mode if you want to review the video and/or image files you have already taken. Plug in the supplied AV cable to your video camera’s AV Out jack.
Additional Features English Your digital video camera comes with an installation CD which includes software for enabling your video camera’s use as a webcam. To begin installing software, insert the CD into your computer’s CD drive. Using Your Digital Video Camera as a Webcam You must install the corresponding driver before attempting to use your digital video camera as a webcam. Double click “SPCA1528_V2250_WHQL_MultLan.exe”, then follow the onscreen instructions to complete installation.
Additional Features If you are using the webcam feature and wish to preview or capture video directly, you can do so using the software. To begin: 1. Click “Options” and select “Preview” from the dropdown menu. A window will appear that shows the live feed from your video camera. 2. Use the other options to capture video or change the webcam settings on your video camera. For more information, click the Amcap program “Help” menu.
Troubleshooting English If you have a problem with this device, please read the troubleshooting guide below. Camera does not power on. • Check that the batteries have adequate charge. If the batteries are old or do not have adequate charge, replace the batteries. The camera does not take pictures/video. • The camera’s memory or memory card may be full. Delete several files and try again. • An incompatible memory card may be inserted. Check that the memory card is in a compatible format.
Troubleshooting • Images will not save if the camera is turned off before data has finished processing. Be sure to allow adequate time for the image to save completely before turning off the video camera. I cannot access the pictures on my camera or memory card from my computer. • Ensure that the camera’s USB mode is set to MSDC. (See the Menu Options section for more information.) Page 29 English Recorded images are not saved in memory.
Specifications English Display Type Image Sensor Video Resolution Zoom Photo Resolution Memory Removable Memory Support Key Functions Other Features Video Format Photo Format PC Interface Support AV Output Power 2.
English Page 31
For more information please check our website www.mpmaneurope.