RM62i Station d'accueil avec CD/MP3/USB/ Carte lecteur SD, radio et iPod
Pour optimiser l’utilisation et la performance, veuillez lire attentivement ce manuel avant de tenter de faire fonctionner l'appareil afin de vous familiariser avec ses caractéristiques, et de vous assurer des années de plaisir d'écoute et bonne performance sans problèmes. Notes Importantes * Gardez les instructions pour le fonctionnement et pour la sécurité pour vous y référer à l’avenir.
4.
3. Stockage * Stocker le disque dans son boîtier. * Ne pas exposer les disques directement au soleil ou à des températures élevées, à une humidité élevée ou dans des endroits poussiéreux. 4. Nettoyage d'un disque * Si le disque est sale, enlever la poussière, la saleté et les empreintes digitales avec un chiffon doux. * Le disque doit être nettoyé du centre vers le bord. * * * DU CENTRE AU BORD N'utilisez jamais de benzène, de diluants, nettoyants liquides ou aérosols anti statiques.
Mise au point manuelle Pour accorder des stations de faible fréquence, utilisez le réglage manuel en appuyant sur le bouton SKIP / TUNE RECHERCHE (haut ou bas) en permanence jusqu'à ce que vous lisiez la bonne fréquence et que la réception est au mieux. Mise au point automatique 1. Appuyer sur le bouton SKIP / TUNE RECHERCHE (haut ou bas) sur l'appareil ou appuyer sur le bouton SKIP / TUNE RECHERCHE (haut ou bas) de la télécommande pendant une seconde ou plus, puis relâchez le bouton.
4. Pour changer le numéro de piste., appuyez sur SKIP/TUNE SEARCH(UP oouDOWN) sur l’unité ou appuyez sur le bouton PLAY/PAUSE/ENTER sur la télécommande une fois. Maintenez appuyé sur la touche SKIP/TUNE SEARCH (UP ou DOWN) sur l’unité une fois ou (sur la télécommande) pour aller rapidement en avant ou en arrière de chaque chanson. 5. Pour recommencer la lecture, apputez sur la touche PLAY/PAUSE/ENTER sur l’unité ou sur la télécommande encore une fois. 6.
FONCTION PROGRAMME L’utilisateur peut utiliser le programme jusqu’à 32 pistes en mode CD ou 64 pistes en mode MP3/WMA/USB/Carte SD dans n’importe quel ordre. 1. 1) 2) Comment utiliser le programme CD Appuyez sur le bouton iPod/MEM/C-ADJ., déplacer en mode MEMOIRE. (F17) Appuyez sur la touche SKIP/TUNE SEARCH (UP ou DOWN) sur l’unité ou sur le bouton équivalent sur la télé, le numéro de la piste sera changé. 3) Appuyez sur le bouton iPod/MEM/C-ADJ pour confirmer le numéro de la piste.
2. Appuyer sur le bouton STOP / MENU (uniquement dans l'iPod) et retour au menu de l'iPod.. a. Pour sélectionner le menu actuel au dessous : Music>Extra>Photo Import (sans la fonction écran sur le IPOD Mini)>Settings>Shuffle Songs>Backlight>Now Playing vous montrera l’écran du lecteur IPod b. Appuyer sur le bouton SKIP/TUNE SEARCH (UP ou DOWN) dans l’unité (ou la télécommande) pour chercher le menu actuel. 3. Appuyer sur le bouton PLAY/PAUSE/ENTER (uniquement dans l’IPod) dans l’unité (lélécommande) a.
XRM62i Docking Station with CD/MP3/USB/SD CARD Player, Radio and iPod INSTRUCTION MANUAL
To achieve the utmost in enjoyment and performance, please read this manual carefully before attempting to operate the unit in order to became familiar with its features, and assure you years of faithful, trouble free performance and listening pleasure. Important Notes Keep instructions the safety and operating instructions should be retained for future reference.
4.
3. Storage * Store the disc in its case. * Do not expose discs to direct sunlight or high temperatures, high humidity or dusty places. 4. Cleaning a disc * Should the disc become soiled, wipe off dust, dirt and fingerprints with a soft cloth. * The disc should be cleaned from the center to the edge. * Never use benzene, thinners, record cleaner fluid or anti static spray. * Be sure to close the CD door so the lens is not contaminated by dust. * Do not touch the lens.
Manual Tuning To tune for weak stations, use manual tuning by touching the SKIP/TUNE SEARCH(UP or DOWN) touch plate continuously until you read the correct frequency or the reception is at its best. Automatic Tuning 1. Touch the SKIP/TUNE SEARCH(UP or DOWN) touch plate on the unit or press the SKIP/TUNE SEARCH(UP or DOWN) button on the remote control for a second or more, then release the button. The tuner will automatically search the first station of sufficient signal strength. 2.
4. To change Track NO., touch SKIP/TUNE SEARCH(UP or DOWN) touch plate on the unit or press the PLAY/PAUSE/ENTER button on the remote control once. And touch and hold the SKIP/TUNE SEARCH (UP or DOWN) touch plate on the unit once or (on the remote control) to skip fast forward or backward of each song 5. To resume playback, touch the PLAY/PAUSE/ENTER touch plate on the unit or press the PLAY/PAUSE/ENTER button on the remote control once more again. 6. To change the ALBUM NO.
PROGRAM FUNCTION User can make the program up to 32 tracks in CD mode or 64 tracks in MP3/WMA/USB/SD CARD mode in any desired order. Program mode is activated while in stop mode. 1. How to play the program - CD 1) Press the iPod/MEM/C-ADJ. button, shift to MEMORY mode.(F17) 2) Touch the SKIP/TUNE SEARCH (UP or DOWN) touch plate on the unit or press the SKIP/TUNE SEARCH(UP or DOWN) button on remote control, the track number will be changed. 3) Press the iPod/MEM/C-ADJ. button to confirm the track number.
3. Touch the PLAY/PAUSE/ENTER (only in iPod) touch plate enter to the desired menu folder. a. Touch the SKIP/TUNE SEARCH (UP or DOWN) touch plate on the unit (or remote control) to search the current content in the each desired menu folder. b. If you want return to the iPod menu, touch the STOP/MENU (only in iPod) touch plate again. 4. To resume playback, press the iPod/MEM/CLOCK-ADJ. button once again, the unit will return to iPod mode. Charging the iPod Player battery through the main unit: 1.
XRM62i Docking-Station mit CD/MP3/USB/SD-CARD-Player, Radio und iPod iPod ist ein Markenzeichen von Apple Inc., eingetragen in den USA und anderen Ländern. Der dargestellte iPod wird nicht mitgeliefert. "Made for iPod" bedeutet, dass das elektronische Zubehör speziell für die Verbindung mit dem iPod entwickelt und vom Hersteller die Einhaltung der Leistungskriterien von Apple bestätigt wurde.
Um Ihr Gerät bestmöglich mit höchster Leistung zu nutzen, lesen Sie bitte dieses Handbuch sorgfältig, bevor Sie das Gerät in Betrieb nehmen, um sich mit seinen Funktionen vertraut zu machen und von einer verlässlichen und fehlerfreien Leistung und bestem Hörgenuss zu profitieren. * * * * * * * * * * * * * * * * Wichtige Hinweise Heben Sie die Anleitung auf. Die Sicherheits-und Bedienungsanweisungen sollten zur Information für die Zukunft aufbewahrt werden.
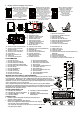
Montagezeichnung des Geräts und der Lautsprecher 1. Zur Befestigung des gesamten Geräts an der Wand: Schlagen Sie parallel zwei Nägel zur Befestigung in die Wand; der Abstand zwischen ihnen sollte 84mm betragen. Hinweis zur Größe der Nägel: 3,5 * 25BA. Drücken Sie die Standhalterung der Verschlüsse A und B auf der Rückseite der einzelnen Lautsprecher nach unten, um sie von den Lautsprechern zu lösen.
4. Anpassen des Anschlussreglers Stellen Sie den Anschlussregler auf Stufe 1 zur Unterstützung der folgenden iPods: „Made for iPod“ mit Farbdisplay (4. Generation) nur mit 40GB, 60GB iPod (4. Generation) nur mit 40GB iPod mit Video (5. Generation) nur mit 30GB iPod Classic 80GB iPod Classic 2. Generation 120GB Stellen Sie den Anschlussregler auf Stufe 2 zur Unterstützung der folgenden iPods: „Made für iPod“ mini (1. Generation) nur mit 4GB, 6GB (4.
28. Intro-Bedienfeld 29. Wiedergabe/Pause/ Enter-Bedienfeld 30. UKW-Antenne 31. Lautsprecher-Ausgang "L" 32. Hauptgerätständer 33. Docking-Halterung 34. iPod-Anschlussregler 35. iPod-Anschluss Fernbedienung 1. Standby-Taste 2. Stumm-Taste 3. Voreinst./Ordner-nach-oben-Taste 4. Voreinst./Ordner-nach-unten-Taste 5. Überspringen/Suche-nach-unten -Taste 6. Intro-Taste 7. ID3/Mono/Stereo-Taste 8. Zufallsmodus-Taste 9. Lauter-Taste 10. Funktions-Taste 11. CD-Öffnen/Schließen-Taste 36.
* Die CD sollte von der Mitte zum Rand hin gereinigt werden. * Verwenden Sie niemals Benzole, Verdünner, Plattenreinigungsflüssigkeiten oder antistatische Sprays. * Achten Sie darauf, das CD-Fach zu schließen, damit die Linse nicht durch Staub verunreinigt wird. * Berühren Sie die Linse nicht.
11. Das Hauptgerät schaltet sich automatisch zur „TIMER ON“-Zeit ein und beginnt die Wiedergabe; das Hauptgerät schaltet sich automatisch zur „TIMER OFF"-Zeit ab. Hinweis: Wenn das Display "ERROR" anzeigt, während Sie den „TIMER ON" setzen, bedeutet dies, dass sowohl „TIMER ON" als auch „TIMER OFF" die gleiche Zeit haben. In diesem Fall gehen Sie bitte auf „TIMER OFF" und stellen die Ausschaltzeit zuerst ein. .
CD/MP3/WMA-BETRIEB CDs anhören (CD/MP3/WMA) 1. Wenn Sie CD/MP3s genießen möchten, drücken Sie zuerst die CD-Öffnen/Schließen-Taste am Gerät und dann öffnet sich das CD-Fach automatisch. (F3) 2. Legen Sie die CD/MP3-Disc in das CD-Fach, drücken Sie die CD-Öffnen/Schließen-Taste wieder und das CD-Fach wird automatisch geschlossen. 3. Berühren Sie das Funktions-Bedienfeld am Gerät oder drücken Sie die Funktions-Taste auf der Fernbedienung, um den CD/MP3-Modus auszuwählen.
ID3-BETRIEB Im MP3/WMA-Modus 1. Drücken Sie die Taste ID3/MONO/STEREO am Gerät (oder auf der Fernbedienung) einmal, um die ID3-Funktion zu öffnen. 2. Wenn die MP3/WMA-Datei im Format „ID3" geschrieben ist, sucht das Gerät automatisch die Informationen zu „Titelname“, „Künstlername“ und „Albumname" im Display. 3. Drücken Sie die Taste ID3/MONO/STEREO am Gerät (oder auf der Fernbedienung) erneut. Das Gerät nimmt die Wiedergabe wieder normal auf. USB/SD-KARTEN-BETRIEB Im Standby-Modus 1.
3. Berühren Sie das Wiederholen-Bedienfeld am Gerät oder drücken Sie die Wiederholen-Taste auf der Fernbedienung noch einmal, um die Wiederholen-Funktion auszuschalten. - MP3/WMA/USB/S D-KARTE 1. Berühren Sie das Wiederholen-Bedienfeld am Gerät oder drücken Sie die Wiederholen-Taste auf der Fernbedienung einmal; „WIEDERHOLEN" wird angezeigt. Der aktuelle Titel wird wiederholt abgespielt. (F14) 2.
Zufallswiedergabe 1. Drücken Sie die Zufallsmodus-Taste am Gerät (oder auf der Fernbedienung) und ZUFALLSMODUS wird angezeigt. (F20) 2. Drücken Sie die Zufallsmodus-Taste erneut, damit das Audio-Gerät zur normalen Wiedergabe zurück wechselt INTRO-WIEDERGABE (auf der Fernbedienung) 1. Drücken Sie die INTRO-Taste auf der Fernbedienung; INTRO wird angezeigt. Bei INTRO werden die ersten 10 Sekunden von jedem Titel abgespielt. (F21) 2.
3. W enn die V ideo-Funktion des iPod unnormales V erhalten zeigt, währen d das Gerät im iPod-Modus ist, aktualisieren Sie es bitte mit der neuesten Version der iPod-Video-Funktion von der Apple-Webseite. Video-Out-Einstellung (nur für iPod Video) 1. Während das Gerät im Standby-Modus ist: Verbinden Sie den Fernseher über ein Videokabel (Cinch-Kabel) mit dem VIDEO-OUT-Anschluss an der Rückseite des Geräts. 2.
SPEZIFIKATION Stromversorgung: Ausgangsleistung: Geräteausmaße: Lautsprecherausmaß: Nettogewicht: 230V ~ 50Hz 10 W x 2 400 (B) x 154 (T) x 211 (H) mm 160 (B) x 154 (T) x 211 (H) mm 5,1 kg Radio-Funktionalität Frequenzbereich: UKW 87,5 - 108 MHz CD-Funktionalität Optische Abtastung: Frequenzbereich: 3fach-Laser 100 Hz - 16 kHz Die Spezifikation kann ohne weitere Ankündigung geändert werden.
XRM62i Docking Station con Lettore CD/MP3/USB/ Scheda SD, Radio e iPod iPod è un marchio di fabbrica di Apple INC., registrato negli Stati Uniti e in altri paesi. iPod dimostrato non incluso. “"Fatta per iPod" significa che un accessorio elettronico è stato progettato per essere collegato specificamente ad un iPod ed è stato certificato dallo sviluppatore per soddisfare gli standard di prestazione di Apple.
Per raggiungere il massimo divertimento e rendimento, si prega di leggere attentamente questo manuale prima di tentare di utilizzare l'apparecchio in modo da prendere familiarità con le sue caratteristiche, e assicurarsi anni di divertimento fedele, senza problemi di prestazioni e di ascolto. Note importanti * Conservare le istruzioni di sicurezza e di funzionamento devono per una consultazione futura.
Schema di montaggio dell’unità e dell’altoparlante 1. Fissaggio dell’unità al muro Porre parallelamente i due chiodi fissanti nella parete, la distanza tra di loro deve essere di 84 millimetri. Nota: Le dimensioni del chiodo: 3.5 * 25BA. Premere verso il basso e premere il pannello dello stand della fibbia A e B sul retro di ogni altoparlante e poi rimuovere ogni stand degli altoparlanti.
4.
28. 28.Introduzione Introduzionesuperficie superficietouch touch 29. 29.Pausa Pausa/ play / play/ entra / entranella nellasuperficie superficietouch touch 30. 30.Antenna AntennaFM FM 31. 31.Altoparlante Altoparlanteesterno esterno"S" "S" 32. 32.Stand Standunità unitàprincipale principale 33. 33.Supporto Supporto 34. 34.manopola manopoladidiregolazione regolazionetappeto tappetoiPod iPod 35. 35.Connettore ConnettoreiPod iPod 36. 36.Altoparlante Altoparlanteesterno esterno"D" "D" TELECOMANDO 1.
* Non utilizzare benzene, diluenti, detergenti fluidi per dischi o spray antistatici. * Assicurarsi di chiudere la porta CD così la lente non è contaminata da polvere. * Non toccare la lente. METTERE IN FUNZIONE L’ UNITA’ Quando collegate l’unità per la prima volta alla presa di corrente, premere il tasto di accensione sul retro dell'unità, l'unità sarà in modalità standby, la luce nera di attesa è di colore rosso. È ora possibile premere il tasto STANDBY / ON sull'unità o premere la luce blu.
SELEZIONARE UNA FUNZIONE La funzione si quando to cca la superficie di con tatto FUNZIONE sull'unità o si preme il tasto FUNZIONE sul telecomando per cambiare la modalità di ogni funzione. Il display cambia come segue: FUNZIONAMENTO DELLA RADIO 1. Toccare la superficie to uch FUNZIONE sull'unità pr incipale o premere il tasto FUNZIONE sul telecomando verso la modalità SINTONIZZAZIONE per selezionare l'operazione FM. 2.
(3)"tasso di trasferimento di riproduzione" in formato MP3 e WMA. a. In formato MP3, bit rate di trasferimento: 8 - 256 kbps. b. In formato WMA, bit rate di trasferimento: 8 - 192 kbps. (4) Il "Max leggibili 99 cartelle e 999 tracce". (5) Se nessun disco si riesce a leggere il TOC, sarà visualizzato NO DISC. (F4) Riprodurre l’intero CD/MP3/WMA - CD 1. Inserire il CD nel vano CD, l'unità principale leggerà automaticamente il numero totale delle cartelle e dei brani contemporaneamente. 2.
FUNZIONAMENTO SCHEDA USB / SD Durante la modalità STANDBY 1. Inserire il dispositivo USB o una scheda SD / MMC, e quindi premere il pulsante STANDBY sull'unità principale (o sul telecomando), per “ACCENDERE” l'unità. 2. Toccare la superficie touch FUNZIONE sull'unità principale (o sul telecomando) per selezionare la porta USB o la modalità SD / MMC. L'unità principale leggerà automaticamente il numero totale delle cartelle e dei brani contemporaneamente. (F9) 3.
FUNZIONE PROGRAMMA L'utente può programmare la riproduzione fino a 32 brani in modalità CD o 64 brani in modalità MP3/WMA/USB/SCHEDA SD in qualunque ordine desiderato. La modalità di programmazione è attivata in modalità di arresto. 1. Come si riproduce la programmazione - CD 1) Premere il pulsante iPod / MEM / C-ADJ., passare alla modalità MEMORIA.
Funzionamento iPod Nota: Per evitare di danneggiare l'iPod, si prega di assicurarsi che l'iPod sia in modalità di attesa per accendere o spegnere. Durante l'unità in modalità standby: 1. Premere il tasto iPod APRI / CHIUDI una volta il pulsante per l’unità principale per aprire la porta iPod. 2. Inserire i giocatori iPod nella fascia di iPod sulla parte anteriore dell'unità principale fissa. 3.
VIDEO OUT impostazione (per i-Pod video) 1. Durante l'unità in modalità di attesa: Collegare il televisore con un cavo video (RCA cavi tipo) per l'uscita video jack sul retro dell'unità. 2. Durante l'unità in modalità iPod: Premere il pulsante "MENU" per l'iPod con ghiera cliccabile per attivare la funzione video. 3. Impostare iPod per visualizzare i video su un televisore: (a) Scegli Video> Impostazioni video, e quindi impostare Uscita TV su Chiedi o On.
XRM62i Docking Station met CD/MP3/USB/SD KAART-speler, Radio en iPod iPod is a trademak of Apple INC., Geregistreerd in de VS en andere landen. iPod afgebeeld niet inbegrepen “"Gemaakt voor ipod" betekent dat een elektronisch accessoire is speciaal ontworpen om verbinding te maken met de iPod en i s gecertificeerd door de ontwikkelaar naar Apple prestatie-normen te voldoen.
TOm de grootste in genot en prestaties, kunt u deze handleiding aandachtig te lezen voordat u het apparaat werken om op raakte vertrouwd met de functies, en verzekeren u jaren van trouwe, probleemloos prestaties en luisterplezier. Belangrijke opmerkingen Instructies Houd de veiligheids-en bedieningsinstructies moeten worden bewaard voor toekomstig gebruik.
Montage tekening van de eenheid en luidspreker 1.Vaststelling van het geheel van de eenheid op de muur Parallel dat de twee spijkers in de muur vast te stellen, moet de afstand van hen te houden 84mm.Opmerking: De grootte van de nagel: 3,5 * 25BA. Druk naar beneden en duw de stand paneel van de sluiting A en B op de achterzijde van de elke luidspreker en vervolgens na elke stand van de spreker zal verwijderen van hen.
4.
28. intro touch plaat 29. afspelen / pauzeren / ENTER touch plaat 30. FM-antenne 31. luidspreker uit "L" 32. hoofdtoestel stand 33. docking beugel 34. iPod aanpassing PAD knop 35. IPod-connector AFSTANDSBEDIENING 1. Standby-knop 2. Mute knop 3. Preset / foler up knop 4. Preset / map omlaag 5. Overslaan / tune zoeken omlaag 6. intro knop 7. ID3/mono/standby knop 8. willekeurige knop 9. volume-omhoog-toets 10. functietoets 11.CD openen / sluiten-knop 36. Luidspreker uit "R" 37. Video uitgang 38.
Bediening van de eenheid Wanneer u voor het eerst het apparaat stekker in het AC stopcontact, druk op de schakelaar aan de achterkant van het apparaat, zal het toestel in standby-modus, is de zwarte licht van de standby-rood. U kunt nu op de STANDBY / ON toets op het toestel of druk op de STANDBY op de afstandsbediening om het apparaat in te schakelen. De zwarte licht van de stand-by en multifunctionele touch plaat licht op blauw. Trek de stekker van AC uit het stopcontact als u wilt volledig uitschakelen.
FUNCTIE SELECTEREN De functie is dat wanne er het in a anraking kom t de FUNCT I Eraken pla at op het to estel of dru k op de FUNCTIE-toets op de afst andsbediening om de wijze van elke functie vera nderen. Tonent vera ndert zoals hieronder. RADIO OPERATIE 1. Druk op de FUNCTIE raken plaat op het apparaat of druk op de FUNCTIE -toets op de afstandsbediening naar de tuner-modus die op de FM-operatie te selecteren. 2.
3. Dru k op de FUNCTIE rake n plaat o p het toestel of druk op d e FUNCTI ON-toets o p d e afst andsbediening te selecteren CD/MP3 modus. Het apparaat leest de CD / MP3 / WMA-schijf automatisch. Opmerking: (1) Dit toestel kan afspelen CD, CD-R, CD-RW, MP3-en WMA-discs. (2) Er kan lezen "8 cm" en "Multi afdeling" van MP3 DISC. (3) De "Playback Transfer Rate" in MP3 en WMA. a. In MP3-, transfer bit rate: 8 - 256 kbps. b. In WMA, overdracht bit rate: 8 - 192 kbps. (4) De "Max Readable 99 mappen en 999 tracks".
USB/SD KAART OPERATIE Tijdens de standby-modus 1. S teek de USB-stick of SD / MMC-kaa rt, en dru k vervolgens op de ST ANDBY toet s op het hoof dtoestel (of afstandsbediening) aan de macht "ON" de eenheid. 2. Druk op de FUNCTIE rake n plaat op het hoof dtoestel (of de a fstandsbediening) om de USB-of SD / MMC-modus. De belangrijkste eenheid zal matisch lees het totale aantal van de mappen en tracks op hetzelfde moment. (F9) 3. Als het USB-opslagapparaat meer dan een map. a.
PROGRAMMA FUNCTIE De ge bruiker kan het p rogramma max imaal 32 tra cks in cd-m odus of 64 tracks in MP3 / WMA / USB / SD KAART-modus in elke gewenste volgorde. Programma modus wordt geactiveerd, terwijl in de stopstand. 1. Hoe spelen het programma - CD 1) Druk op de iPod / MEM / C-INS. knop, verschuiving naar Geheugen-modus.
3. Power op het apparaat, en raak vervolgens de FUNCTIE raken plaat op het toestel of druk op de FUNCTIE-toets op de afstandsbediening om de iPod-modus, wordt de iPod-indicator verschijnt op het hoofdtoestel spelen. (F22) Tijdens de eenheid in iPod-modus: 1. Druk op de SPELEN / PAUZE / ENTER (alleen in iPod) touch plaat of druk op de Spelen / Pauze / ENTER-toets op de afstandsbediening om te beginnen met de iPod te spelen.
AUX IN SPELEN(Aux in kabel niet meegeleverd) 1. Druk op de FUNCTION raken plaat op het toestel of druk op de FUNCTIE knop op de afstandsbediening, totdat de "AUX" indicator licht op het Tonen. Dit toestel kan analoge audio-ingang via de AUX (lijn) in aansluiting aan de rechterzijde van het toestel. 2. Gebruik een kabel met RCA-aansluiting voor aansluiting externe audiobron. Instelling Slaap Functie 1. Als u in slaap valt aan muziek, drukt u op de SLAAP knop op het toestel of op de afstandsbediening. 2.