
Operation Manual


UK-2
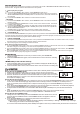
FEATURES AND CONTROLS
1
2
3
4. Adjust the adjusting pad knob
Adjust the Adjusting pad Knob at the
level 1 to support these iPod
Players as belows:
Made for iPod with
color display
(4th generation)40GB, 60GB only
iPod(4th generation)40GB only
iPod with video
(5th generation)30GB only
iPod classic 80GB
iPod classic 2nd generation 120GB
Adjust the Adjusting pad Knob at the
level 3 to support these iPod
Players as belows:
Made for iPod nano
(1st generation)1GB, 2GB, 4GB only
iPod touch
8GB/16GB/32GB
iPod touch 2nd generation
8GB/16GB/32GB
Adjust the Adjusting pad Knob at the
level 2 to support these iPod
Players as belows:
Made for iPod mini
(1st generation)4GB, 6GB only
(4th generation)20GB only
U2 Special Edition
iPod with
color display
(4th generation)20GB, 30GB only
U2 Special Edition
iPod with video
(5th generation)60GB,80GB only
iPod classic 160GB
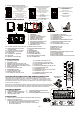
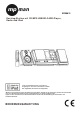
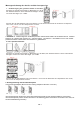
1. SPEAKER
2. SPEAKER STAND
3. STANDBY LED INDICATOR
4. SD/MMC CARD IN SLOT
5. HEADPHONES JACK
6. USB DEVICE IN PORT
7. iPod OPEN/CLOSE BUTTON
8. STANDBY/ON BUTTON
9. CD OPEN/CLOSE BUTTON
10. SLEEP BUTTON
36.SPEAKER OUT “R”
37.VIDEO OUT JACK
38.LINE IN JACK
39.HITCHING HOLE
40.MEMORY BACK-UP BA
TTERY DOOR
41.AC POWER SWITCH
42.AC POWER CORD
43.iPod PLAYER DOOR
44.SKIP/TUNE SEARCH UP TOUCH PLATE
11. ID3/MONO/ST. BUTTON
12. iPod/MEM/CLOCK-ADJ. BUTTON
13. TIMER BUTTON
14. RANDOM BUTTON
15. MUTE BUTTON
16. PRESET/FOLDER DOWN BUTTON
17. PRESET/FOLDER UP BUTTON
18. EQ TOUCH PLATE
19. STOP/MENU TOUCH PLATE
20. VOLUME DOWN TOUCH PLATE
21. SKIP/TUNE SEARCH DOWN
T
OUCH PLATE
22. VOLUME UP TOUCH PLATE
23. FUNCTION TOUCH PLATE
24. IR SENSOR
25. LCD DISPLAY WINDOW
26. CD DOOR
27. REPEAT TOUCH PLATE
28. INTRO TOUCH PLATE
29. PLAY/PAUSE/ENTER TOUCH
PLATE
30. FM ANTENNA
31. SPEAKER OUT “L”
32. MAIN UNIT STAND
33. DOCKING BRACKET
34. iPod ADJUSTING PA
D KNOB
35. IPod CONNECTOR
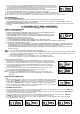
REMOTE CONTROL
1. STANDBY BUTTON
2. MUTE BUTTON
3. PRESET/FOLDER UP BUTTON
4. PRESET/FOLDER DOWN BUTTON
5. SKIP/TUNE SEARCH DOWN BUTTON
6. INTRO BUTTON
7. ID3/MONO/ST. BUTTON
8. RANDOM BUTTON
9. VOLUME UP BUTTON
10.FUNCTION BUTTON
11.CD OPEN/CLOSE BUTTON
12.VOLUME DOWN BUTTON
13.iPod OPEN/CLOSE BUTT
ON
14.PLAY/PAUSE/ENTER BUTTON
15.EQ BUTTON
16.SKIP/TUNE SEARCH UP BUTTON
17.STOP/MENU BUTTON
18.SLEEP BUTTON
19.iPod/MEM/CLOCK-ADJ. BUTTON
20.TIMER BUTTON
21.NUMBER SEARCH BUTTON
22.REPEAT BUTTON
**BATTERIES NOT
INCLUDED**
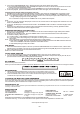
PUTTING THE BATTERIES INTO THE REMOTE CONTROL UNIT
Press down the compartment cover, and slide the cover off to open the
compartment.Place the two (UM4), (AAA), (R03) batteries in the remote control
according to the polarity markings ("+" and " - ") inside the compartment and on
the batteries. Place the cover over the compartment, press down lightly
, and push
it upward until it snaps on.
Note: Remove the batteries from the remote control if not in use for long period of
the time. Do not mix normal batteries with rechargeable batteries, when the batteries
become weak, remote control will not function and replace with new batteries.
1
2
3
4
5
6
7
8
9
10
11
12
13
14
15
16
17
18
19
21
20
22
LCD DISPLAY WINDOW
A. TIMER INDICATOR
B. ALBUM NUMBER INDICATOR
C. REPEAT 1 & ALL INDICATOR
D. STEREO INDICATOR
E. VOLUME HIGH/LOW INDICATOR
F. SLEEP INDICATOR
G. TRACK/NUMBER/TIME INDICATOR
COMPACT DISC
1. Always use a compact discs bearing the mark as shown.
2. Notes on handling discs
Removing the disc from its storage case and loading it.
* Do not touch the reflective recorded surface.
* Do not stick paper or write anything on the surface.
* Do not bend the disc.
3
40
39
41
42
4
5
6
879
15
16
17
18
30
31
32
1
2
20
21
10
11
121314
22
23
24
25
33
35
38
37
36
32
19
27 29
2826
34
43
44